How to Secure Google Chrome Browser

Enhance Chrome Security
Google Chrome is like a bodyguard for your internet experience. It’s made to protect you from bad websites that want to steal your passwords or mess up your computer. Chrome is really good at this because it uses clever tricks to keep you safe, like putting websites in virtual sandboxes and isolating them from each other.
It also has a new tool that can predict when a website is trying to trick you into giving away your private information (like your password), and it stops you from falling into the trap. But from your side, how can you ensure your online safety? Here, we’ll provide some valuable tips to help you stay secure on the internet.
Security Features and Tips for Google Chrome
Ensure Safety with HTTPS (Always Secure):
Using HTTPS on websites is like a “Pass” sign from a food inspector for a restaurant – it means it’s safe to visit. Not using HTTPS is like a “Fail” sign, which means something bad might happen.
HTTPS is like a secret code that protects your information when you visit a website. It makes it hard for bad guys to steal your data. It also checks if a website is real and not pretending to be something else, just like a restaurant must be what it claims to be.
Think of it this way: HTTPS stops online bad things, just like food safety rules stop people from getting sick after eating. Even if you don’t know much about it, your web browser checks if a site is trustworthy by looking for HTTPS.
So, when you see HTTPS in your browser, it’s like a green light saying, “This site is safe.” And when you don’t see it, your browser gives you a warning that the site might not be safe. It’s all about keeping you and your data secure online.
To enable HTTPS-First mode in Chrome, follow these steps:
- Open Chrome.
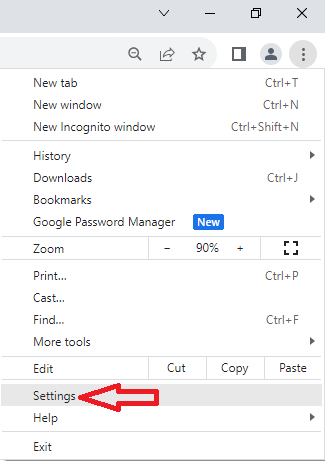
- Click the three dots in the top right corner.

- Go to “Settings.”
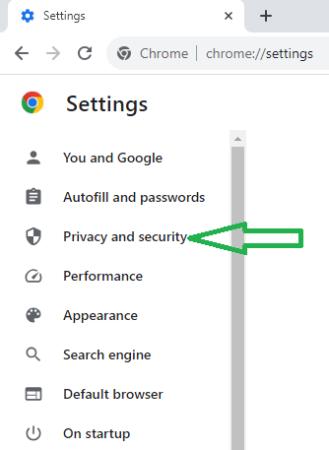
- Select “Privacy and Security.”
- Choose “Security.”

- Turn on “Always use secure connections.”
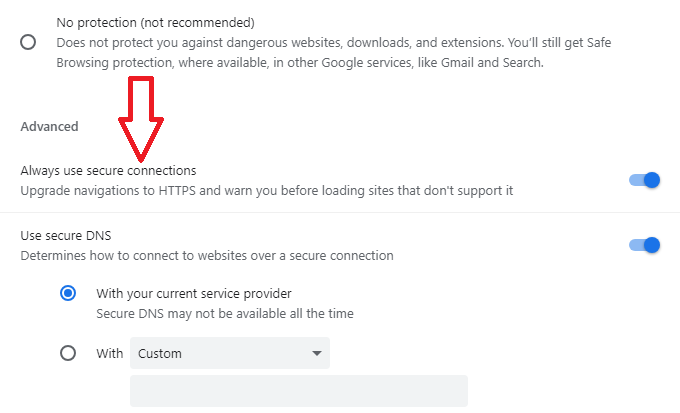
Tip: When you visit a site without HTTPS, you’ll see a “Not Secure” warning in the address bar, reminding you that the site may not be safe for your information. Enabling this mode helps protect your online security.
Activate Secure DNS for Security:
When you go to a website, Chrome figures out where that website is located on the internet. This process is like finding an address. To keep your info safe, Chrome can use a Secure DNS system.
Secure DNS is like sending your address request in a locked envelope so no one can see it. By default, Chrome does this automatically. But if there’s a problem, it might try the unsecured way.
You can also pick your own Secure DNS provider. Think of this like choosing a trusted messenger to deliver your address request. If there’s a mistake, you might see an error message saying the address couldn’t be found.
Secure DNS comes in different types: DNS over HTTPS (DoH), DNS over TLS (DoT), and DNSCrypt. They all do the same job but use different methods to keep your address requests private. It’s like having different types of locked envelopes. They just use different keys and paths to deliver your request.
If your device is monitored or has parental controls, you can’t use Chrome’s secure DNS feature. To turn it on or off, follow these steps:
- Open Chrome.
- Click the three dots in the top-right corner

- Choose “Settings.”

- Select “Privacy and security

- Choose Security

- Toggle “Use Secure DNS” on or off.
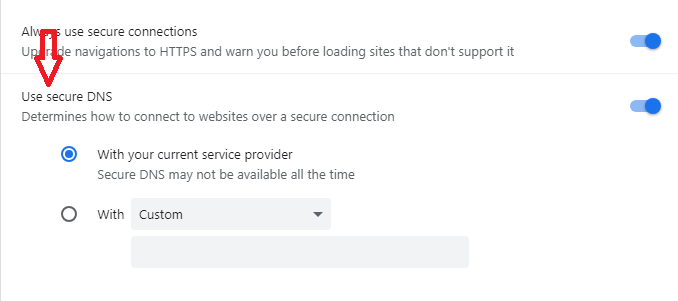
- You can pick your current service provider or select a custom one from the drop-down menu.
Enable Enhanced Security for Protection:
Enhanced Protection mode is a powerful security feature in Google Chrome that helps keep you safe while browsing the internet. When you turn it on, Chrome becomes more proactive in guarding you against malicious websites, downloads, and browser extensions. It does this by closely monitoring your online activities and predicting and notifying you about potential threats before they can harm your computer.
Here’s how Enhanced Protection works:
- Real-Time Analysis: When Enhanced Protection is enabled, Chrome constantly watches what you do online. It looks at website addresses and examines sample pages in real-time to identify any suspicious or dangerous behavior.
- Early Warnings: If Chrome detects something unusual or risky, it alerts you before you even visit the dangerous website, download harmful files, or install questionable browser extensions. This early warning system is a crucial part of keeping you safe.
- Improved Google App Security: Enhanced Protection also enhances the security of other Google apps you may be using, such as Gmail and Google Drive. For example, if you receive an email in Gmail that contains a link to a potentially harmful site, Enhanced Protection will communicate with Chrome to make sure you’re warned if you click on that link.
- Password Security: Another benefit is that Chrome will notify you if any of your saved passwords are compromised in a data breach. This means you’ll be alerted if a website or service you use experiences a security breach, ensuring that you take immediate action to secure your accounts.
By default, when you first install Google Chrome, it comes with what’s known as “Standard protection.” This level of protection provides basic warnings about potentially risky downloads, websites, and extensions. But if you’re serious about your online safety and want to take security to the next level, you can enable Enhanced Protection mode.
Here’s how you can turn on Enhanced Protection in Google Chrome on different platforms:
For Android:
- Open the Google Chrome app on your Android device.
- Tap the three-dot menu in the top right corner

- Access settings.

- Under “Basics,” go to “Privacy and security.”

- Navigate to “Safe Browsing.”
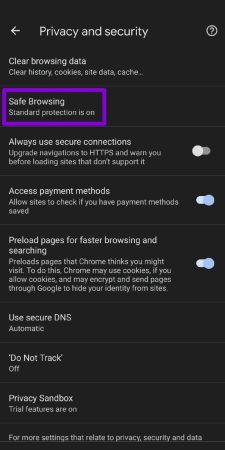
- Select “Enhanced protection.”

For iOS (iPhone):
- Launch Google Chrome on your iPhone.
- Tap the three-dot menu icon

- Access the Settings menu.
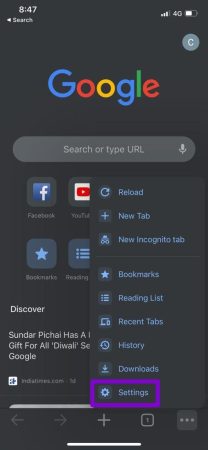
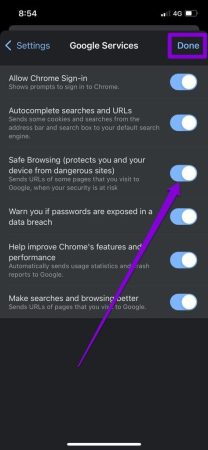
- Go to “Google Services.”

- Turn on the switch next to “Safe Browsing” and tap “Done” to save your changes.
For Desktop (Windows or MacOS):
- Open Google Chrome on your computer.
- Click on the three-dot menu icon in the upper right corner.
- Navigate to “Settings.”
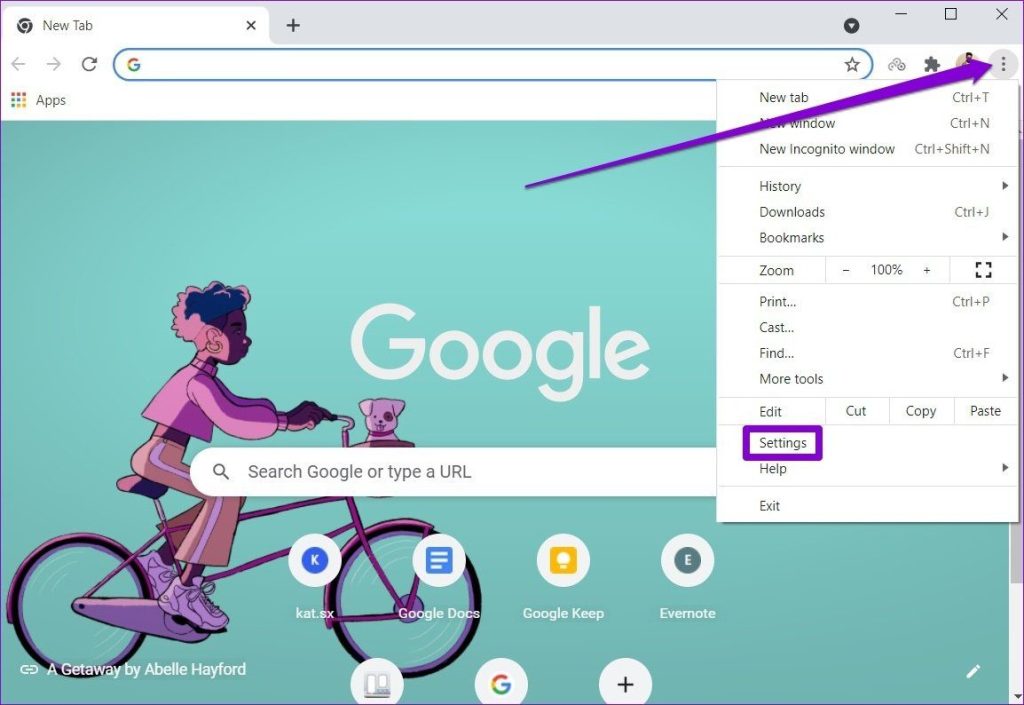
- Go to the “Privacy and Security” tab.
- Click on “Security.”

- Select the “Enhanced protection” option under “Safe Browsing.”
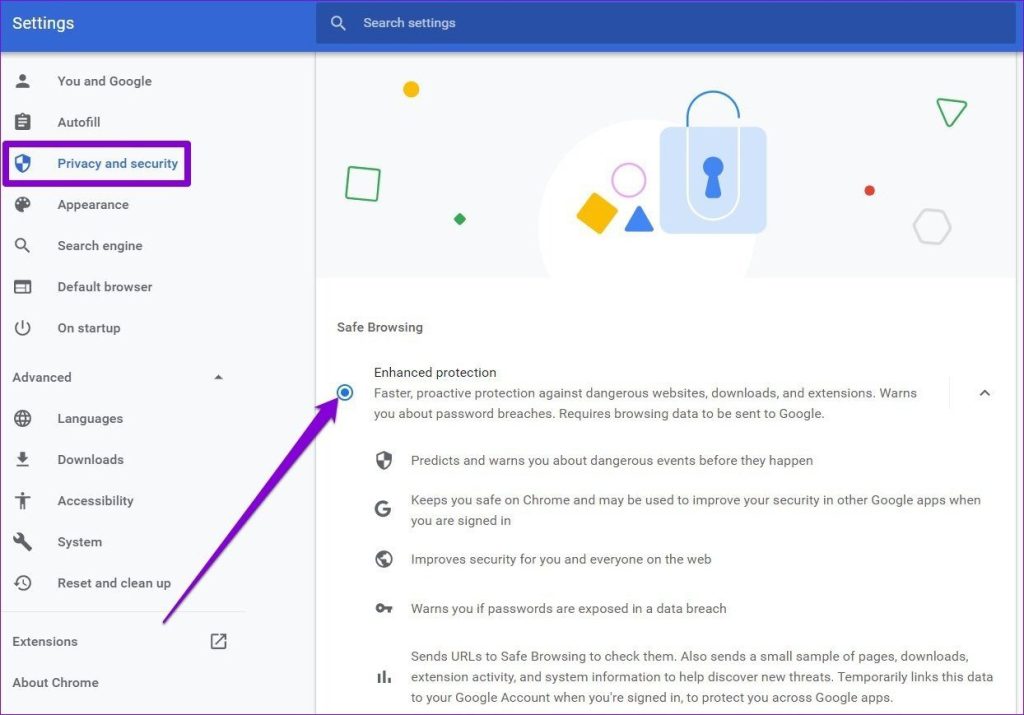
By enabling Enhanced Protection, you’re taking a significant step to make your online experience safer and more secure. It helps you stay ahead of potential threats, warns you about dangerous websites and downloads, and even keeps your Google apps more secure. So, whether you’re browsing on your mobile device or desktop, you have the tools to enhance your online security with Google Chrome.
Enable Two-Step Authentication:
Two-Step authentication or Two-factor authentication (2FA) is like having an extra layer of security for your online accounts, just in case someone steals your password. With 2FA, when you log in, you need two things to prove it’s really you:
- Your password (the first thing).
- Something else, usually your phone (the second thing).
Imagine it as double-checking your identity. It’s like the website or app asking, “Hey, is this person really who they say they are?” And you answer through a different way, like your phone.
You’ve probably used 2FA before without realizing it. If a website ever sent you a code on your phone that you had to enter to get in, that’s 2FA. It’s super important for online security because even if someone knows your password (maybe they guessed it or tricked you into telling them), it’s not enough to get in. They need that second thing, like your phone, to prove it’s really you.
2FA also gets you involved in keeping your accounts safe. When you get a 2FA notification, you have to think, “Did I do this, or is someone trying to get into my account?” It makes you more aware of your online security.
Here’s how 2FA usually works:
- You log in with your username and password.
- The website or app checks your password.
- If it’s right, you’re asked for the second thing.
- They send a special code to your second thing (like your phone).
- You confirm it’s you by entering that code.
While the basic idea is the same, different services might use 2FA in various ways. To set up 2FA for your Google account, follow these simple steps:
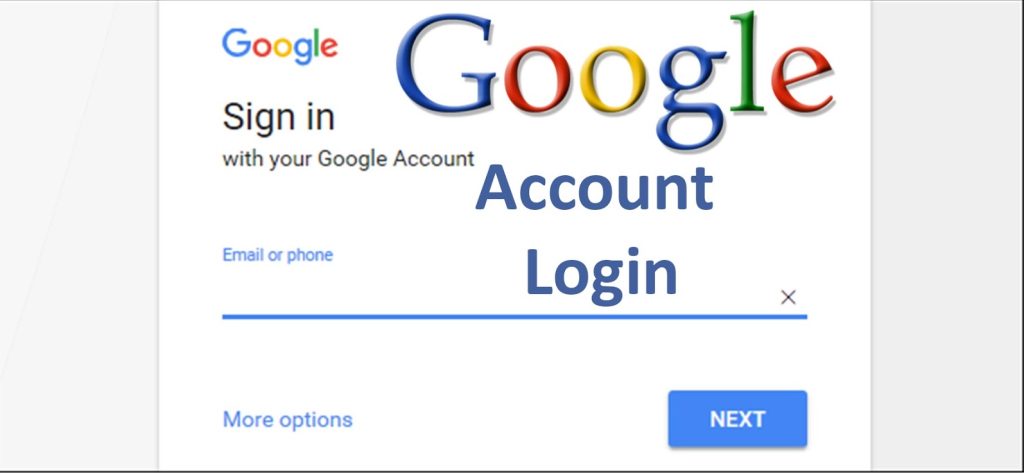
- Go to your Google Account.
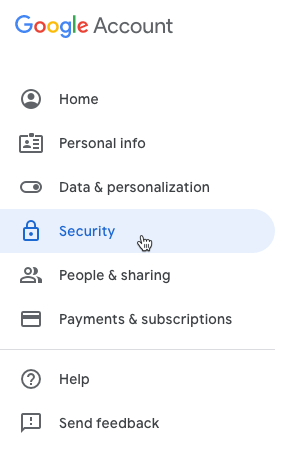
- Click on “Security” in the menu.
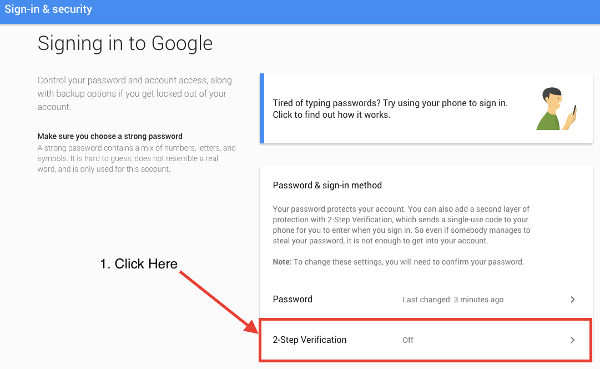
- Under “Signing in to Google,” choose “2-Step Verification” and click “Get started.”
- Follow the instructions on the screen.
Note: If you use an account from your work, school, or a group, these steps might not work, so ask your administrator for help.
Turn off Mic, Camera, and GPS:
When you use Google Chrome for video calls, it needs permission to access your webcam and microphone. However, it’s a good idea to limit this access to only the websites you trust. Here’s how you can prevent websites from using your camera and microphone:
To stop websites from accessing your camera:
- Click the three-dot menu in the top right corner of Chrome.

- Choose “Settings.”

- On the left side, choose “Privacy and Security.”
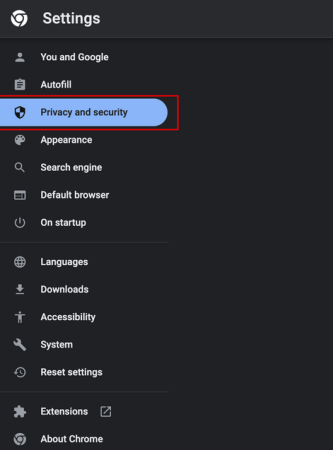
- Click on “Site Settings.”

- Under “Permissions,” select “Camera.”
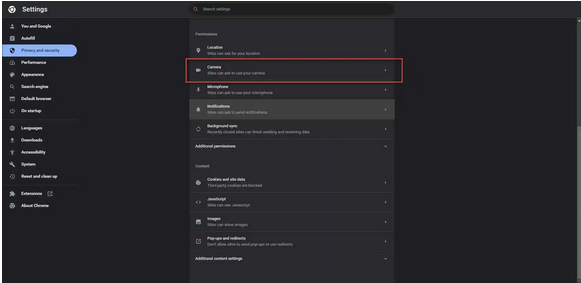
- Under “Default behavior,” choose “Don’t allow sites to use your camera.”

Now, let’s see how you can disable microphone access:
To disable microphone access:
- Click the three-dot menu in the top right corner of Chrome.

- Choose “Settings.”
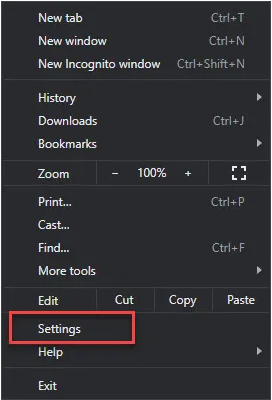
- On the left side, select “Privacy and Security.”

- Click on “Site Settings.”

- Under Permissions, select “Microphone.”
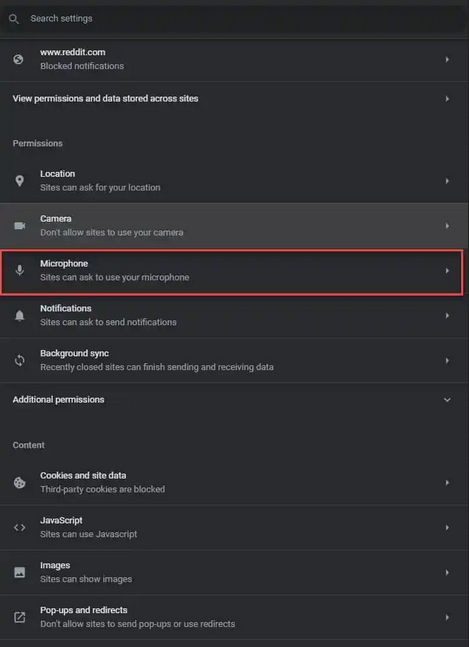
- Under “Default behavior,” choose “Don’t allow sites to use your microphone.”
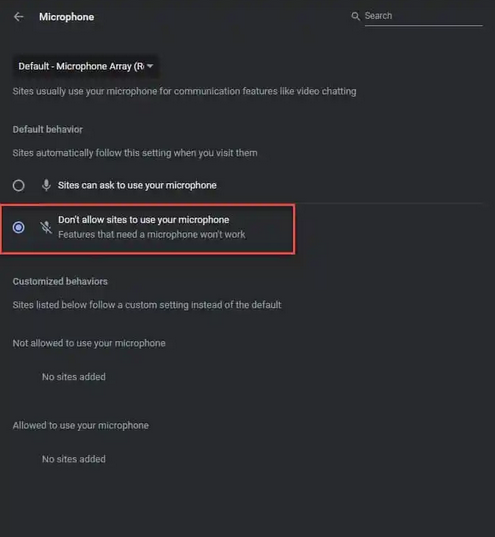
You can always make exceptions for specific websites if you want them to access your camera or microphone.
To turn off location tracking in Google Chrome:
- Open Google Chrome.
- Click the three vertical dots in the top right corner.

- Select “Settings.”

- Click “Advanced” on the right side and choose “Privacy and Security.”
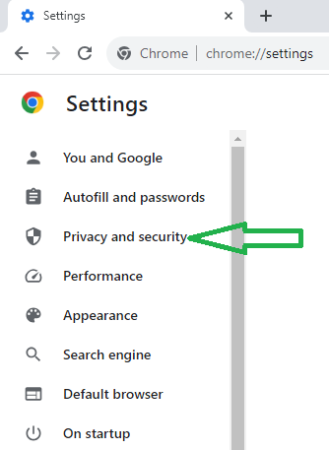
- Now select “Site Settings” and click on “Location.”

- Toggle off the “Blocked” option to prevent your location from being tracked.

By following these steps, you can control which websites can access your camera, microphone, and location, helping you protect your privacy and security while using Google Chrome.
Perform Safety Check:
To keep your online experience safe and secure, Google Chrome offers a built-in tool called Safety Check. This tool helps you protect yourself from data breaches, harmful browser extensions, and other potential risks. Here’s how to run a safety check in Google Chrome:
- Open Google Chrome on your computer.
- Look for the three-dot menu icon in the upper right corner of the browser and click on it.

- In the menu that appears, select “Settings.”

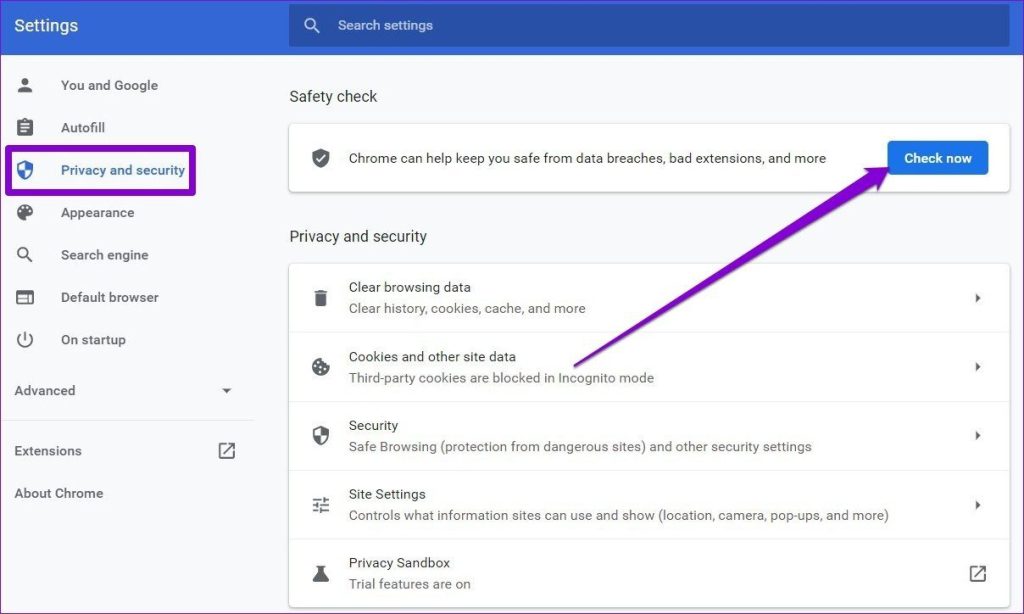
- On the left side of the settings page, you’ll see various options. Click on “Privacy and security.”

- Under the “Privacy and security” section, you’ll find “Safety Check.” Click on the “Check Now” button to start a quick scan of your browser’s safety and security settings.
- Once the scan is complete, Chrome will provide you with recommendations based on the scan results. These suggestions are meant to enhance your online safety.
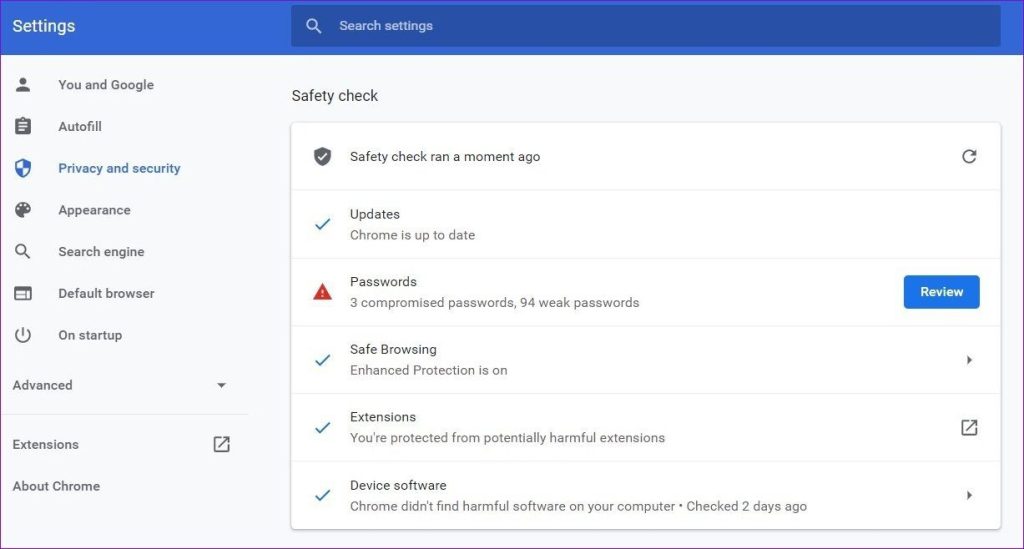
- If Chrome recommends specific actions, follow the suggested steps to make your browsing experience more secure.
By running the Safety Check tool and following its recommendations, you can help ensure that your online activities are protected from potential threats, making your web browsing experience safer and more secure.
Review the Privacy Guide:
Google Chrome’s Privacy Guide is like a helpful tour for your internet browser. It’s designed to show you how to control your online privacy and security. Here’s how it works:
- Accessing Privacy Guide: You find it in Chrome settings. To get there, open Chrome, click the three vertical dots at the top right, select “Settings,” and then click on “Privacy and Security.”
- Learning Choices: Once you’re in Privacy Guide, it provides step-by-step explanations for various settings like cookies, history sync, Safe Browsing, and data-sharing options. It tells you what each setting does, what benefits it offers, and what happens when you turn it on or off.

- Making Informed Choices: The idea is to help you understand the choices you make when using Chrome. For example, you might learn about how cookies work and decide whether you want to accept or block them. You can also explore other settings that affect your browsing experience.
- Easy to Follow: The guide is designed to be user-friendly, with clear, easy-to-follow instructions. It’s like having a friendly guide to walk you through the sometimes confusing world of browser settings.
- Ongoing Updates: Google plans to add more settings to this guide over time to keep it up to date with Chrome’s features.
In conclusion, to enhance your online security and privacy in Chrome, follow these steps: enable HTTPS, use secure DNS, activate enhanced protection, set up two-factor authentication, restrict microphone, camera, and location access, perform a safety check, and review the Privacy Guide. These actions will help safeguard your browsing experience.