Exposed: The Deceptive Reality of Sirfairpic.live Subscription Scam

About Sirfairpic.live Scam
In the vast landscape of the internet, a treacherous trap lies in wait for unsuspecting users. Sirfairpic.live, a deceitful scam website, preys on innocent individuals with cunning tactics that cloak its malicious intent. The scamsters employ a web of deception, masquerading as reputable brands like Amazon, The Home Depot, and Walmart to lure visitors into a web of deceit.
The nefarious scheme unfolds through a seemingly innocent online survey. Users, enticed by the promise of winning valuable prizes such as iPhones, eagerly participate. However, the true face of the scam emerges when victims are coerced into paying a seemingly insignificant $9.90 shipping fee to claim their illusory reward. Little do they know that this marks the beginning of their unwitting enrollment into costly monthly subscriptions without their explicit consent. To add salt to the wound, the promised prizes never materialize.
The architects of Sirfairpic.live deploy a variety of unscrupulous tactics to drive traffic to their malevolent domain. Cheaply acquired social media ads dangle enticing offers, exploiting vulnerable demographics with false claims of winning free iPhones or urgent surveys. Deceptive spam emails flood inboxes, warning recipients of imminent prizes or account suspensions, leading them down the malicious path to Sirfairpic.live. Malvertising, in the form of popup ads on dubious websites, further snares unsuspecting victims with promises of free gift cards or virus warnings.
In this perilous digital realm, users must exercise constant vigilance to shield themselves from such scams. If an online offer appears too good to be true, it likely conceals a malicious agenda. Staying cautious and informed is the armor against the deceptive allure of Sirfairpic.live and similar virtual pitfalls.
Uncovering the Deceptive Tactics of Sirfairpic.live Scam Site

Stepping into the virtual realm of Sirfairpic.live, users are greeted with a façade meticulously crafted to ensnare trust and excitement. The website employs familiar fonts, colors, and templates akin to reputable online stores, creating an illusion of credibility. Logos from well-known brands like Amazon and official security badges, though unaffiliated, further contribute to the deceptive masquerade.
Engaging in the seemingly harmless survey, visitors answer brief demographic questions, unknowingly triggering notifications of prize winnings. The illusion intensifies as users participate in a Prize Selection game, seemingly akin to online gaming. Regardless of the chosen box, predetermined prizes like iPhones, gift cards, or smart home devices are flaunted.
As the unsuspecting user reaches the climax of the scam, the Shipping Payment Page demands personal and payment details under the guise of a meager $9.90 shipping fee for their supposed winnings. Unbeknownst to them, this marks the sinister transition, where account and billing information is surreptitiously pilfered for unauthorized monthly subscriptions.
Through this inside view, the manipulative tactics of Sirfairpic.live unfold. What appears as innocent engagement in surveys and prize games conceals a malicious plot, trapping even the most cautious internet users in a web of deceit.
Consequences Unfold Post Providing Payment Details
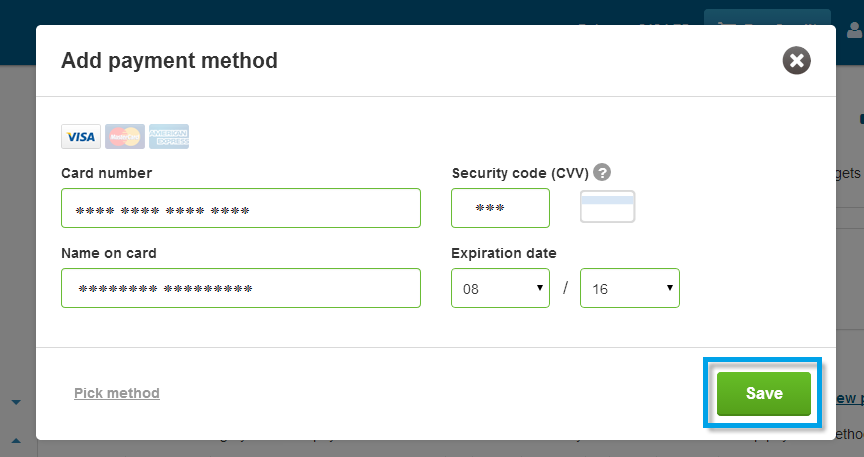
- Personal Information Sold: The credit card details, passwords, and addresses entered on Sirfairpic.live are not just used for the supposed shipping fee; they are sold on dark web marketplaces, putting victims at risk of future financial fraud and identity theft.
- Missing Prizes: The enticing promise of free gifts, such as iPhones and smartwatches, turns out to be a sham. Victims never receive the promised items, and the delivery timeframes provided on the website were nothing but deceptive tactics.
- Unwanted Subscriptions: Shortly after providing payment information, victims discover mysterious monthly charges on their credit card statements. These charges, ranging from $89 to $299, are for subscription services they never knowingly signed up for. The recurring billing scheme adds insult to injury.
In essence, Sirfairpic.live operates as a deceptive front, using fake prizes and surveys to lower users’ defenses. The website’s true purpose is to gather sensitive user data and enroll unsuspecting visitors in recurring billing scams, leaving victims facing both financial loss and the threat of identity compromise.
Modus Operandi of Sirfairpic.live Scam

On the internet, there’s a cunning trap called Sirfairpic.live, designed to fool unsuspecting users into a web of deceit. Let’s unravel the twisted tale of how this scam snags well-meaning visitors into unwanted subscription plans.
- Luring Through Deceptive Ads: Sirfairpic.live employs tricky tactics to lure users, mainly through social media ads, banners, email links, and popups. These deceptive messages promise free gift cards, prize giveaways, or urgent warnings, enticing users to click without considering the risks.
- The Illusion of Credibility: Once users take the bait, they land on Sirfairpic.live. The website is cleverly designed, mimicking legitimate e-commerce sites with familiar fonts, colors, and logos. It’s a wolf in sheep’s clothing, building credibility around surveys and prize giveaways.
- Crafting Trust Through Surveys: Visitors encounter exciting confirmation messages, making them feel specially chosen for an exclusive customer satisfaction survey. The website flaunts fake reviewer quotes, security badges, a US business address, and brand logos to manufacture trust. It’s a well-executed charade.
- Innocent-Looking Survey Questions: To lower users’ guards, Sirfairpic.live presents a series of 3-4 multiple choice questions asking seemingly innocent details like age, gender, shopping habits, and brand preferences. Users believe it’s to improve their experiences with major retailers, but the truth is more sinister.
- Building Detailed User Profiles: The collected information isn’t for enhancing shopping experiences; it’s a ploy to build detailed user profiles for targeted data selling. Users, unsuspecting, proceed, thinking these harmless questions will lead to generous prizes.
- Fake Prize Notifications and Online Game: After completing the survey, users are bombarded with exciting prize claim notifications. The scam takes on a simulated online game, urging users to pick a box to reveal their “win.” It’s a suspense-building tactic, and the countdown clock adds pressure to make quick choices.
- Paying the “Shipping Fee”: Now, having shown personalized prize notifications, Sirfairpic.live asks users to validate their eligibility by paying a small $9.90 shipping charge. Blinded by the promise of incredible prizes, users willingly input sensitive payment information, believing there are no hidden charges.
- Cold Reality Sets In: Within 1-2 weeks, the promised prizes never arrive. Instead, users discover unfamiliar recurring charges on their credit card statements, ranging from $49 to $99. These charges are for monthly subscription plans the scammers signed victims up for without their knowledge.
- Illicit Monthly Subscription Plans: Victims realize they’ve been ensnared in monthly subscription plans for services they never requested. These plans could be for pdf converters, antivirus software, movie clubs, job listing sites, or other obscure services. The scammers have successfully stolen financial data and set up unauthorized subscriptions.
- Tracing and Disputing Fail: Unfortunately, victims can’t trace the scammers due to the use of dummy domains and offshore hosting. Attempts to dispute credit card charges mysteriously fail. The victims are left with the daunting task of canceling each fraudulent subscription and monitoring their financial statements.
- Profiting from Stolen Data: In the end, Sirfairpic.live achieves its sinister goal. They’ve collected sensitive personal and payment information to profit from underground selling of data, forced subscription plans, or potential financial theft. The victims, once hopeful of winning prizes, are left grappling with the aftermath of a well-executed online scam.
In the vast expanse of the internet, Sirfairpic.live stands as a stark reminder to tread cautiously, for what seems like a golden opportunity might just be a meticulously crafted web of deception.
If deceived by Sirfairpic.live, take following action to protect yourself

Discovering that you’ve fallen victim to a scam like Sirfairpic.live can be infuriating, especially when personal information and hard-earned money are involved. While some damage may be irreversible, taking smart and immediate action is crucial. Here are steps victims should consider:
Contact banks to oversee accounts for potential fraudulent activity ahead:
If scammers have your info, future harm is a worry. Call your banks and credit card companies linked to Sirfairpic.live. Tell them to mark your accounts as risky for fraud. Ask for extra safety like PIN transactions, lower cash limits, and online purchase verification. If possible, turn on fraud monitoring.
Also, request new card numbers to safeguard your compromised payment details. Though it may seem extreme, getting a completely new card provides peace of mind against ongoing financial threats. Stay safe by taking these steps to protect yourself from potential harm.
File complaints about scam site and charges with the Federal Trade Commission:
Getting money back from tricky scam sites is hard. But, reporting them to the FTC helps build cases. Victims should file complaints online or by calling the FTC fraud division, sharing info about the scam site and credit card fraud. Speaking up adds power to a joint effort against these operations.
The more victims report, the better the chances for stronger rules to protect people. By taking these steps, victims contribute to shutting down these scams and protecting others from falling into the same traps.
Supervise credit histories and activate alerts for potential fraudulent activities:
Protecting your credit history is vital when scammers have your info. Get complete credit reports and carefully check for signs of identity theft. Set up 90-day fraud alerts to warn lenders about the compromised info, stopping scammers from opening fake credit lines.
Think about strong steps like credit freezes, which block all access without approval, or 7-year fraud alerts. Though extreme, these measures give extra security, shielding you from privacy threats. Taking these actions helps ensure your financial safety in the face of potential scams.
Terminate ongoing subscriptions or services immediately:
Check your bank and credit card statements for unexpected charges, usually between $89-$299 per month, caused by Sirfairpic.live. Identify any unauthorized subscriptions or purchases. Contact these companies right away, demanding cancellation and refunds, emphasizing the payments were unauthorized. Be persistent.
Additionally, dispute these charges with your credit card provider to improve your chances of getting your money back. Stay vigilant against unauthorized charges and act promptly to secure your finances. It’s crucial to communicate firmly with the companies involved and your credit card provider to address the situation and minimize the impact of the fraudulent transactions.
Execute antivirus sweeps to eliminate potential threats:
Visiting technically-savvy scam websites like Sirfairpic.live may expose victims to dangerous malware, such as spyware, keystroke loggers, or Trojan bot downloads. These threats can capture passwords, financial data, or control devices covertly over an extended period.
Scan your computer thoroughly for advanced hacking threats using antivirus software. These threats might sneak past the usual protections on your Windows or MacOS. Protect yourself by changing passwords to keep your online identity secure.
In conclusion, responding to a scam like Sirfairpic.live requires a multi-pronged approach to mitigate potential damages. Taking these smart action steps can help victims protect their financial accounts, report the scam to relevant authorities, monitor and safeguard their credit reports, cancel unauthorized subscriptions, and remove any potential malware. While it may not undo all the harm, these measures provide a proactive stance towards minimizing the impact of the scam.
Sirfairpic.live Leads to Potential Malware or Browser-Hijacker Attacks

Sirfairpic.live, notorious for its subscription scam, poses additional threats beyond unauthorized charges. Visiting this site may expose users to potential malware or browser-hijacker attacks. The site, known for deceptive practices, could employ sophisticated tactics to compromise user systems. Malware, such as spyware or browser-hijackers, may be covertly downloaded, compromising sensitive data and online security.
Spyware can track keystrokes, capturing passwords and financial information, while browser-hijackers manipulate browser settings, redirecting users to malicious websites. This dual threat extends the impact of the scam, targeting not only users’ financial information but also their overall online safety. It is imperative for individuals who may have interacted with Sirfairpic.live to not only address the subscription scam but also take measures to detect and remove potential malware, safeguarding their digital environment from broader security risks.
Remove Sirfairpic.live and its Related Applications from PC
To keep your computer safe from threats like those introduced by Sirfairpic.live, it’s important to use a trustworthy security tool like SpyHunter 5. Anti-malware programs, such as SpyHunter 5, can actively scan your system, identify suspicious activities, and alert you to potential threats. They act as a shield, preventing harmful files from entering your device. Alternatively, for those who prefer a hands-on approach, we offer simple instructions for both Windows and Mac users to address security issues on their own.
Special Offer
In order to remove Sirfairpic.live hassle free, we suggest you to scan the PC with powerful SpyHunter antimalware scanner. The fully functional free Trial of SpyHunter is Available for 7 days (Windows Version) with Credit Card required. There are no upfront charges within this period. Further, no charge will apply if you cancel 2 business days before the trail ends. For Mac Users, it is suggested to use Combo Cleaner which is a powerful antivirus and System optimizer.
Do make sure to read SpyHunter’s EULA and Privacy Policy. Spyhunter free scanner downloaded just scans and detect present threats from computers and can remove them as well once, however it requires you to wait for next 48 hours. If you intend to remove detected threats instantly, then you will have to buy its licenses version that will activate the software fully.
How to remove unwanted program from Windows 11
To get rid of an unsafe program on your Windows computer, follow these straightforward steps:
- Open your computer's settings by pressing "Windows + I" or right-clicking the "Start" button and choosing "Settings."

- In the settings window, click on "Apps" and then select "Apps & Features."
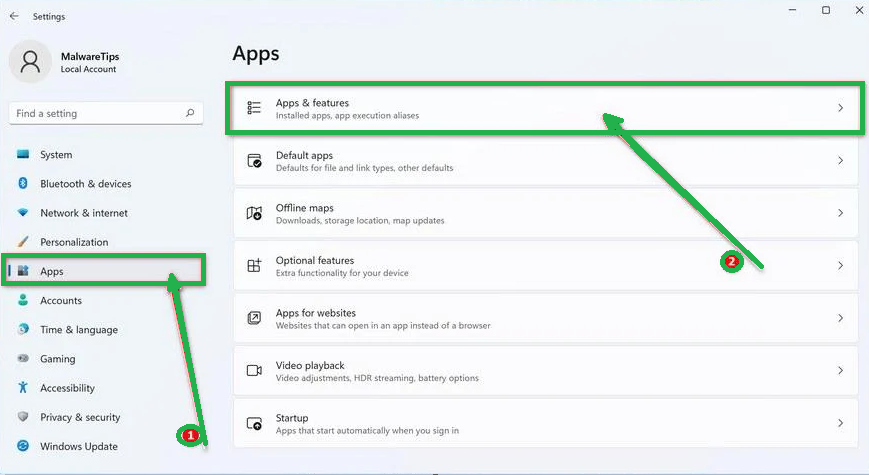
- You'll see a list of installed programs. Scroll through them and look for anything suspicious or unfamiliar. To make it easier, you can sort the list by the installation date. Just click "Sort by" and pick "Install date."
- Keep an eye out for any programs that don't seem right – things you don't remember installing or that don't sound like legitimate software. When you find a suspicious program, click the three dots next to it and choose "Uninstall."

- A message box will pop up. Confirm the uninstall process by clicking "Uninstall" and follow any prompts that come up to complete the removal.
- It's crucial to read all the prompts carefully because some malicious programs might try to sneak in extra things, hoping you won't notice.

- Once you've successfully removed the malicious programs from your computer, you've taken a big step in getting rid of the unwanted program.
How to Remove Unwanted program Virus from Windows 10
To remove an unwanted program from a Windows 10 computer, follow these steps:
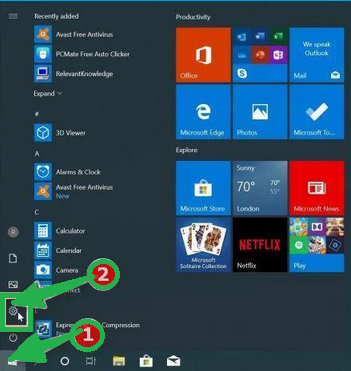
- Open the "Settings" app by press the "Windows key + I" on your keyboard. Alternatively, you can click the "Start" button on the taskbar and then choose "Settings" (the gear icon).
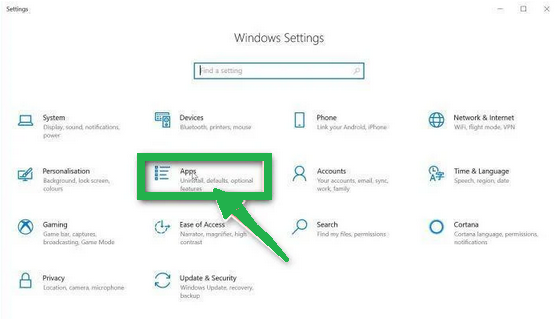
- In the "Windows Settings" window, you'll see various options. Click on "Apps." By default, it should take you to "Apps and Features," but if not, select it from the options on the left.
- In the "Apps & Features" settings, scroll through the list of installed programs. Look for anything that seems unfamiliar or suspicious. To help with this, you can sort the programs by their installation date. To do this, click "Sort by" and pick "Install date."
- Keep an eye out for any program that you don't remember downloading or that doesn't seem like a legitimate piece of software. When you find a suspicious program, click on it and then choose "Uninstall" from the menu that appears.

- A message box will pop up to confirm the uninstallation process. Click "Uninstall" to confirm and follow any additional prompts that come up to complete the removal.
- It's essential to carefully read all the prompts because some malicious programs might try to sneak in additional things during the process, hoping you won't notice.

- Once you've gone through these steps successfully, the malicious program will be removed from your computer.
How to Remove Unwanted program Virus from Windows 7
To remove an unwanted program from Windows 7, follow these steps:
- Click the "Start" button and select "Control Panel."
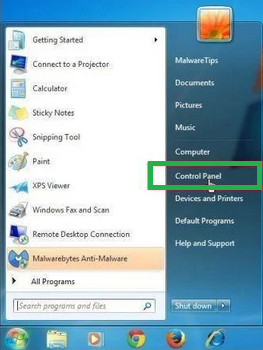
- In the Control Panel, click "Uninstall a Program" under the "Programs" category.

- You'll see a list of all installed programs in the "Programs and Features" screen. Find any suspicious or unfamiliar programs, click to highlight them, and then click "Uninstall."
- Look for anything that doesn't seem legitimate or you don't remember installing.

- Confirm the uninstallation in the message box by clicking "Yes" and follow any prompts to complete the removal. Read carefully, as some malicious programs try to slip in unnoticed.
- Once you've completed these steps, the malicious software will be removed from your computer.
How to Remove Unwanted program from Android/Mobile
To remove an unwanted program virus from your Android phone, follow these simple steps:
Step 1: Start in Safe Mode
First, we'll start your phone in Safe Mode. Safe Mode boots your Android with only the essential apps and settings, preventing malicious apps from interfering.
- Long-press your phone's power button (usually found on the side of your phone) until the power off menu appears.
- When the menu appears, tap and hold the "Power off" button on your screen. You'll see a "Safe mode" option.

- Tap on "Safe mode" to enter it.
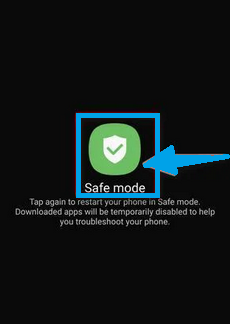
- Your phone will restart in Safe Mode, and you'll see the "Safe Mode" text at the bottom left corner of your device.
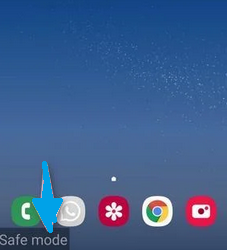
If you can't find Safe Mode on your phone, you can activate Airplane mode instead to cut off network connections.
Step 2: Check for Malicious Apps with Administrator Privileges
In this step, we'll check if there are any malicious apps with administrator privileges on your phone. These privileges are sometimes used for legitimate purposes but can also be exploited by malicious apps to prevent their removal.
- Tap the "Settings" app on your phone's menu or home screen.
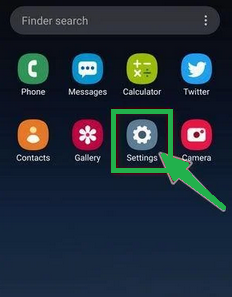
- In the "Settings" menu, look for "Biometrics and Security" (or similar) and then navigate to "Other Security Settings" and "Device admin apps." The location of this option may vary depending on your Android version or phone brand.
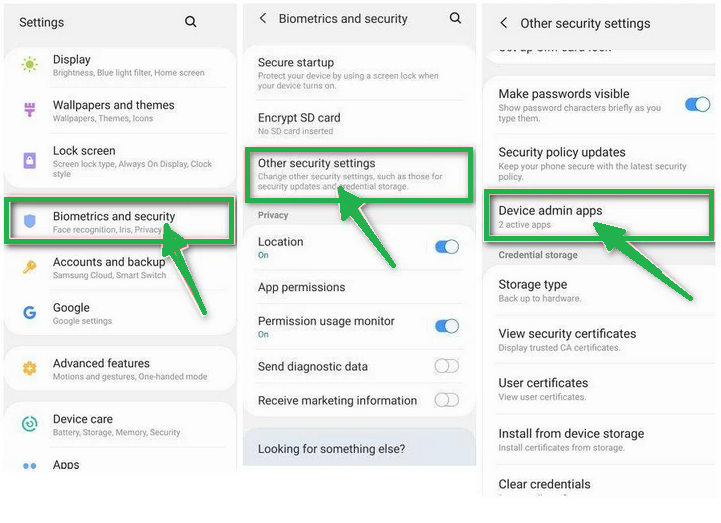
If you can't find "Device admin apps" easily, you can use your phone's search function to look for it.
- Once you're in the list of device admin apps, disable admin rights by tapping the option next to the app. This will remove the checkmark or turn off the toggle button. Some phones also let you tap the app in the admin apps list and then use the "Uninstall" link to remove it immediately.

Step 3: Check for Malicious Apps
While your phone is still in Safe Mode, we'll check for malicious apps.
- Tap the "Settings" app.

- In the "Settings" menu, tap on "Apps" or "App Manager" to view all installed applications on your phone.
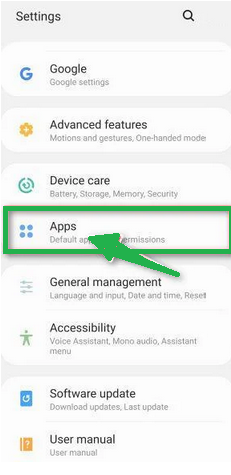
- You'll see a list of all installed apps. Scroll through the list and look for any suspicious apps that you don't remember downloading or that don't seem genuine. Malware is often hidden in apps like photo editors, weather apps, or camera apps.
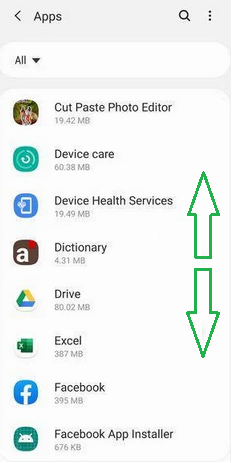
- When you find a suspicious app, tap on it to uninstall. This won't open the app but will take you to the app details screen. If the app is currently running, tap "Force stop," then tap "Uninstall."
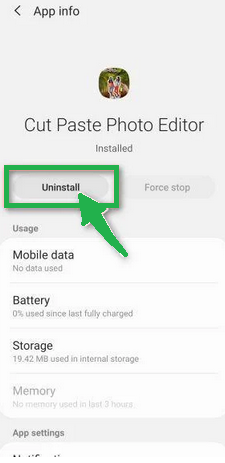
- A confirmation dialog will appear. Tap "OK" to remove the malicious app from your phone.

Step 4: Exit Safe Mode
Now that you've removed the malicious app from your phone, you can exit Safe Mode.
- Hold down the power button until you see the power off menu.
- Select the restart option. Your phone will reboot and exit Safe Mode, returning to normal operation.
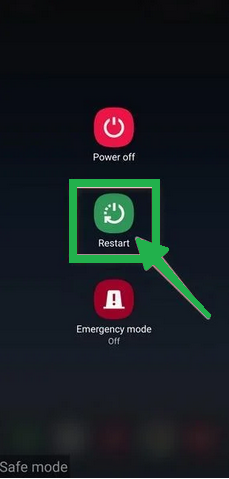
By following these steps, you can effectively remove a Unwanted program virus from your Android phone and restore its security.
How to remove Unwanted program from Mac
- Check the top-right corner of your Apple menu bar for any unfamiliar icons.
- If you see one, click on it and choose “Quit.”
- Go to your dock and click on the “Finder” app.

- In the left pane of Finder, tap on “Applications.”
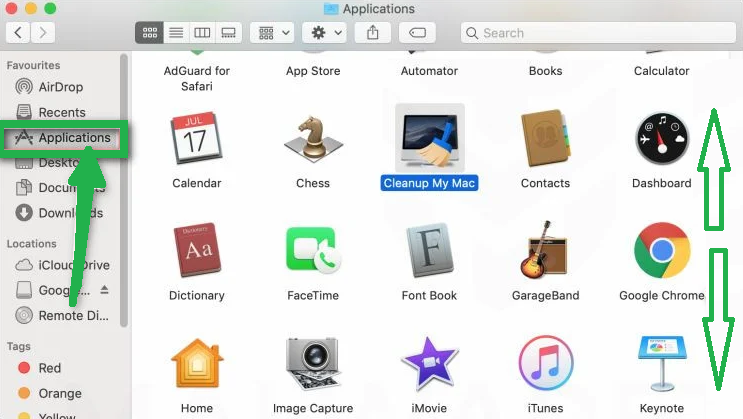
- A list of installed apps appears; locate the suspicious one.
- Right-click on the malicious app and select “Move to Trash.”
To completely uninstall an undesired application, navigate to the Application Support, LaunchAgents, and LaunchDaemons directories and delete associated files. This ensures thorough removal of the unwanted app.
- Click on “Go” in the top menu, then choose “Go to Folder.”

- Type /Library/Application Support and press Enter.
- Delete any suspicious items in the Application Support folder.
- Repeat for /Library/LaunchAgents and /Library/LaunchDaemons.

- Remove all relevant .plist files in these folders.
These steps help you find and delete potentially harmful files associated with unwanted apps on your Mac.
Undo Changes Made by Sirfairpic.live in different Settings of PC
To reverse alterations inflicted by Sirfairpic.live on your computer, it’s crucial to eliminate any registries it generated. Commonly affected Windows system registries include the following. Adjust phrasing as needed.
HKEY_LOCAL_MACHINE\Software\Microsoft\Windows\CurrentVersion\Run
HKEY_CURRENT_USER\Software\Microsoft\Windows\CurrentVersion\Run
HKEY_LOCAL_MACHINE\Software\Microsoft\Windows\CurrentVersion\RunOnce
HKEY_CURRENT_USER\Software\Microsoft\Windows\CurrentVersion\RunOnce
Access these entries by launching the Windows registry editor and eliminating any values introduced by Sirfairpic.live. Execute this process by following the instructions below, ensuring a thorough removal of unwanted registry entries.
- Open the Windows registry editor by pressing “Win + R,” typing “regedit,” and clicking “OK.”

- Navigate to the Run and RunOnce keys.

- Identify the virus-created value by right-clicking and selecting “Modify” to reveal the associated file location.
- Verify if the file location corresponds to the virus; if so, remove the value.

Clean the Browser
After deleting the unwanted program, resetting your browser is like giving it a fresh start. It’s a helpful fix if you notice issues like slow performance or strange behavior. The reset takes your browser back to its original settings, erasing any changes made by the unwanted program. It’s like pressing a reset button to eliminate troublesome tweaks and ensure your browser works smoothly without any lingering problems.
How to Reset Browsers
How To Reset Chrome to Default Settings
Reset Chrome for Windows
Here's a step-by-step guide to reset Google Chrome on Windows:
- Launch Google Chrome on your computer.
- Look for the three vertical dots in the top right corner of the Chrome window. Click on them to open a menu. Then, select "Settings" from this menu.

- In the Settings tab that appears, you'll see a sidebar on the left. Click on "Advanced" to get more options.
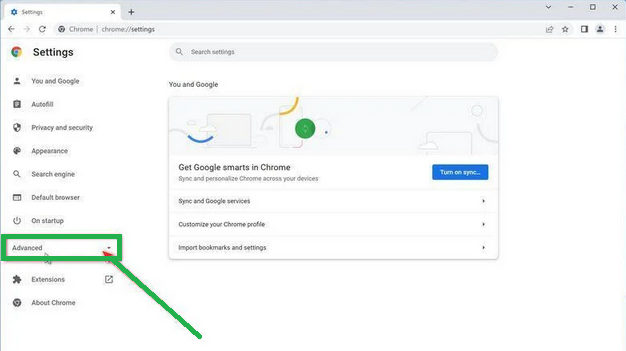
- Under the "Advanced" section in the sidebar, you'll find "Reset and clean up." Click on it.

- Now, in the main part of the window, you'll see the "Reset and clean up" section. Click on "Reset settings to their original defaults."
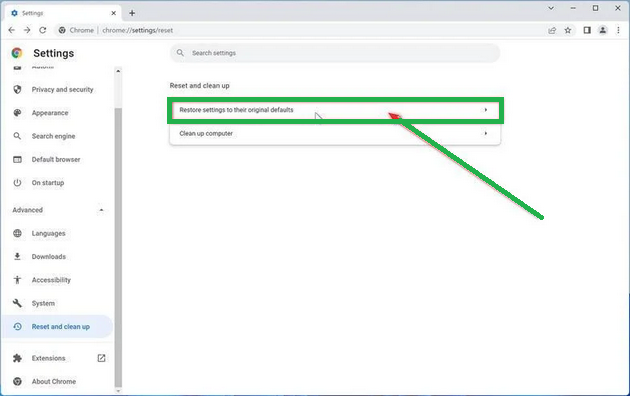
- A window will pop up to confirm the reset. It will explain what will go back to the default settings. If you're okay with that, click on "Reset settings."
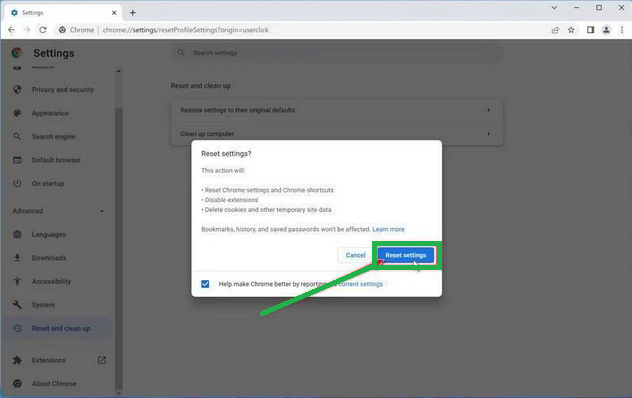
- If you find that a troublesome extension keeps coming back even after the reset, you can reset the data sync. To do this, go to chrome.google.com/sync and click on "Clear Data."

Reset Chrome for Mac
If you're using Google Chrome on a Mac and want to reset it back to its default settings, follow these steps:
- Click on the three dots in the top-right corner of Chrome (the menu button).
- Select "Settings" from the menu that appears. This will open the basic settings screen.

- In the left sidebar, click on "Reset and clean up."

- Now, click on "Reset settings to their original defaults."
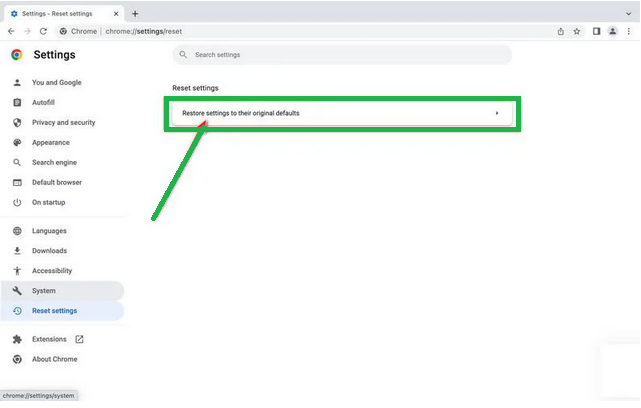
- A confirmation box will pop up, telling you what will be set back to the default settings. To complete the process, click on "Reset Settings."

Keep in mind that doing this will erase your homepage, tab settings, saved information, browsing history, and cookies. It will also disable any extensions you've installed. However, your bookmarks will be safe.
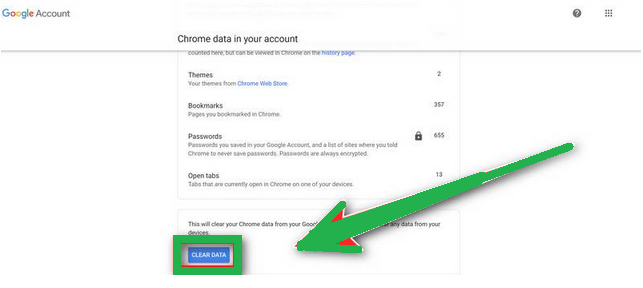
- If you're still having trouble with a malicious extension coming back even after resetting your browser, you can reset your data sync. To do this, go to chrome.google.com/sync and click on the "Clear Data" button.
Reset Chrome for Android
Resetting Chrome to its default settings on Android isn't as straightforward as on computers, but it's doable by clearing the app data. This means getting rid of saved cookies, cache, and site settings. Here's how to do it:
- Open the "Settings" app on your Android device. You can usually find it on your home screen or in your phone's app menu.

- In the "Settings" menu, look for "Apps" or "App Manager." This will show you a list of all the apps installed on your phone.

- Scroll through the list until you find the "Chrome" app, and then tap on it to view the app's details.

- Inside Chrome's app info menu, tap on "Storage."
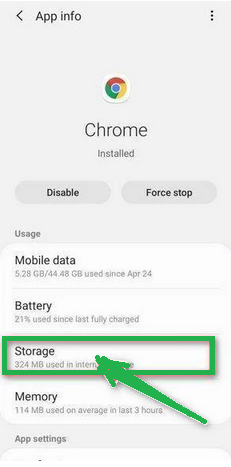
- Under the storage settings, you'll see two options – "Manage Space" and "Clear Cache." Click on "Manage Space."
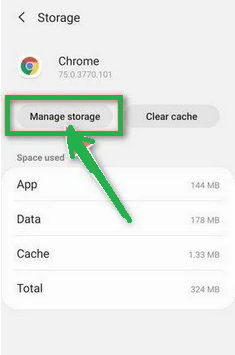
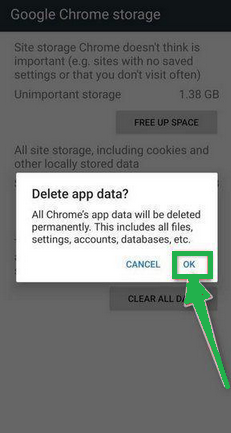
- Now, click on "Clear all Data." This will delete everything related to Chrome, including your accounts, bookmarks, and settings, essentially resetting it to its default state.

- A confirmation message will pop up, explaining what will be reset. To finish the reset process, tap "OK."
How to Reset Internet Explorer
Resetting Internet Explorer is an easy process and only takes a few minutes. Here's how you can do it:
- Open Internet Explorer, which is your web browser.
- Look for a little gear icon in the top-right corner of the browser and click on it.

- Then, select "Internet Options."

- In the "Internet Options" box, click on the "Advanced" tab.
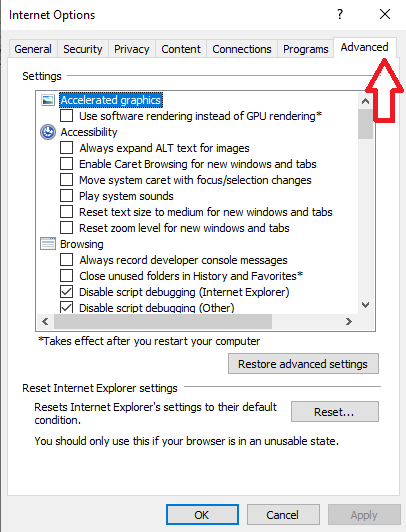
- You'll see a "Reset" button. Click on that.
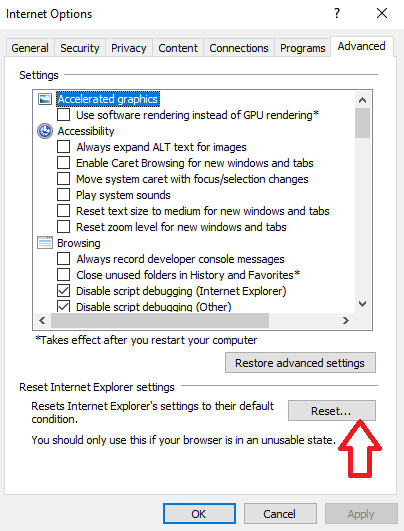
- Now, in the "Reset Internet Explorer settings" section, there's a box that says "Delete personal settings." Check this box, and then click "Reset."

- When Internet Explorer finishes the reset, a message will pop up. Click "Close" to close it. After that, close your browser, and you can open Internet Explorer again.

How To Reset Mozilla Firefox
Reset Firefox for Windows
- Click on the three horizontal lines in the top right corner of Firefox to open the menu. Choose "Help" from the menu.

-
- In the "Help" menu, tap on "More troubleshooting information."

- On the "Troubleshooting Information" page, find the "Refresh Firefox" button and click it.

- Confirm the reset by clicking "Refresh Firefox" again in the new window that pops up.

- Firefox will close and go back to its default settings. It will show you what information it saved. Click "Finish" when it's done.
After the reset, you'll see a folder called "Old Firefox Data" on your desktop. It holds your old settings. If the reset didn't solve your problem, you can copy some of the files from this folder to the new profile that was created. But if you're sure you won't need this folder anymore, it's a good idea to delete it since it might contain sensitive information.
Reset Firefox for Mac
Resetting Firefox on a Mac is easy. Here's what you do:
- Click on the three horizontal lines in the top right corner of Firefox to open the menu. Select "Help" from the menu.

- Then, choose "Troubleshooting Information."

- On the Troubleshooting page, you'll see a "Refresh Firefox" button in the upper-right corner. Click on it.

- Confirm the reset by clicking "Refresh Firefox" again in the new window.

- Firefox will close and go back to its default settings. It will show you what information it saved. Click "Finish" when it's done.
That's it! Resetting Firefox on your Mac is a quick way to make it work better while keeping your important data safe.
Reset Firefox for Android
Resetting Firefox to its default settings on Android is a bit different but still doable. It involves clearing the app's data, which includes cookies, cache, and saved site settings. Here's how you can do it:
- Open your phone's "Settings" app, which you can find in your menu or on the home screen.

- In the "Settings" menu, look for "Apps" or "App Manager." This will show you all the apps installed on your phone.

- Scroll through the list of apps until you find "Firefox." Click on it to open the app's details.

- In Firefox's app menu, click on "Storage."

- In the storage settings, you'll see two options: "Manage Space" and "Clear Cache." Click on "Manage Space."

- Now, click on "Clear all data." This will delete all of Firefox's data, including your accounts, bookmarks, and settings, effectively resetting it to its default state.

- You'll see a confirmation message that explains what will be reset. To complete the reset, tap "Ok."
How To Reset Edge to Default Settings
To reset Microsoft Edge on your computer, follow these simple steps:
- Click on the three horizontal dots in the top-right corner of Microsoft Edge to open the menu. From the menu, select "Settings."

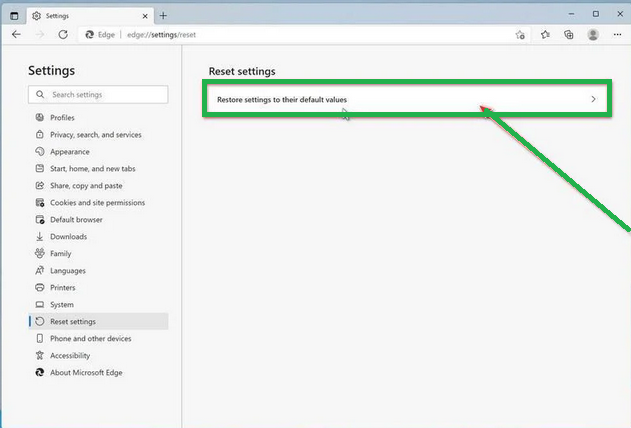
- Tap "Reset Settings" on the left side of the window.

- Now, click on "Restore settings to their default values" in the main window.
- A confirmation message will appear, explaining what will be reset. To proceed, click "Reset."
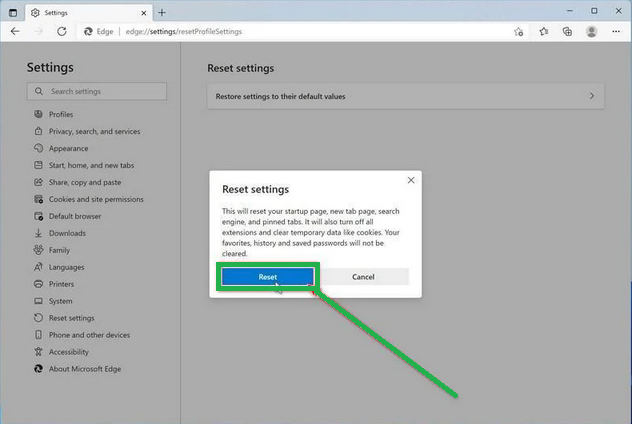
- Microsoft Edge will erase your personal data, browsing history, and disable any installed extensions. But don't worry, your bookmarks will remain safe and accessible.
How To Reset Safari
Before resetting Safari to its default settings, if you have bookmarks you want to keep, open Safari, go to the "File" menu, and choose "Export Bookmarks." Give your backup a name and save it.
To reset Safari on a Mac, you can use the Settings menu or Terminal. If you're using Safari on an iPhone or iPad, tap the iOS tab to reset the settings. This way, you won't lose your important bookmarks when you reset Safari. It's like making a copy of your bookmarks before cleaning up your browser.
Reset Safari for Mac via Settings
Here's how to reset Safari:
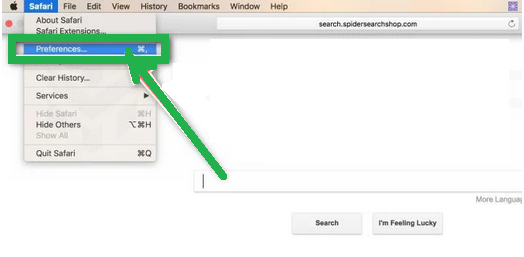
- Click "Safari" in the menu, then choose "Preferences." This opens a new window with your Safari settings.
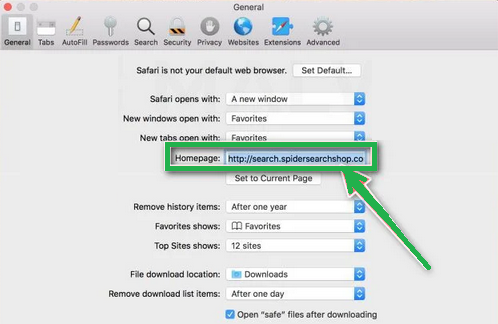
- Check your homepage in the "General" tab. If it's not what you want, change it.
- Next, click on the "Extensions" tab.

- Look for any extensions you don't remember installing or seem suspicious. It's usually safe to remove them.

- In "Preferences," go to "Websites" and then "Notifications." Turn off the option that allows websites to ask for push notifications.

- In the Safari menu, choose "Preferences" again, then go to "Privacy." Tap on "Manage Website Data".

- Choose "Remove All" to clear website data.

- To show the "Develop" menu, go to the "Advanced" tab in "Preferences" and enable "Show Develop menu in menu bar."

- Click on "Develop" in the menu bar, and then select "Empty Caches" to clear out temporary files.

Reset Safari for Mac via Terminal
To reset Safari on your Mac, follow these steps:
- Open the "Terminal" app (you can search for it using Spotlight with "Cmd + Space").
- Go to the Apple menu at the top-left and choose "Force Quit." Select "Safari" to close it completely.
- Enter the commands one by one in Terminal. It will ask for confirmation to delete files. Type "y" and press "Enter" after each command.
mv ~/Library/Safari ~/Desktop/Safari-`date +%Y%m%d%H%M%S`;
rm -Rf ~/Library/Cache/*;
rm -Rf ~/Library/Caches/Apple\ -\ Safari\ -\ Safari\ Extensions\ Gallery;
rm -Rf ~/Library/Caches/Metadata/Safari;
rm -Rf ~/Library/Caches/com.apple.Safari;
rm -Rf ~/Library/Caches/com.apple.WebKit.PluginProcess;
rm -Rf ~/Library/Cookies/*;
rm -Rf ~/Library/Cookies/Cookies.binarycookies;
rm -Rf ~/Library/Preferences/Apple\ -\ Safari\ -\ Safari\ Extensions\ Gallery;
rm -Rf ~/Library/Preferences/com.apple.Safari.LSSharedFileList.plist;
rm -Rf ~/Library/Preferences/com.apple.Safari.RSS.plist;
rm -Rf ~/Library/Preferences/com.apple.Safari.plist;
rm -Rf ~/Library/Preferences/com.apple.WebFoundation.plist;
rm -Rf ~/Library/Preferences/com.apple.WebKit.PluginHost.plist;
rm -Rf ~/Library/Preferences/com.apple.WebKit.PluginProcess.plist;
rm -Rf ~/Library/PubSub/Database;
rm -Rf ~/Library/Safari/*;
rm -Rf ~/Library/Safari/Bookmarks.plist;
rm -Rf ~/Library/Saved\ Application\ State/com.apple.Safari.savedState;
Reset Safari for iOS (iPhone or iPad)
To reset Safari on your iPhone or iPad, follow these steps:
- Open the "Settings" app.

- Turn on "Airplane Mode" to disconnect from the internet temporarily and block unwanted access.
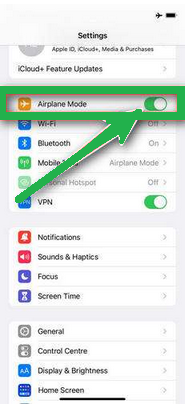
- Scroll down and click on "Safari."
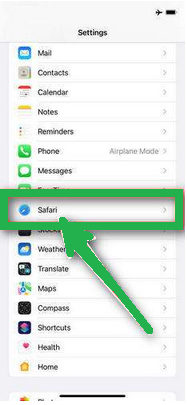
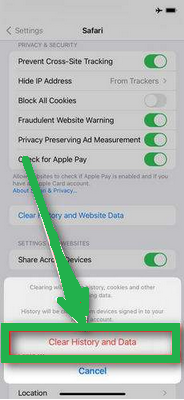
- Now, choose "Clear History and Website Data."

- Confirm by tapping "Clear History and Data" in the pop-up window.
- While in Safari settings, make sure to turn on "Block Pop-ups" and "Fraudulent Website Warning."
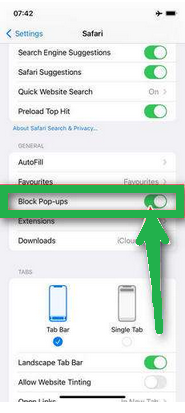
These steps clear your browsing history, website data, and other information stored by websites you visited. Also, by enabling "Block Pop-ups" and "Fraudulent Website Warning," you can enhance your browsing experience and protect yourself from unwanted ads and potentially harmful websites.
Recommended Security Software (SpyHunter)
SpyHunter acts like a guardian for your computer, shielding it from nasty stuff like malware and spyware. Using smart scanning, it hunts down and kicks out harmful programs sneaking around your system. It’s not just a detective; it also stops new threats from barging in. Anyone, whether tech-savvy or not, can easily use it because of its simple design. Plus, it keeps learning and gets regular updates to stay ahead of the bad guys. If you want a solid defender for your PC against digital troublemakers, SpyHunter is a reliable choice, always ready to keep your computer safe.
Step 1: Download SpyHunter 5 for your device through the provided link. Obtain it by clicking below.
Step 2: Proceed to the location where the installer is saved in your system. Typically, the file is stored in the “Downloads” directory. Execute the setup process by double-clicking on the installer file.
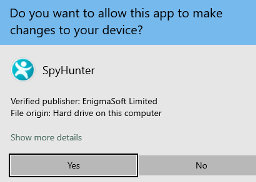
Step 3: Choose your desired language and press the “OK” button. This action triggers the installer initialization. When prompted, click the “Continue” button to proceed with the installation process.

Step 4: During installation, you’ll encounter a prompt to approve the ‘EULA and Privacy Policy.’ Opt for ‘I accept the EULA and Privacy Policy’ and then select the ‘Accept & Install’ button. This step is necessary to proceed with the installation process of the application.

Step 5: Initiate the installation process, and observe the progression through the visible progress bar. The process may require some time for completion. Once finished, a notification confirming successful installation will be displayed.

Step 6: Upon installation completion, SpyHunter will automatically launch. The following screen will be displayed for your attention.

Step 7: Additionally, the scanner will initiate a comprehensive scan of your computer to identify potential threats within your device. Throughout the scan, it will present you with information such as the detected threat’s name, security level, and specific details about the threat. Relax and wait for the scan process to conclude.

Step 8: Upon completion of the scan, press the “Next” button to continue the process.

Step 9: To finalize the removal process, the application will prompt you to purchase its licensed version. Alternatively, you have the option to opt for a 7-day free trial, during which the software will be fully operational, allowing you to eliminate all identified threats.

Special Offer
In order to remove Sirfairpic.live hassle free, we suggest you to scan the PC with powerful SpyHunter antimalware scanner. The fully functional free Trial of SpyHunter is Available for 7 days (Windows Version) with Credit Card required. There are no upfront charges within this period. Further, no charge will apply if you cancel 2 business days before the trail ends. For Mac Users, it is suggested to use Combo Cleaner which is a powerful antivirus and System optimizer.
Do make sure to read SpyHunter’s EULA and Privacy Policy. Spyhunter free scanner downloaded just scans and detect present threats from computers and can remove them as well once, however it requires you to wait for next 48 hours. If you intend to remove detected threats instantly, then you will have to buy its licenses version that will activate the software fully.
FAQs about Sirfairpic.live
What is the Sirfairpic.live subscription scam?
The Sirfairpic.live subscription scam involves deceptive tactics to trick individuals into subscribing to services, often resulting in unauthorized charges.
How does it operate?
Typically, the scam employs misleading ads or notifications, convincing users to subscribe. Victims may unknowingly provide personal or financial information.
What are the red flags of Sirfairpic.live scams?
Common signs include unexpected subscription prompts, unclear terms, and unauthorized charges. Be wary of unsolicited messages or dubious websites.
How to avoid falling for such scams?
Stay vigilant, verify the legitimacy of offers, review terms thoroughly, and avoid sharing sensitive information unless certain of the source’s credibility.
What to do if scammed by Sirfairpic.live?
Report the incident to relevant authorities, contact your bank to dispute charges, and enhance online security measures to prevent future scams.

