Don’t Get Duped by the Chicose.club Scam

Chicose.club Scam Details
Watch out for Chicose.club! It’s a fake online store that promises super cheap stuff but delivers either fake or really bad quality products, or sometimes nothing at all. They might show you pictures of nice things, but what you get isn’t what you paid for. It’s like buying a cool toy online but getting a broken one in the mail. They trick you into thinking you’re getting a great deal, but it’s just a scam. Don’t fall for it! Stick to trusted websites when shopping online, so you don’t end up disappointed or wasting your money on junk. Stay smart and shop safe!
The people behind Chicose.club use spam emails and social media platforms like Facebook, Instagram, and TikTok to get the word out about their site and attract unsuspecting victims. They lure people in by offering incredibly low prices and using pictures of products they’ve stolen from other places.
Once people place orders and enter their payment info, the scammers just take the money and disappear. Customers end up with one of these bad outcomes. Often, the orders don’t get fulfilled, and the scammers just vanish after taking the money. Some folks get cheap copies made with low-quality materials that don’t match what was promised. In other cases, people get items that are clearly used, damaged, or tampered with, showing that they’re not sending new stuff. Some orders even show up with completely different products from what was ordered, which means they’re not getting the right stuff.
On top of selling fake or nothing at all, Chicose.club also sneakily gathers personal and financial data during checkout. They get things like your full name, home address, phone number, credit card details, and more. They probably use this info for bad things like stealing your identity, credit card fraud, or selling it on the dark web.
Our research shows that Chicose.club is likely part of a big network of scams. This network runs many fake online stores, and their only goal is to trick people and take their money.
There are lots of signs that this is not a real business. The legal pages on the site are just copied and don’t have real policies. They don’t provide any way to contact customer service, and the folks who run the website are hiding their identities. They offer discounts that seem way too good to be true, up to 90% off, to lure in shoppers. All the info about the products is stolen from big stores, and there’s no real presence on social media.
To sum it up, we strongly recommend staying away from this deceitful website. Don’t fall for the tempting discounts they use to trick you. The pictures of the products are not real, and there’s no real customer service to help you if something goes wrong. To protect yourself, it’s best to steer clear of Chicose.club and similar websites altogether.
What defines an illegitimate online shopping site?

Fake shopping websites are like traps set by scammers to steal your money, passwords, or personal info. These websites can look just like real online stores, but they’re designed to trick you.
Scammers often use tricky tactics to get you to these fake websites. They might send you scam emails, texts, or show you ads on social media to lure you in. Sometimes, these fake websites can look a lot like well-known stores, using logos and pictures stolen from the real ones. If you’re not careful, you might think they’re safe to shop from.
These fake websites often promise incredible deals on things like fancy clothes, jewelry, and electronics at super low prices. They might even say you’ll get free shipping and your stuff will arrive really quickly. All of this sounds great, right?
But here’s the catch: These websites are out to scam you, especially during the holiday season and big shopping events when you’re looking for bargains. They take advantage of people searching for good deals and fast delivery.
What makes fraudulent online stores a threat?

Fake websites are set up by scammers to fool people looking for great deals. These scams aim to make you buy products that aren’t real, share your private info like passwords and financial details, or even get you to download harmful software.
Only a few of these fake sites might send you something, but it’s likely to be a cheap knockoff. Most of them are just after your money or personal info. They want to steal your identity or use your financial details for fraud.
How to spot fake online stores effectively?
Online shopping has become a convenient way to purchase goods and services, but it also comes with the risk of encountering fake websites that aim to scam you out of your money. To protect yourself from these dodgy deals, you need to be vigilant and learn how to identify fake websites quickly. Here are ten simple ways to spot fake online shopping portals and avoid getting scammed.
Check the URL
The first and most crucial step to identify a fake website is to examine the website’s URL. Legitimate online stores use secure connections, which are indicated by “HTTPS” in the URL and a padlock symbol next to it. This signifies that the site uses SSL encryption, making it harder for malicious actors to intercept your data. Be wary of websites that only use “HTTP” as they are less secure.
Additionally, pay close attention to the URL itself. Some fake websites create URLs that are intentionally similar to those of genuine retailers, but with slight differences. For example, if you’re shopping for products from “Vivobarefoot,” a reputable brand, their official website might be “vivobarefoot.com/us.” Fake websites might have URLs like “vivobarefootoutlet[dot]us,” attempting to mimic the real site but with slight alterations. To avoid spoofed domains, always manually type the retailer’s URL into your browser and refrain from clicking on links in emails, text messages, or direct messages unless you are sure they are from the legitimate company.
Look for Typos and Bad Grammar

Legitimate companies take the time to proofread and edit their website content before it goes live. In contrast, scammers often rush their efforts and may not have the same attention to detail. As a result, fake websites are prone to making obvious spelling and grammar mistakes in their product descriptions, contact information, and other content. If you notice multiple errors on a website, it’s a red flag that you might be dealing with a fake one.
Verify Contact Information

When shopping online, always ensure that you can easily find the seller’s physical address, support email, and phone number. Legitimate businesses typically provide this information for customer inquiries and concerns. Be suspicious if the website lacks contact details, only offers a fill-in contact form, uses a random Yahoo or Gmail email address for customer service, or lacks contact information altogether. This is often a sign of a fraudulent website.
Check for a Legitimate Social Media Presence
Most reputable businesses maintain an active presence on social media platforms as a way to promote their products and services. If an online retailer claims to be legitimate but lacks an overt social media presence, or if the social media icons on their website lead nowhere, it’s a strong indicator of a potential scam.
For example, if you visit the website of Vivobarefoot and click on their social media icons, you should be directed to their official social media pages. In contrast, fake websites might only provide options to share the site’s URL on your own social media, as they have no legitimate social presence.
Additionally, look for online reviews left by other users about the site you’re considering. Scammers often post fake reviews on their websites to appear more legitimate. However, if the website is a more established scam, you might find a flood of negative reviews from previous victims on platforms like Google or Trustpilot. Be wary of such feedback.
Examine Image Quality

Fake websites often feature stolen images, typically taken from genuine retailer websites or found on search engines. Consequently, the images on these scam sites are usually of low quality and may appear pixelated. Pay attention to the quality of the images on the website. If they seem unprofessional or of poor resolution, it’s a sign that the website might not be trustworthy.
Investigate Domain History

The domain name of a fake shopping website is often registered for a short period, usually leading up to popular holidays and shopping events. In contrast, established and legitimate brands typically have domain names with a longer history. For instance, a quick search of Vivobarefoot’s legitimate domain reveals that it was created over 18 years ago, which aligns with the brand’s established reputation. However, the copycat site may have a domain created only a few months prior. Checking a website’s domain history can help you assess its authenticity.
Beware of Questionable Payment Options

Genuine online stores usually offer a variety of secure payment options, such as credit and debit cards, cash on delivery, or pay later options like Klarna and Afterpay. In contrast, fake shopping websites often try to force you to use non-reversible and non-traceable payment methods, including bank transfers, gift cards, cryptocurrencies, or payment apps like Cash App, PayPal, or Venmo.
While debit and credit card issuers may offer some protection against fraud, it’s essential to monitor your bank accounts, especially during major shopping holidays, to ensure no unexpected charges are debited. If a website pushes you to use unconventional payment methods, it’s a significant warning sign.
Be Cautious of Bargain-Basement Prices

Shopping holidays like Black Friday and Singles’ Day are known for offering great deals at discounted prices. However, if you come across a website offering a product at a price significantly lower than what you’ve seen elsewhere, it’s a reason for concern. Authentic deals are good, but if an offer appears too good to be true, it likely is.
To assess the legitimacy of a deal, research the price history of the item you want to buy. Compare prices on different websites that are running similar offers. As a general rule, if a website advertises prices that are more than 50% off, it’s wise to verify the site’s authenticity before making a purchase.
Assess the Website Design

Scammers no longer require extensive technical skills to create e-commerce stores. Online website builders and platforms like Shopify have made it relatively easy for users to design their storefronts quickly. However, fraudulent websites tend to cut corners and opt for simple, inexpensive website templates with limited features. These templates may lack the complexity and polish found in legitimate online stores. When browsing a shopping site, explore its design and functionality. Oversimplified, poorly designed sites can be a strong indicator of illegitimacy.
Examine the Returns Policy
Legitimate retailers are transparent about their return and refund policies to comply with consumer protection laws. These policies are usually clearly outlined on their websites. In contrast, scammers may not put much thought into their return policies, or they may make them convoluted or sketchy. Before making a purchase, read and understand the website’s return policy. If it appears confusing or vague, it’s a sign that the site may be fraudulent.
Genuine retail websites should also include other important legal information, such as terms and conditions, a privacy policy, and a data collection policy. If you cannot find this information on the website, it raises concerns about its legitimacy.
In summary, being a savvy online shopper means being able to identify the signs of fake websites to avoid falling victim to scams.
Ways to steer clear of fraudulent shopping sites

When you browsing the web, it’s crucial to be vigilant and protect yourself from potential online shopping scams. Here are some simple tips to ensure a secure shopping experience:
- Examine the Website Carefully: Take a close look at the website you’re visiting. Be on the lookout for signs that it might be fake. Some red flags include unusual domain names that are slightly different from the official retailer’s website, poor website design, noticeable grammatical errors in the content, and low-quality images. Legitimate websites put effort into their appearance and content, so if something seems off, be cautious.
- Watch Where You Click: Avoid clicking on links in emails, text messages, or social media posts that promise fantastic deals. These links can lead you to fake websites designed to steal your money or personal information. Instead, type the website’s URL directly into your browser’s address bar. This way, you ensure you’re visiting the legitimate website of the retailer you trust.
- Do Your Research: Before making a purchase from an unfamiliar online retailer, take the time to read reviews about the website and the retailer. Reviews from other customers can give you valuable insights into the legitimacy and reliability of the online store. If other shoppers have had positive experiences, it’s a good sign.
- Beware of Pop-Up Windows: Some fake websites use an excessive number of pop-up ads, often unrelated to the products you’re browsing. These pop-ups can be quite annoying and are often a sign of a less trustworthy website. If you encounter too many pop-ups, consider it a warning sign.
- Use Trusted Price Comparison Tools: If you use price comparison tools or apps to find the best deals, ensure that they come from reputable sources. Some fraudulent websites create fake price comparison tools that may lead you to scam websites. Stick to well-known and trusted tools to avoid accidentally falling into a scam.
- Stay Informed About Scams: Stay up to date with common online shopping scams and be aware of new tactics scammers might use. Government agencies and consumer protection websites often provide valuable resources and information to help you recognize and avoid scams. Being informed is your first line of defense.
Moreover, there are additional steps you can take to enhance your protection:
- Keep Software and Antivirus Updated: Regularly update your computer’s operating system, browser, and antivirus software. These updates often include security patches that protect you from known vulnerabilities and malware.
- Use a High-Quality VPN: A Virtual Private Network (VPN) like ExpressVPN can provide an extra layer of security. It encrypts your internet traffic and hides your IP address, making it more challenging for fraudulent websites to track your online activity.
- Use Credit Cards for Payments: When making online purchases, consider using a credit card rather than a debit card. Credit cards offer additional protections, and you can dispute charges if you’re billed for an item you never received or if the product doesn’t match its description. Debit cards may not provide the same level of protection against fraudulent transactions.
By following these simple tips and staying informed about common scams, you can protect yourself from fake websites and enjoy a safe and secure online shopping experience.
What to do if you’re a victim of a fake shopping website

If you think you’ve given your personal information or money to a fake shopping website, you need to act quickly to protect yourself. Here’s what you should do:
- Change Your Passwords: If you’ve entered your account information like passwords on the fake website, change those passwords immediately. It’s like changing the locks on your house after realizing someone had a copy of your keys. Make your new passwords strong and unique. Enable two-factor authentication (2FA) for an extra layer of security.
- Contact Your Bank or Credit Card Company: Call your bank or credit card company’s fraud department right away. Let them know that you believe a scammer has accessed your accounts. Many financial institutions have fraud protection, and they can help you with unauthorized charges.
- Attempt to Reverse Payments: If you made a payment through a legitimate service like PayPal, try reaching out to them for help. PayPal, for example, has a feature called Buyer Protection that can cover you in case of fraud.
- Report Identity Theft to the FTC: If you’re in the United States, file an identity theft report with the Federal Trade Commission (FTC). This report is essential for disputing fraudulent transactions and fixing any damage to your credit in case you become a victim of identity theft.
- Complain to the Platform: If you made a purchase from a fraudulent seller on a big platform like eBay or Amazon, report the issue to the platform. They can investigate the seller and help you get a refund.
- File a Police Report: If you’ve been scammed online, consider filing a report with your local police. This not only helps in catching the fraudsters but might also be required by your bank, credit card company, or insurance provider when you’re trying to get your money back.
- Scan for Malware: If you downloaded anything from the fake website or suspect it was a phishing attempt, use antivirus software to scan your computer and devices for malware. Scammers might have installed malicious software that can harm your devices or steal your information.
How to report a fake Online store?
If you find a fake shopping website, report it immediately. You can report it to Google or Microsoft, and if you’re in the U.S., you can also report it to the FTC or the FBI’s Internet Crime Complaint Center (IC3). Tell them why you think the site is fake and provide lots of details to help with their investigation. Reporting is crucial to stop scammers.
Special Offer
In order to remove Chicose.club hassle free, we suggest you to scan the PC with powerful SpyHunter antimalware scanner. The fully functional free Trial of SpyHunter is Available for 7 days (Windows Version) with Credit Card required. There are no upfront charges within this period. Further, no charge will apply if you cancel 2 business days before the trail ends. For Mac Users, it is suggested to use Combo Cleaner which is a powerful antivirus and System optimizer.
Do make sure to read SpyHunter’s EULA and Privacy Policy. Spyhunter free scanner downloaded just scans and detect present threats from computers and can remove them as well once, however it requires you to wait for next 48 hours. If you intend to remove detected threats instantly, then you will have to buy its licenses version that will activate the software fully.
How to remove unwanted program from Windows 11
To get rid of an unsafe program on your Windows computer, follow these straightforward steps:
- Open your computer's settings by pressing "Windows + I" or right-clicking the "Start" button and choosing "Settings."

- In the settings window, click on "Apps" and then select "Apps & Features."
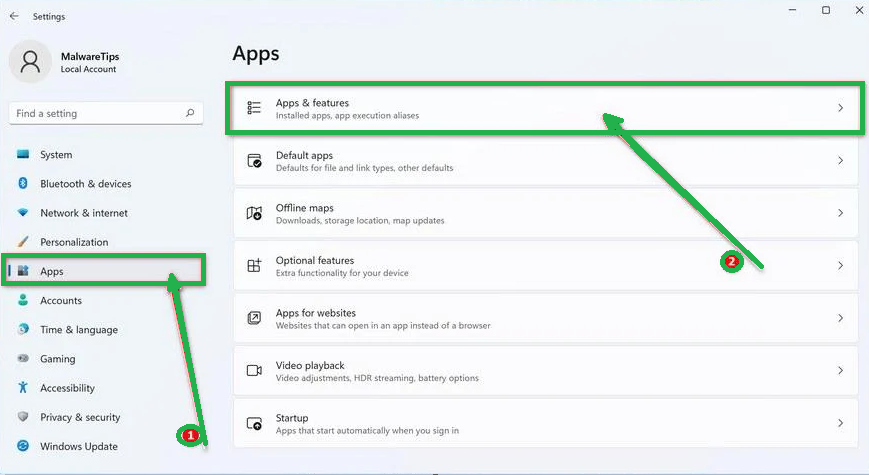
- You'll see a list of installed programs. Scroll through them and look for anything suspicious or unfamiliar. To make it easier, you can sort the list by the installation date. Just click "Sort by" and pick "Install date."
- Keep an eye out for any programs that don't seem right – things you don't remember installing or that don't sound like legitimate software. When you find a suspicious program, click the three dots next to it and choose "Uninstall."

- A message box will pop up. Confirm the uninstall process by clicking "Uninstall" and follow any prompts that come up to complete the removal.
- It's crucial to read all the prompts carefully because some malicious programs might try to sneak in extra things, hoping you won't notice.

- Once you've successfully removed the malicious programs from your computer, you've taken a big step in getting rid of the unwanted program.
How to Remove Unwanted program Virus from Windows 10
To remove an unwanted program from a Windows 10 computer, follow these steps:
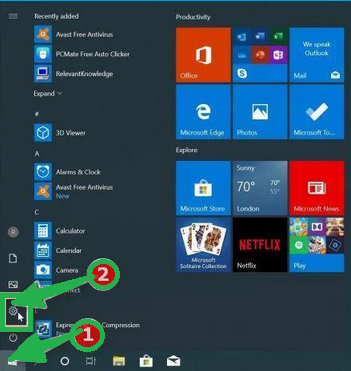
- Open the "Settings" app by press the "Windows key + I" on your keyboard. Alternatively, you can click the "Start" button on the taskbar and then choose "Settings" (the gear icon).
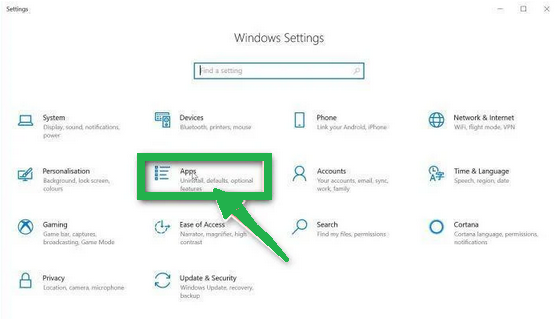
- In the "Windows Settings" window, you'll see various options. Click on "Apps." By default, it should take you to "Apps and Features," but if not, select it from the options on the left.
- In the "Apps & Features" settings, scroll through the list of installed programs. Look for anything that seems unfamiliar or suspicious. To help with this, you can sort the programs by their installation date. To do this, click "Sort by" and pick "Install date."
- Keep an eye out for any program that you don't remember downloading or that doesn't seem like a legitimate piece of software. When you find a suspicious program, click on it and then choose "Uninstall" from the menu that appears.

- A message box will pop up to confirm the uninstallation process. Click "Uninstall" to confirm and follow any additional prompts that come up to complete the removal.
- It's essential to carefully read all the prompts because some malicious programs might try to sneak in additional things during the process, hoping you won't notice.

- Once you've gone through these steps successfully, the malicious program will be removed from your computer.
How to Remove Unwanted program Virus from Windows 7
To remove an unwanted program from Windows 7, follow these steps:
- Click the "Start" button and select "Control Panel."
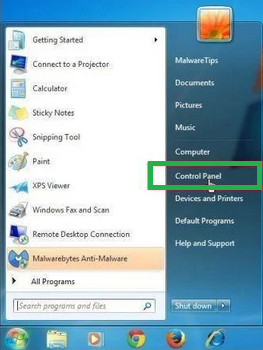
- In the Control Panel, click "Uninstall a Program" under the "Programs" category.

- You'll see a list of all installed programs in the "Programs and Features" screen. Find any suspicious or unfamiliar programs, click to highlight them, and then click "Uninstall."
- Look for anything that doesn't seem legitimate or you don't remember installing.

- Confirm the uninstallation in the message box by clicking "Yes" and follow any prompts to complete the removal. Read carefully, as some malicious programs try to slip in unnoticed.
- Once you've completed these steps, the malicious software will be removed from your computer.
How to Remove Unwanted program from Android/Mobile
To remove an unwanted program virus from your Android phone, follow these simple steps:
Step 1: Start in Safe Mode
First, we'll start your phone in Safe Mode. Safe Mode boots your Android with only the essential apps and settings, preventing malicious apps from interfering.
- Long-press your phone's power button (usually found on the side of your phone) until the power off menu appears.
- When the menu appears, tap and hold the "Power off" button on your screen. You'll see a "Safe mode" option.

- Tap on "Safe mode" to enter it.
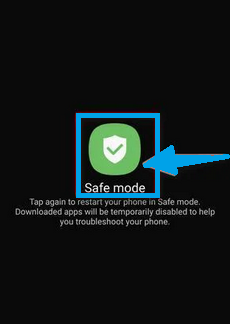
- Your phone will restart in Safe Mode, and you'll see the "Safe Mode" text at the bottom left corner of your device.
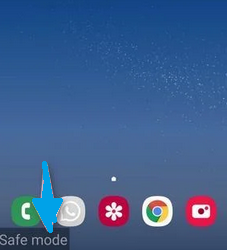
If you can't find Safe Mode on your phone, you can activate Airplane mode instead to cut off network connections.
Step 2: Check for Malicious Apps with Administrator Privileges
In this step, we'll check if there are any malicious apps with administrator privileges on your phone. These privileges are sometimes used for legitimate purposes but can also be exploited by malicious apps to prevent their removal.
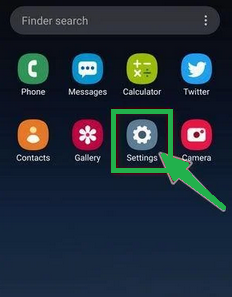
- Tap the "Settings" app on your phone's menu or home screen.
- In the "Settings" menu, look for "Biometrics and Security" (or similar) and then navigate to "Other Security Settings" and "Device admin apps." The location of this option may vary depending on your Android version or phone brand.
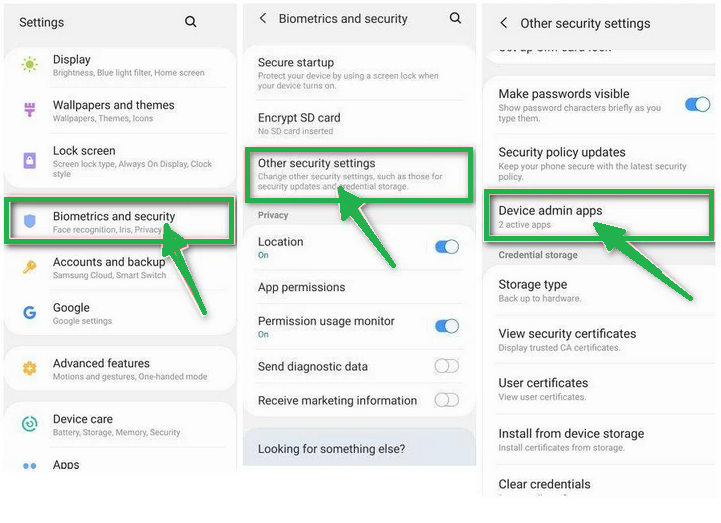
If you can't find "Device admin apps" easily, you can use your phone's search function to look for it.
- Once you're in the list of device admin apps, disable admin rights by tapping the option next to the app. This will remove the checkmark or turn off the toggle button. Some phones also let you tap the app in the admin apps list and then use the "Uninstall" link to remove it immediately.

Step 3: Check for Malicious Apps
While your phone is still in Safe Mode, we'll check for malicious apps.
- Tap the "Settings" app.

- In the "Settings" menu, tap on "Apps" or "App Manager" to view all installed applications on your phone.
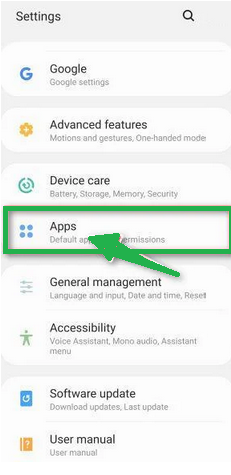
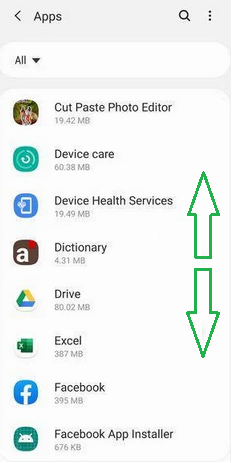
- You'll see a list of all installed apps. Scroll through the list and look for any suspicious apps that you don't remember downloading or that don't seem genuine. Malware is often hidden in apps like photo editors, weather apps, or camera apps.
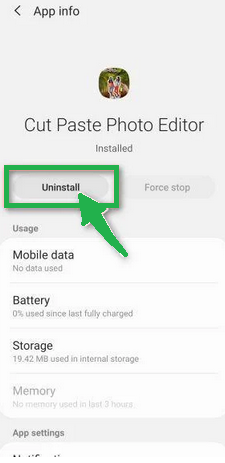
- When you find a suspicious app, tap on it to uninstall. This won't open the app but will take you to the app details screen. If the app is currently running, tap "Force stop," then tap "Uninstall."
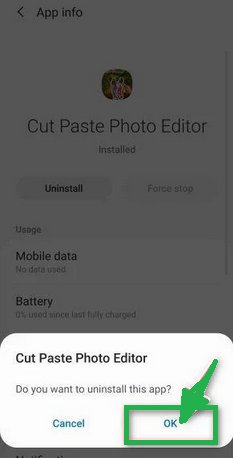
- A confirmation dialog will appear. Tap "OK" to remove the malicious app from your phone.
Step 4: Exit Safe Mode
Now that you've removed the malicious app from your phone, you can exit Safe Mode.
- Hold down the power button until you see the power off menu.
- Select the restart option. Your phone will reboot and exit Safe Mode, returning to normal operation.
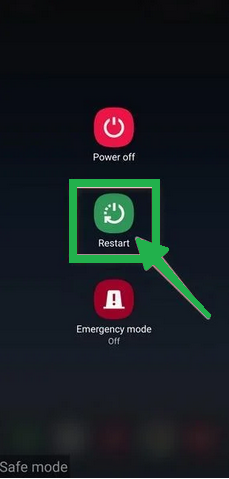
By following these steps, you can effectively remove a Unwanted program virus from your Android phone and restore its security.
How to Reset Browsers
How To Reset Chrome to Default Settings
Reset Chrome for Windows
Here's a step-by-step guide to reset Google Chrome on Windows:
- Launch Google Chrome on your computer.
- Look for the three vertical dots in the top right corner of the Chrome window. Click on them to open a menu. Then, select "Settings" from this menu.
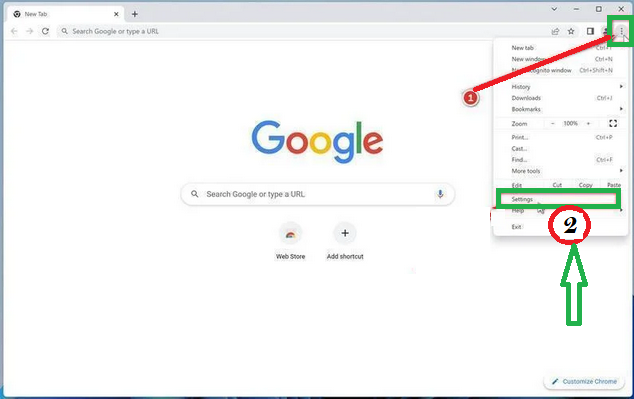
- In the Settings tab that appears, you'll see a sidebar on the left. Click on "Advanced" to get more options.
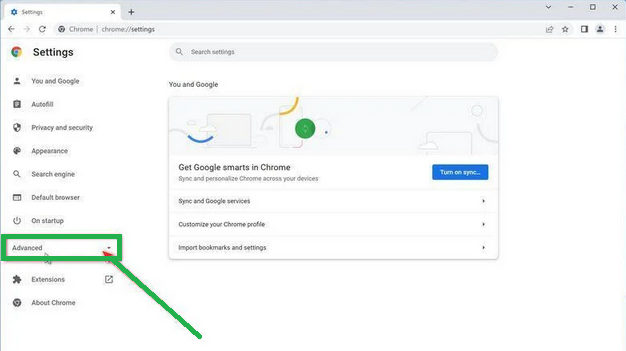
- Under the "Advanced" section in the sidebar, you'll find "Reset and clean up." Click on it.

- Now, in the main part of the window, you'll see the "Reset and clean up" section. Click on "Reset settings to their original defaults."
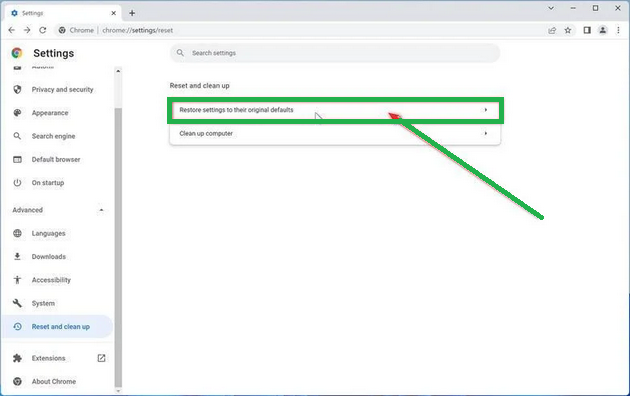
- A window will pop up to confirm the reset. It will explain what will go back to the default settings. If you're okay with that, click on "Reset settings."
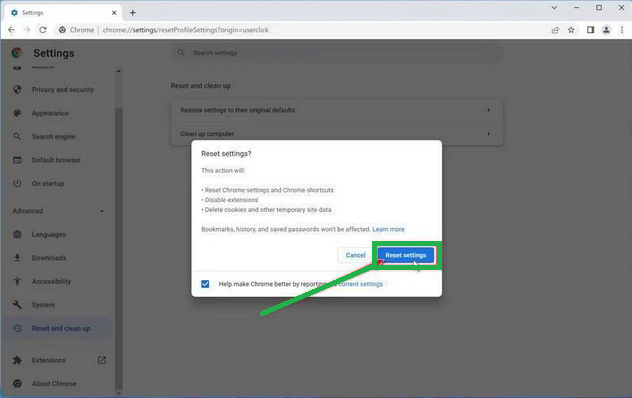
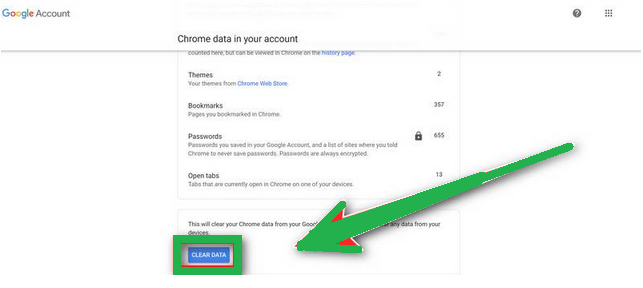
- If you find that a troublesome extension keeps coming back even after the reset, you can reset the data sync. To do this, go to chrome.google.com/sync and click on "Clear Data."

Reset Chrome for Mac
If you're using Google Chrome on a Mac and want to reset it back to its default settings, follow these steps:
- Click on the three dots in the top-right corner of Chrome (the menu button).
- Select "Settings" from the menu that appears. This will open the basic settings screen.

- In the left sidebar, click on "Reset and clean up."

- Now, click on "Reset settings to their original defaults."
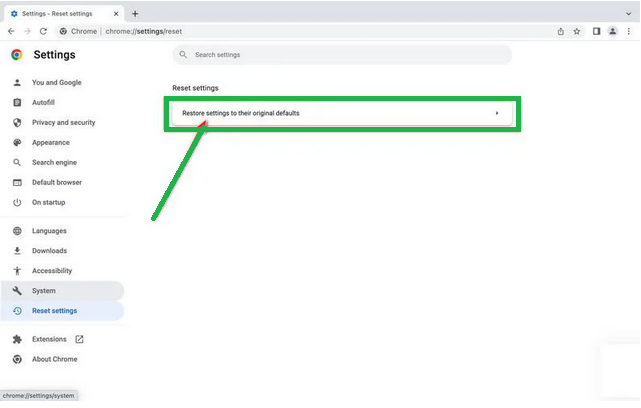
- A confirmation box will pop up, telling you what will be set back to the default settings. To complete the process, click on "Reset Settings."

Keep in mind that doing this will erase your homepage, tab settings, saved information, browsing history, and cookies. It will also disable any extensions you've installed. However, your bookmarks will be safe.
- If you're still having trouble with a malicious extension coming back even after resetting your browser, you can reset your data sync. To do this, go to chrome.google.com/sync and click on the "Clear Data" button.
Reset Chrome for Android
Resetting Chrome to its default settings on Android isn't as straightforward as on computers, but it's doable by clearing the app data. This means getting rid of saved cookies, cache, and site settings. Here's how to do it:
- Open the "Settings" app on your Android device. You can usually find it on your home screen or in your phone's app menu.

- In the "Settings" menu, look for "Apps" or "App Manager." This will show you a list of all the apps installed on your phone.

- Scroll through the list until you find the "Chrome" app, and then tap on it to view the app's details.

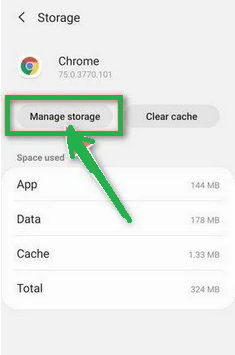
- Inside Chrome's app info menu, tap on "Storage."
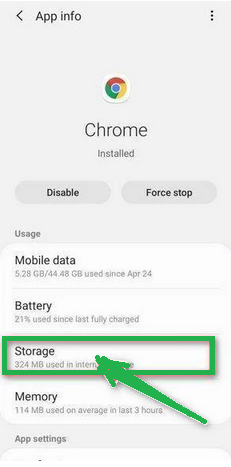
- Under the storage settings, you'll see two options – "Manage Space" and "Clear Cache." Click on "Manage Space."
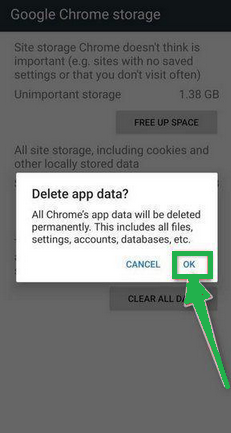
- Now, click on "Clear all Data." This will delete everything related to Chrome, including your accounts, bookmarks, and settings, essentially resetting it to its default state.

- A confirmation message will pop up, explaining what will be reset. To finish the reset process, tap "OK."
How to Reset Internet Explorer
Resetting Internet Explorer is an easy process and only takes a few minutes. Here's how you can do it:
- Open Internet Explorer, which is your web browser.
- Look for a little gear icon in the top-right corner of the browser and click on it.

- Then, select "Internet Options."

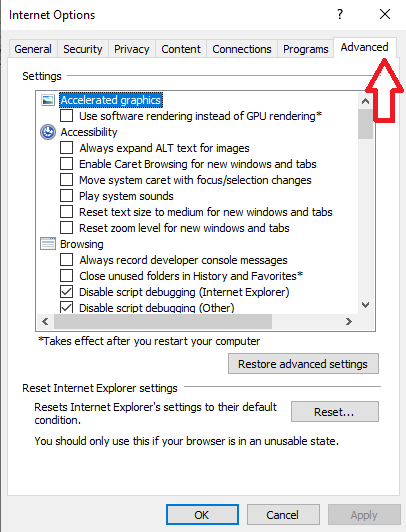
- In the "Internet Options" box, click on the "Advanced" tab.
- You'll see a "Reset" button. Click on that.
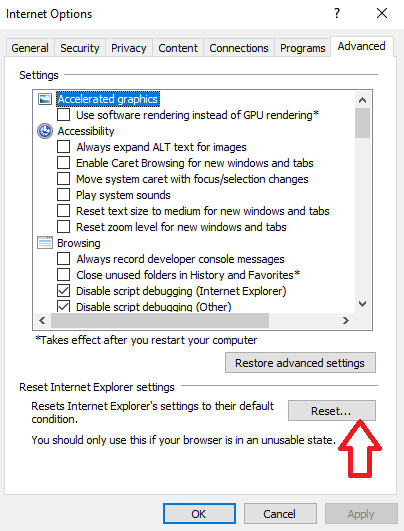
- Now, in the "Reset Internet Explorer settings" section, there's a box that says "Delete personal settings." Check this box, and then click "Reset."

- When Internet Explorer finishes the reset, a message will pop up. Click "Close" to close it. After that, close your browser, and you can open Internet Explorer again.

How To Reset Mozilla Firefox
Reset Firefox for Windows
- Click on the three horizontal lines in the top right corner of Firefox to open the menu. Choose "Help" from the menu.

-
- In the "Help" menu, tap on "More troubleshooting information."

- On the "Troubleshooting Information" page, find the "Refresh Firefox" button and click it.

- Confirm the reset by clicking "Refresh Firefox" again in the new window that pops up.

- Firefox will close and go back to its default settings. It will show you what information it saved. Click "Finish" when it's done.
After the reset, you'll see a folder called "Old Firefox Data" on your desktop. It holds your old settings. If the reset didn't solve your problem, you can copy some of the files from this folder to the new profile that was created. But if you're sure you won't need this folder anymore, it's a good idea to delete it since it might contain sensitive information.
Reset Firefox for Mac
Resetting Firefox on a Mac is easy. Here's what you do:
- Click on the three horizontal lines in the top right corner of Firefox to open the menu. Select "Help" from the menu.

- Then, choose "Troubleshooting Information."

- On the Troubleshooting page, you'll see a "Refresh Firefox" button in the upper-right corner. Click on it.

- Confirm the reset by clicking "Refresh Firefox" again in the new window.

- Firefox will close and go back to its default settings. It will show you what information it saved. Click "Finish" when it's done.
That's it! Resetting Firefox on your Mac is a quick way to make it work better while keeping your important data safe.
Reset Firefox for Android
Resetting Firefox to its default settings on Android is a bit different but still doable. It involves clearing the app's data, which includes cookies, cache, and saved site settings. Here's how you can do it:
- Open your phone's "Settings" app, which you can find in your menu or on the home screen.

- In the "Settings" menu, look for "Apps" or "App Manager." This will show you all the apps installed on your phone.

- Scroll through the list of apps until you find "Firefox." Click on it to open the app's details.

- In Firefox's app menu, click on "Storage."

- In the storage settings, you'll see two options: "Manage Space" and "Clear Cache." Click on "Manage Space."

- Now, click on "Clear all data." This will delete all of Firefox's data, including your accounts, bookmarks, and settings, effectively resetting it to its default state.

- You'll see a confirmation message that explains what will be reset. To complete the reset, tap "Ok."
How To Reset Edge to Default Settings
To reset Microsoft Edge on your computer, follow these simple steps:
- Click on the three horizontal dots in the top-right corner of Microsoft Edge to open the menu. From the menu, select "Settings."

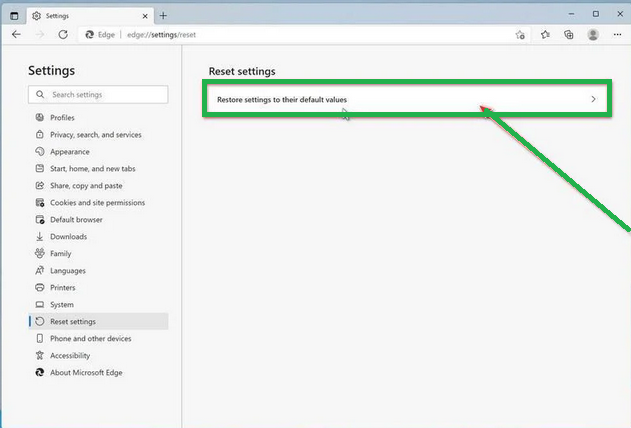
- Tap "Reset Settings" on the left side of the window.

- Now, click on "Restore settings to their default values" in the main window.
- A confirmation message will appear, explaining what will be reset. To proceed, click "Reset."
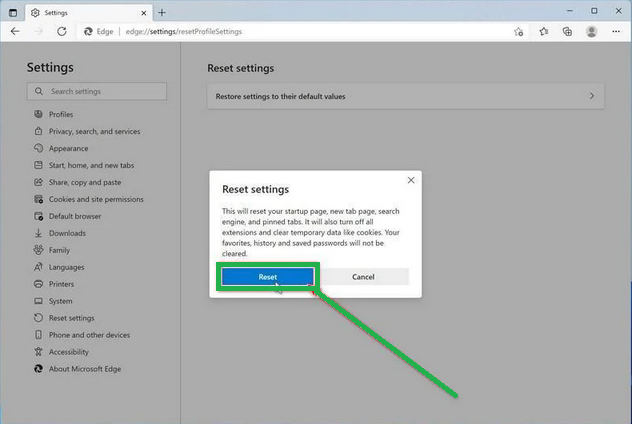
- Microsoft Edge will erase your personal data, browsing history, and disable any installed extensions. But don't worry, your bookmarks will remain safe and accessible.
How To Reset Safari
Before resetting Safari to its default settings, if you have bookmarks you want to keep, open Safari, go to the "File" menu, and choose "Export Bookmarks." Give your backup a name and save it.
To reset Safari on a Mac, you can use the Settings menu or Terminal. If you're using Safari on an iPhone or iPad, tap the iOS tab to reset the settings. This way, you won't lose your important bookmarks when you reset Safari. It's like making a copy of your bookmarks before cleaning up your browser.
Reset Safari for Mac via Settings
Here's how to reset Safari:
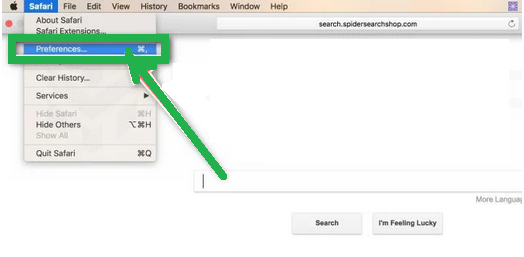
- Click "Safari" in the menu, then choose "Preferences." This opens a new window with your Safari settings.
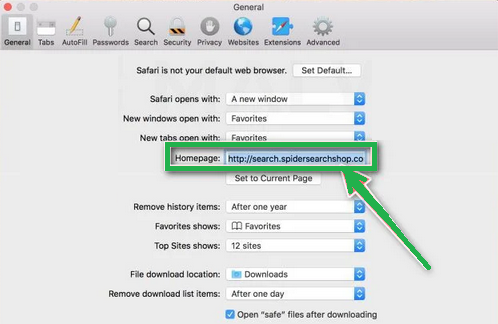
- Check your homepage in the "General" tab. If it's not what you want, change it.
- Next, click on the "Extensions" tab.

- Look for any extensions you don't remember installing or seem suspicious. It's usually safe to remove them.

- In "Preferences," go to "Websites" and then "Notifications." Turn off the option that allows websites to ask for push notifications.

- In the Safari menu, choose "Preferences" again, then go to "Privacy." Tap on "Manage Website Data".

- Choose "Remove All" to clear website data.

- To show the "Develop" menu, go to the "Advanced" tab in "Preferences" and enable "Show Develop menu in menu bar."

- Click on "Develop" in the menu bar, and then select "Empty Caches" to clear out temporary files.

Reset Safari for Mac via Terminal
To reset Safari on your Mac, follow these steps:
- Open the "Terminal" app (you can search for it using Spotlight with "Cmd + Space").
- Go to the Apple menu at the top-left and choose "Force Quit." Select "Safari" to close it completely.
- Enter the commands one by one in Terminal. It will ask for confirmation to delete files. Type "y" and press "Enter" after each command.
mv ~/Library/Safari ~/Desktop/Safari-`date +%Y%m%d%H%M%S`;
rm -Rf ~/Library/Cache/*;
rm -Rf ~/Library/Caches/Apple\ -\ Safari\ -\ Safari\ Extensions\ Gallery;
rm -Rf ~/Library/Caches/Metadata/Safari;
rm -Rf ~/Library/Caches/com.apple.Safari;
rm -Rf ~/Library/Caches/com.apple.WebKit.PluginProcess;
rm -Rf ~/Library/Cookies/*;
rm -Rf ~/Library/Cookies/Cookies.binarycookies;
rm -Rf ~/Library/Preferences/Apple\ -\ Safari\ -\ Safari\ Extensions\ Gallery;
rm -Rf ~/Library/Preferences/com.apple.Safari.LSSharedFileList.plist;
rm -Rf ~/Library/Preferences/com.apple.Safari.RSS.plist;
rm -Rf ~/Library/Preferences/com.apple.Safari.plist;
rm -Rf ~/Library/Preferences/com.apple.WebFoundation.plist;
rm -Rf ~/Library/Preferences/com.apple.WebKit.PluginHost.plist;
rm -Rf ~/Library/Preferences/com.apple.WebKit.PluginProcess.plist;
rm -Rf ~/Library/PubSub/Database;
rm -Rf ~/Library/Safari/*;
rm -Rf ~/Library/Safari/Bookmarks.plist;
rm -Rf ~/Library/Saved\ Application\ State/com.apple.Safari.savedState;
Reset Safari for iOS (iPhone or iPad)
To reset Safari on your iPhone or iPad, follow these steps:
- Open the "Settings" app.
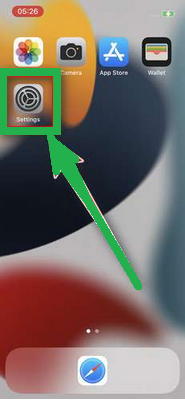
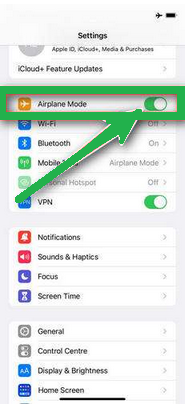
- Turn on "Airplane Mode" to disconnect from the internet temporarily and block unwanted access.
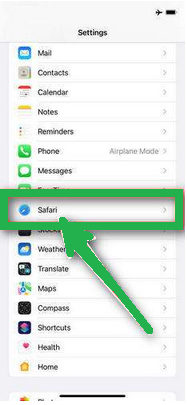
- Scroll down and click on "Safari."
- Now, choose "Clear History and Website Data."

- Confirm by tapping "Clear History and Data" in the pop-up window.
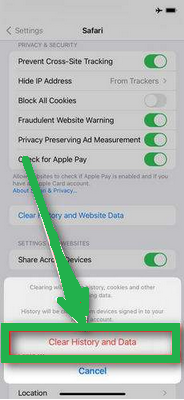
- While in Safari settings, make sure to turn on "Block Pop-ups" and "Fraudulent Website Warning."
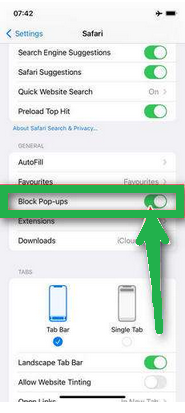
These steps clear your browsing history, website data, and other information stored by websites you visited. Also, by enabling "Block Pop-ups" and "Fraudulent Website Warning," you can enhance your browsing experience and protect yourself from unwanted ads and potentially harmful websites.
Recommended Security Software (SpyHunter)
SpyHunter acts like a guardian for your computer, shielding it from nasty stuff like malware and spyware. Using smart scanning, it hunts down and kicks out harmful programs sneaking around your system. It’s not just a detective; it also stops new threats from barging in. Anyone, whether tech-savvy or not, can easily use it because of its simple design. Plus, it keeps learning and gets regular updates to stay ahead of the bad guys. If you want a solid defender for your PC against digital troublemakers, SpyHunter is a reliable choice, always ready to keep your computer safe.
Step 1: Download SpyHunter 5 for your device through the provided link. Obtain it by clicking below.
Step 2: Proceed to the location where the installer is saved in your system. Typically, the file is stored in the “Downloads” directory. Execute the setup process by double-clicking on the installer file.
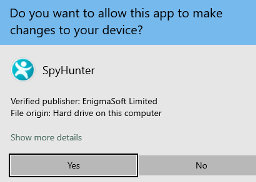
Step 3: Choose your desired language and press the “OK” button. This action triggers the installer initialization. When prompted, click the “Continue” button to proceed with the installation process.

Step 4: During installation, you’ll encounter a prompt to approve the ‘EULA and Privacy Policy.’ Opt for ‘I accept the EULA and Privacy Policy’ and then select the ‘Accept & Install’ button. This step is necessary to proceed with the installation process of the application.

Step 5: Initiate the installation process, and observe the progression through the visible progress bar. The process may require some time for completion. Once finished, a notification confirming successful installation will be displayed.

Step 6: Upon installation completion, SpyHunter will automatically launch. The following screen will be displayed for your attention.

Step 7: Additionally, the scanner will initiate a comprehensive scan of your computer to identify potential threats within your device. Throughout the scan, it will present you with information such as the detected threat’s name, security level, and specific details about the threat. Relax and wait for the scan process to conclude.

Step 8: Upon completion of the scan, press the “Next” button to continue the process.

Step 9: To finalize the removal process, the application will prompt you to purchase its licensed version. Alternatively, you have the option to opt for a 7-day free trial, during which the software will be fully operational, allowing you to eliminate all identified threats.

Special Offer
In order to remove Chicose.club hassle free, we suggest you to scan the PC with powerful SpyHunter antimalware scanner. The fully functional free Trial of SpyHunter is Available for 7 days (Windows Version) with Credit Card required. There are no upfront charges within this period. Further, no charge will apply if you cancel 2 business days before the trail ends. For Mac Users, it is suggested to use Combo Cleaner which is a powerful antivirus and System optimizer.
Do make sure to read SpyHunter’s EULA and Privacy Policy. Spyhunter free scanner downloaded just scans and detect present threats from computers and can remove them as well once, however it requires you to wait for next 48 hours. If you intend to remove detected threats instantly, then you will have to buy its licenses version that will activate the software fully.

