How to Remove Adware from Computer

Impact of Adware in Real World
Adware, short for advertising-supported software, wields a substantial impact in the real world, significantly influencing individuals and businesses alike. This software category, designed to display advertisements on a user’s device, introduces several far-reaching consequences.
Privacy Invasion is one of the most evident impacts of adware. It tracks users’ online activities, collecting data that encompasses browsing habits, personal information, and other online behavior. This invasion of privacy extends into user profiles, potentially leading to the targeted delivery of ads. However, the overreach into personal data raises valid concerns about data security and the potential misuse of this information.
In addition to privacy concerns, Adware can dramatically affect System Performance. It often operates in the background, consuming a substantial portion of a device’s resources. This resource consumption contributes to slower system performance, manifesting as slow load times, system freezes, and a generally frustrating user experience.
The connection between adware and Malware is also a substantial concern. Adware can act as a gateway for more sinister forms of malware. Users may inadvertently click on malicious ads or install fake software updates, inadvertently downloading malicious software. This chain of events can result in severe security breaches, data loss, and financial fraud.
Moreover, Adware plagues users with a barrage of Unwanted Advertisements. These ads not only disrupt the user’s online experience but can also lead to accidental clicks, possibly causing subscription sign-ups, purchases, or additional service fees, all of which impact the user financially.
Dangers Caused by Adware

Adware infections pose numerous risks, with potentially severe consequences. These dangers encompass privacy breaches, security threats, performance issues, financial repercussions, and so on. Now, let’s take a look at some dangers related to adware in details:
- Risk to Privacy: Adware can be like a nosy neighbor for your computer. It sneaks in with innocent-looking free software and starts watching everything you do online. It tracks the websites you visit, the things you search for, and sometimes even your personal information. The danger here is that it collects all this data without your permission. That’s a breach of your privacy. Your online activities, like the websites you visit or what you shop for, become known to someone else. Even worse, this data might even get into the wrong hands, potentially leading to identity theft or scams.
- Data Theft: As we said, Adware watches what you do online, like the websites you visit and things you search for. This info is valuable to advertisers, so they can show you ads you’re more likely to click on. But here’s the problem: this info can be sensitive, like your personal interests or what you shop for. Bad people can get their hands on this data and use it for harmful things. For instance, they might pretend to be a brand you like, tricking you into giving them personal details or money. This is called phishing.
- Redirects Users to Malicious Webpages: Adware is like a tricky guide on the internet. It doesn’t play fair and sometimes redirects you to harmful or malicious websites. These malicious webpages are created by people with bad intentions. They can contain viruses, scams, or other harmful things that can harm your computer or steal your personal information. It’s like falling into a trap when you thought you were on a safe path. Adware’s redirects are like unwanted detours, and they can put your online security at risk.
- Degrades the System Performance and Stability: As soon as adware comes into your system, instead of having a good time, it starts causing trouble. It makes your device slow. This is because it uses a lot of your computer’s resources, like memory and processing power, to show you ads. Think of it like having too many apps open on your phone – it gets sluggish. Adware does the same to your computer, making it less stable. It can cause your programs to crash or even freeze your device, like a game of freeze tag.
How does Adware Infiltrate?

There are so many ways through which adware can get into the PC systems, some of them are:
Unsafe downloads: Adware spreads through unsafe downloads primarily by being bundled with seemingly legitimate software or files. Users who download from untrustworthy sources may inadvertently accept adware by rushing through installations without noticing hidden checkboxes or fine print that allow adware to install. Free software and shareware often carry adware, as users excited about a free program may unknowingly accept bundled adware. Additionally, unsafe websites, especially those offering cracked or pirated software, are common sources of adware.
Software Bundling: Adware spreads through a practice known as software bundling, where it’s packaged with legitimate software downloads. Unsuspecting users may inadvertently install adware when they download and install other software. Often, during the installation process, users may overlook or not notice checkboxes or fine print that grant permission for adware installation. This bundled adware can display unwanted ads, slow down system performance, and compromise privacy.
Fake Software Updates and Deceptive Ads: Adware can spread through other deceptive means as well, including fake software updates and misleading ads. Users may encounter pop-up messages or banners urging them to update software, which, when clicked, lead to adware downloads instead of legitimate updates. Deceptive ads on websites or malicious links can also trick users into downloading adware when they believe they’re accessing useful content.
Unintentional Invitations: Adware spreads through unintentional invitations when users unknowingly accept or install it while downloading or installing other software, often due to overlooked checkboxes or misleading prompts.
- Ignoring Prompts during Installation: The advertising tool sneaks into the PC as users install software by ignoring prompts and checkboxes, inadvertently permitting adware installation. These overlooked options lead to unwanted adware on their devices.
- Interacting with Random Suspicious Links: The ad-supported app spreads when users interact with suspicious links, often encountered on untrustworthy websites or in misleading ads. Clicking on these links can lead to unintended adware installations.
- Disabling the Security Software: Adware can get into the systems when users disable their security software, leaving their devices vulnerable to adware infiltration through malicious downloads or deceptive websites that may go undetected without protection.
How to Remove Adware from Computer without Antivirus (Manually Method)

Adware can act like a clingy extension on your web browser, causing unwanted ads. To get rid of it, you should remove this pesky plugin. But sometimes, it can be stubborn and make changes to your browser settings, making it tough to remove.
This issue can affect popular browsers like Google Chrome, Mozilla Firefox, and Microsoft Edge. The good news is, removing adware is pretty much the same for each of them. You usually need to uninstall the suspicious add-on or extension and reset your browser to its default settings.
So, if you ever find yourself bothered by adware on any of these browsers, don’t worry; you can get rid of it by removing the unwanted extension and resetting your browser settings.
Removing adware from Chrome
Chrome is a popular web browser with add-ons and extensions. While Chrome’s own store has safe extensions, some websites try to sneak in third-party ones that can fill your browser with annoying ads, including adult content.
You might not even notice it, but this adware could be running quietly or causing chaos on your screen. To check if you have a rogue extension, go to your Chrome settings, find the extensions list, and review them. If you see any unfamiliar ones, it’s best to remove them. Think of it like cleaning your room – get rid of stuff you don’t recognize to keep your browser clean and ad-free.
Here’s how to find and remove unwanted extensions from your Google Chrome browser:
- Open Chrome and click on the three vertical dots.

- In the menu, go to More Tools > Extensions.

- You’ll see a list of extensions. If any seem suspicious or unfamiliar, they might be adware in disguise.
- To get rid of a particular extension, click on the Remove button.

- That’s all! You’re done. This is how you can spot and remove adware from your Chrome browser. It’s like cleaning out your closet – if you find something you don’t recognize, just toss it out to keep your browser clutter-free.
Removing Adware from Firefox
To get rid of malicious code in your browser, like annoying ads, the first step is to uninstall bad extensions or plugins. This usually works, but for really stubborn stuff, a full browser reset might be needed. However, keep in mind that resetting erases your personalized data. So, try the uninstall method first. If that doesn’t work, then go for the reset. It’s like cleaning your room: you start by getting rid of the clutter, but if it’s really messy, you might need to do a deep clean that involves resetting everything.
Here’s how to manually remove adware from Firefox:
- Go to the “Firefox” menu and choose “Add-ons.”
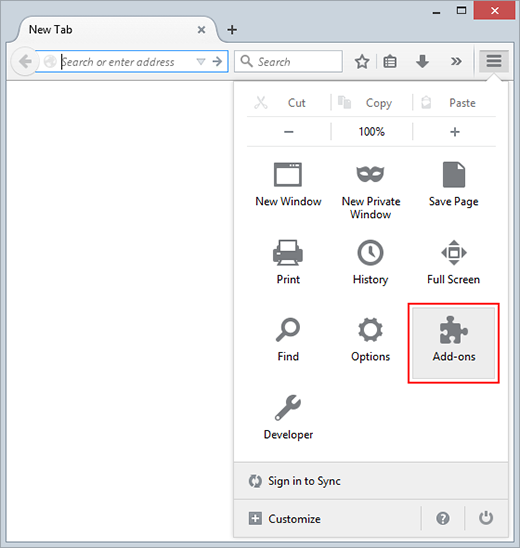
- In the Add-ons screen, click on “Extensions” and remove any suspicious ones by clicking “Remove.”

- Go back to the “Firefox” menu, choose “Options.”

- In the General tab, click “Restore to Default” in the Home Page section.

- Go to the “Search” tab or click the magnifying glass in the search bar and pick “Change Search Settings.”
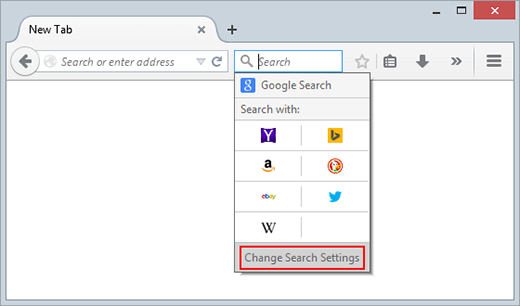
- In the “Default Search Engine” section, pick your preferred search engine and save the changes.

- Restart Firefox and browse to see if the problem is gone.
Removing Adware from Microsoft Edge
Removing adware from Microsoft Edge is essential to prevent disruptive and potentially harmful ads, safeguard your browsing privacy, and ensure a smoother and more secure web experience. To manually remove adware from Microsoft Edge, follow these steps:
- Open Microsoft Edge.
- Click on the three horizontal dots (menu icon) in the upper-right corner.

- Go to “Extensions” in the menu.
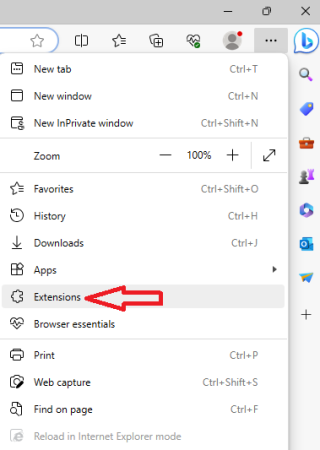
- Look for any suspicious or unwanted extensions and click “Remove” next to each of them.
This process should help you remove adware and restore your browser’s normal functionality.
Clearing Browser Cookies and Caches

Clearing browser cookies and caches is a common maintenance task that helps improve browsing performance and privacy. Cookies are small files that websites store on your computer to remember your preferences and login information. While they can be useful, they can also accumulate and slow down your browser or potentially be used to track your online activity. Caches, on the other hand, store temporary data from websites, enabling faster loading times upon revisiting. However, over time, the cache can become cluttered and affect browser performance.
Clearing cookies and caches is like tidying up your browser’s storage space, making it run more efficiently and enhancing your online privacy by removing potentially sensitive data. Most browsers provide options to clear cookies and caches, and this process usually involves accessing browser settings and choosing the appropriate options. It’s a good practice to perform this task periodically to keep your browser running smoothly.
To clear your browser’s cache and cookies quickly, follow these simple steps:
- For Chrome, Edge, Internet Explorer, or Firefox, press Ctrl + Shift + Delete at the same time.
- This keyboard shortcut opens a window to clear cache and cookies.
- Remember, after doing this, close and reopen your browser. It’s like giving your browser a fresh start, making it run smoother and protecting your privacy.
Resetting Browser to its Default Settings

Resetting a browser to its default settings is necessary when it’s infected with adware, slowed down, or behaving abnormally. Adware and unwanted extensions can alter browser settings and compromise security, making it crucial to reset to remove these unwanted changes. Additionally, over time, browser settings can accumulate errors or conflicts, leading to issues like slow performance, crashes, or display errors. A reset essentially takes your browser back to its fresh, clean state, eliminating any problematic configurations or unwanted software. This helps restore stability, security, and optimal performance, ensuring a safer and more efficient browsing experience. So, to reset different browsers, follow the below steps:
Google Chrome
To reset Google Chrome, you can follow various methods, but the most effective one is outlined below for your convenience:
Method 1. Utilize the “Reset Settings” option to restore Chrome to its default state
To do this, follow these steps:
- Open Chrome and click the three vertical dots in the top-right corner.
- Select “Settings.”

- Find “Reset Settings” and click it.

- A table will pop up, click “Reset settings” to confirm.

- Close and reopen Chrome.
This process will clear any changes or problems caused by unwanted extensions or settings. It’s like giving Chrome a fresh start, making it work smoothly again.
Method 2. Easily reach the Chrome reset page for a quick reset
In Method 1, we showed you how to reset Chrome in six steps. But there’s a faster way. Just copy and paste “chrome://settings/resetProfileSettings” into your browser’s address bar, then press Enter. This will take you straight to the Chrome reset page, and you can start the reset right away. It’s a shortcut to get things done quickly.

Method 3. Reset Chrome using the Flags panel for quick resetting
You can also reset Chrome by going into the “Flags” control panel, which is a bit like the method we talked about in step 2. Instead of using a quick link, type “Chrome://flags” into the address bar and press enter. A new window will pop up, and there, you can choose “Reset all.”
However, keep in mind that this method is a bit experimental. It might work to fix some problems caused by unwanted changes, but it might not work for everything. So, use it cautiously and understand that there’s a little risk involved when using this method.

Method 4. Reset Google Chrome: Delete Default User profile for a fresh start
To reset Google Chrome, follow these steps:
- Click “Start” and type “run” in the search bar, then press Enter to open the “Run” window.

- In the “Run” window, type “%appdata%” and click “OK.” This will take you to the “Roaming” folder.

- Inside the “Roaming” folder, go up one level to the “AppData” folder.

- Navigate to “Local” -> “Google” -> “Chrome” -> “User Data.” The full path is usually something like C:\Users\YourUsername\AppData\Local\Google\Chrome\User Data, with “YourUsername” being your computer’s username.

- Inside the “User Data” folder, you’ll see a folder called “Default.” Before doing anything, make a backup of this folder.
- Right-click on the “Default” folder and exit Chrome if it’s running.

- Finally, delete the “Default” folder. This action will remove your Chrome user data, including bookmarks, history, cookies, and cache, resetting Chrome to its default settings.

Method 5. Reinstall Google Chrome browser
If other fixes haven’t worked and your Chrome is still causing problems, the last resort is to reinstall it. Before you do that, make sure to completely remove all parts of the current Chrome.
To remove Google Chrome from Windows 10:
- Close all Chrome windows and tabs.
- Click the “Settings” icon in the Start menu (it looks like a gear wheel).

- Go to “Apps.”

- Find Google Chrome in the list.
- Select it.
- Click “Uninstall.”

- Confirm by clicking “Uninstall.”
- If you want to remove your browsing data, check “Also delete your browsing data.”

- Finally, click “Uninstall.” This will remove Chrome from your computer and, if you chose, delete your browsing data as well.
To uninstall Google Chrome on Windows 8 and Vista:
- Close all Chrome windows.
- Go to the “Control Panel.”

- Choose “Uninstall a program” or “Programs and Features.”
- Find Google Chrome.
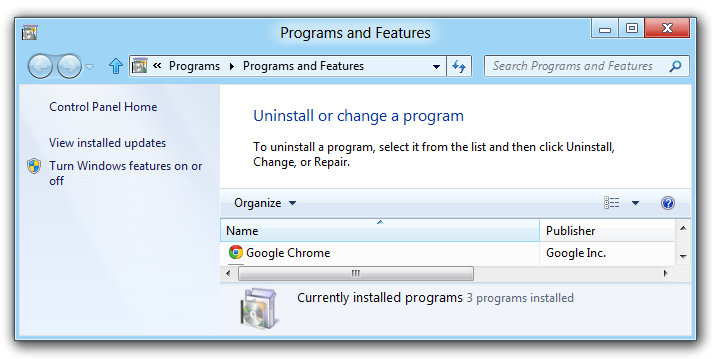
- Check the box that says “Also delete your browsing data.”
- Click “Uninstall.” This will remove Chrome and, if you want, delete your browsing data.
Once you’ve removed Chrome, visit the official Google Chrome website to download and install it again. Be careful and only download it from the official site. Avoid unknown third-party websites because they might offer harmful versions bundled with bad stuff that can harm your computer. Stick to the official source to keep your PC safe.
Mozilla Firefox
Resetting Mozilla Firefox clears added extensions, themes, and certain settings, but it leaves your bookmarks, browsing history, and cookies untouched. This process removes website permissions, extra search engines, download data, and various customizations. However, it doesn’t touch your open tabs, personal dictionary, or auto-fill info. It’s like giving your browser a fresh start while keeping your important stuff safe.
For resetting Mozilla Firefox, you can use different methods, but here’re some effective ones for your ease:
Method 1. Reset Firefox via Troubleshooting Information
To reset Firefox:
- Open Firefox and click the three-bar button.

- Now select “Help”

- Select “Troubleshooting Information.”
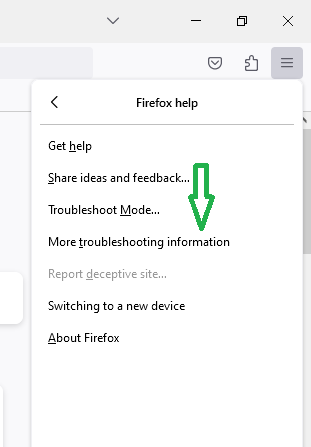
- Click “Refresh Firefox” and confirm.

- When the “Import Wizard” appears, click “Finish.” This will reset Firefox to its default settings, resolving issues.

Method 2. Easily reach Mozilla’s reset page
To quickly reset Mozilla Firefox:
- Open Firefox and type “about:support” in the address bar, then press Enter.

- On the right, find “Give Firefox a tune-up” and click “Refresh Firefox.”

- Confirm by clicking “Refresh Firefox” in the pop-up.

- Firefox will close and restart. An “Import Wizard” will show items added after the reset. Just click “Finish.”
Method 3. Reset Firefox without launching it
To reset Firefox without opening it normally:
- Open Firefox in “Safe Mode” by holding the Shift key while trying to launch it. If that doesn’t work, use your computer’s search to find the “Mozilla Firefox (Safe Mode)” shortcut.

- If you have multiple user profiles, you’ll be asked to choose one. Hold Shift while selecting the profile. If you have only one profile, you’ll see a message about Firefox Safe Mode.

- Click “Refresh Firefox” in Safe Mode to start the reset process.

Method 4. Reset Firefox via Profile Manager
To reset Firefox using the Profile Manager:
- Press Windows key + R to open the Run prompt.
- Type “firefox.exe -p” or “firefox.exe -P” and press OK.

- In the Firefox Profile Manager, select “default” and click “Delete Profile.”

- Confirm by clicking “Delete Files.”

- Finally, click “Exit.” This process resets Firefox by removing the profile, which includes your settings and data.

When you reopen Firefox, the Import Wizard appears. It asks where you want to import settings, bookmarks, passwords, history, and more from, helping you set up your browser again.
Method 5. Reinstall Mozilla Firefox browser
If your Firefox browser still has issues after trying these fixes, you can reinstall it. This means you remove it and then download it again. Here’s how:
- Close Firefox: Click the three horizontal lines in the upper-right corner of Firefox (the menu button) and select “Exit” to close the browser.

- Uninstall Firefox: Right-click on the “Start” menu (or go to “Control Panel” on Windows 7/Vista, or “Add/Remove Programs” on Windows XP). Look for “Mozilla Firefox” in the list of installed programs and click “Uninstall.”

- Use Uninstall Wizard: If the Uninstall Wizard doesn’t start, locate the “helper.exe” file in one of these folders: C:\Program Files\Mozilla Firefox\uninstall\helper.exe or C:\Program Files (x86)\Mozilla Firefox\uninstall\helper.exe. Double-click it, and when the “User Account Control” window appears, click “Yes” to continue. Follow the prompts in the Uninstall Wizard, click “Next,” “Uninstall,” and finally, “Finish.”

- Delete Firefox Folder: After uninstalling Firefox, you’ll need to delete the Firefox installation folder. Look for it in one of these locations: C:\Program Files\Mozilla Firefox or C:\Program Files (x86)\Mozilla Firefox.

- Remove User Data (Optional): If you want to remove your bookmarks, history, and other user data, press the Windows key + R on your keyboard, type “%APPDATA%\Mozilla\” and hit “OK.” In the “Mozilla” folder, you’ll see a folder named “Firefox” – delete it.
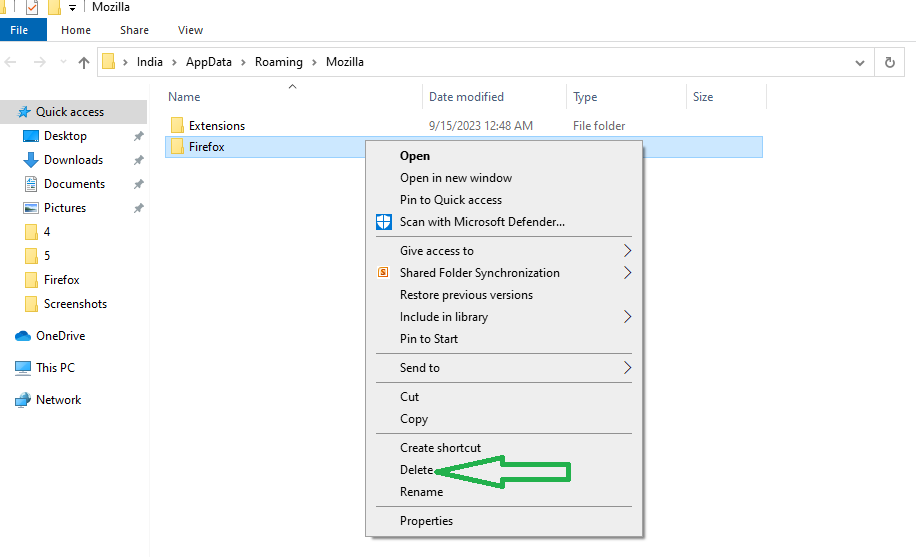
- Reinstall Firefox: Once you’ve uninstalled Firefox and removed user data (if desired), you can reinstall it. To ensure you get the safe and official version, use another browser to visit Mozilla’s official download page. Download the Firefox installer to your PC.
Microsoft Edge
There are multiple methods to reset Microsoft Edge. We offer four solutions, and the choice depends on the severity of the issue. For minor problems, quicker fixes may work. However, if you’re dealing with a potentially unwanted program, it’s best to perform a complete reset. Let’s continue with the step-by-step instructions.
Method 1. Clear Edge data to reset the browser
To reset Microsoft Edge by clearing browser data, follow these steps:
- Open Microsoft Edge and click on the three-dot icon in the upper-right corner (that’s the menu button). Then, scroll down and click on “Settings.”

- Look for or search in the search box “Clear Browsing Data” option and click on “Choose what to clear.”
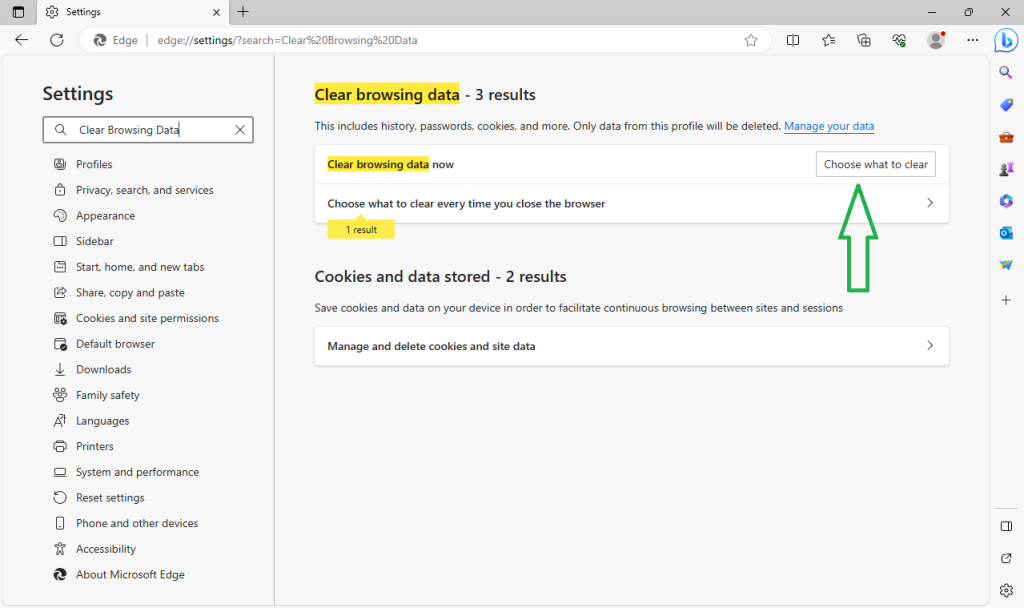
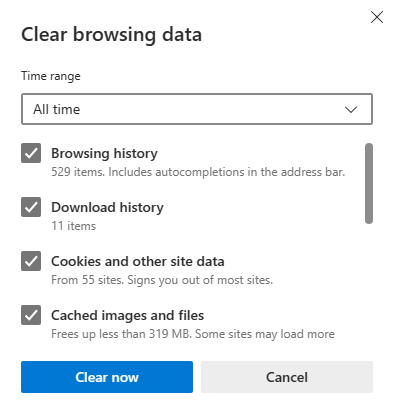
- A new window will pop up, showing different types of data. Usually, the first three or four options are automatically selected, but it’s a good idea to check all. Then, click the “Clear Now” button.
If your Microsoft Edge is not responding and you can’t start the reset because the browser won’t close, here’s what you can do:
- Click the “Start” button and open “Task Manager.”

- In the list of processes, find “Microsoft Edge.” Right-click on each entry and choose “Go to details.”

- In the details tab, find the Microsoft Edge entries again, right-click on them, and select “End Task.”

This will help you force-close Microsoft Edge so you can proceed with the reset. Remember, clearing your browser data can help fix issues and make your browser work smoothly again.
Method 2. Utilize PowerShell to perform a Microsoft Edge reset
If Microsoft Edge is giving you trouble, like running slow, not loading websites, or showing error messages, you can try this method to fix it:
- Create a new administrator account on your computer. You can do this by opening “File Explorer” and typing in the following: C:\Users\%username%\AppData\Local\Packages\Microsoft.MicrosoftEdge_8wekyb3d8bbwe

- Select the existing folders, right-click on them, and choose “Delete.”

- Go back to your regular account and open “PowerShell.” You can do this by pressing the Windows button or clicking the Start icon, then typing “powershell.” Right-click on it and select “Run as administrator.”
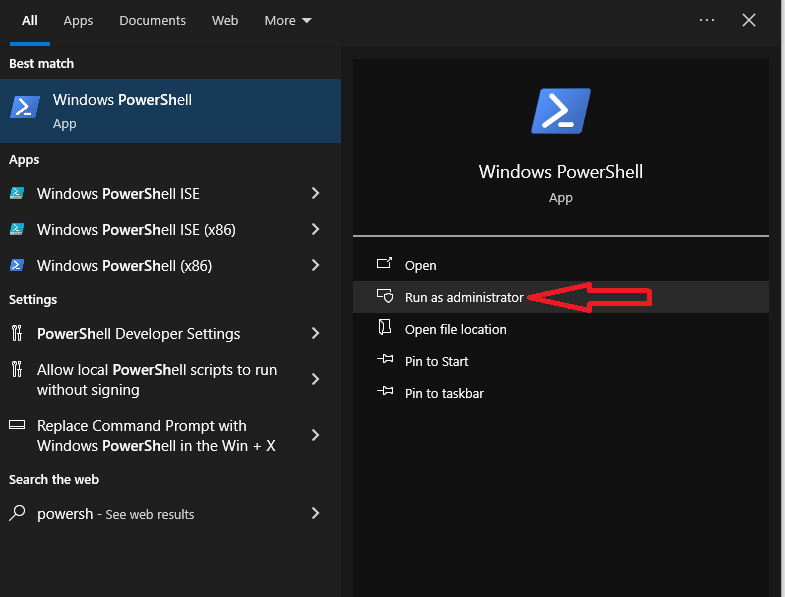
- In the PowerShell window, paste this command: Get-AppXPackage -AllUsers -Name Microsoft.MicrosoftEdge | Foreach {Add-AppxPackage -DisableDevelopmentMode -Register “$($_.InstallLocation)\AppXManifest.xml” -Verbose}

- Press “Enter” and let the command run. It will reset Microsoft Edge. You’ll see the command running.
- Once it’s done, Edge will be fully reset and should work better.
- Finally, enter this command: Get-AppXPackage -AllUsers -Name Microsoft.MicrosoftEdge | Foreach {Add-AppxPackage -DisableDevelopmentMode -Register “$($_.InstallLocation)\AppXManifest.xml”}
- This will reinstall Microsoft Edge on your computer.
Method 3. Remove Microsoft Edge registry entries to eliminate user settings and preferences
If you have a problem with Microsoft Edge due to a browser hijacker or adware, you can fix it by deleting certain settings in the Windows Registry. Here’s how:
- Open the Registry Editor by pressing the Windows key and the “R” key at the same time. In the dialog box that appears, type “regedit” and press Enter.

- In the Registry Editor, go to this location: HKEY_CURRENT_USER\SOFTWARE\Classes\Local Settings\Software\Microsoft\Windows\CurrentVersion\AppContainer\Storage\microsoft.microsoftedge_8wekyb3d8bbwe\MicrosoftEdge
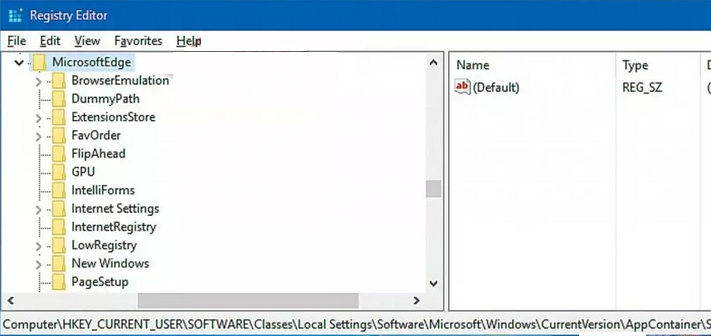
- Delete the content inside this location.
- Close the Registry Editor.
- You might see a prompt asking you to restart your device. If you do, go ahead and restart it.
Method 4. Use System File Checker to check for viruses and ensure your system is free from them
If Microsoft Edge is still not working well and you suspect something worse might be going on, you can use Command Prompt to check for hidden problems. Here’s how:
- Click the “Start” button, type “Command Prompt,” and choose “Run as administrator.”
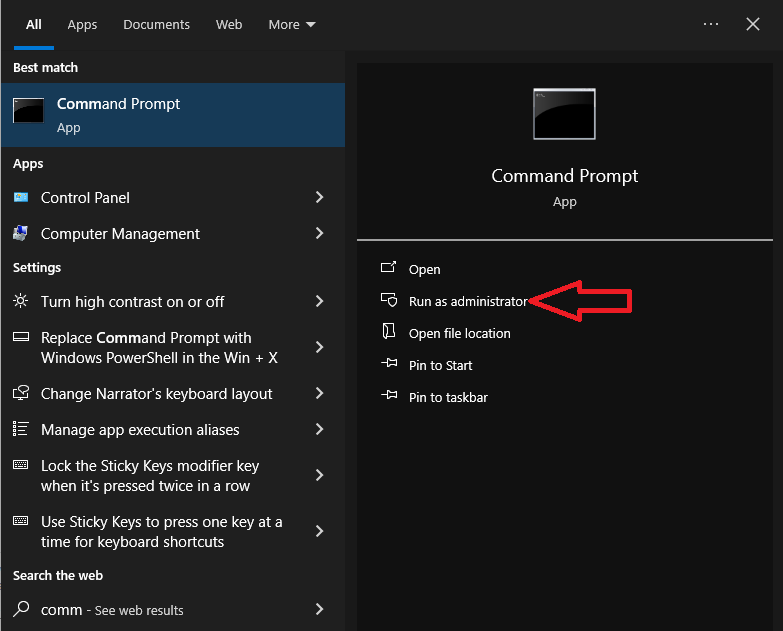
- In the Command Prompt window, type “sfc /scannow” and press Enter.

- The process will take a bit of time.

- Wait for it to finish, and it might help fix any more serious issues with Microsoft Edge.
Method 5. Reinstall Microsoft Edge
If the previous methods didn’t work, you can completely reset Microsoft Edge by uninstalling it from your computer and then downloading it again from the official website. It’s a quick process that might solve persistent problems.
Internet Explorer
There are more secure and better browsers for today’s internet. But, if you want to stick with IE and just need to fix it, you can reset it. This means taking it back to its original settings. Here are five ways to do it:
Method 1. Use “System File Checker” to reset Internet Explorer settings safely
Here’s how to reset Internet Explorer using the “System File Checker” option:
- If you have Windows 10, you can open Command Prompt (Admin) in two ways: by pressing Win+X and selecting it from the menu, or by typing “cmd” in the search bar, right-clicking Command Prompt, and choosing “Run as Administrator.”
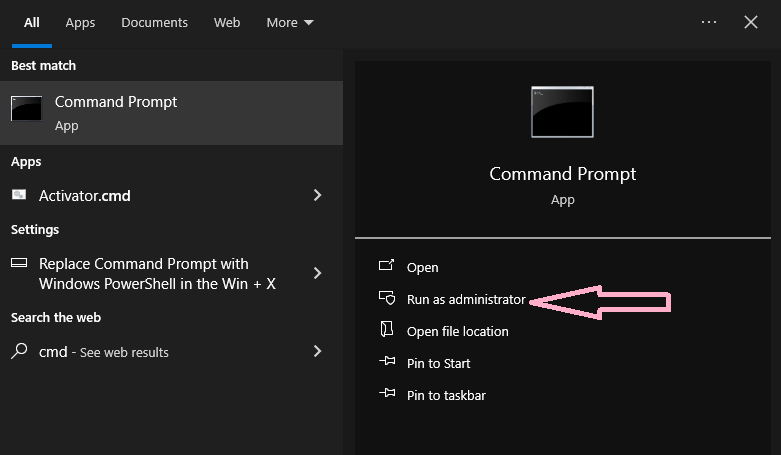
- For Windows 8/8.1, go to Apps screen -> Windows System -> Command Prompt. For Windows 7, Vista, or XP, click Start -> All Programs -> Accessories -> Command Prompt.
- When a window asks for permission (User Account Control), click “Yes” to let it make changes.
- In the command line, type “SFC /SCANNOW” and press Enter.
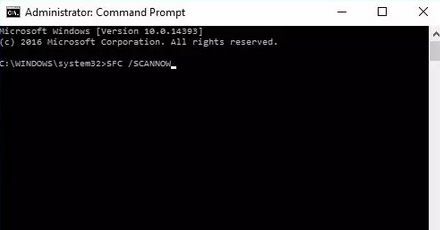
- Wait for the process to finish. It will check for and fix any issues, including problems with Internet Explorer.
This helps ensure Internet Explorer works better by correcting any errors it might have.
Method 2. Use “Reset Settings” option to restore Internet Explorer to default
To reset Internet Explorer, follow these steps:
- Open Internet Explorer and pick “Tools” menu in the top right corner. If you don’t see the “Tools” menu, press “Alt.”

- Click on “Tools” and select “Internet Options.”
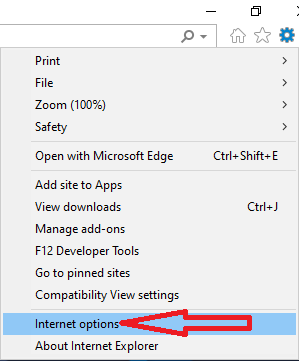
- Go to the “Advanced” tab.
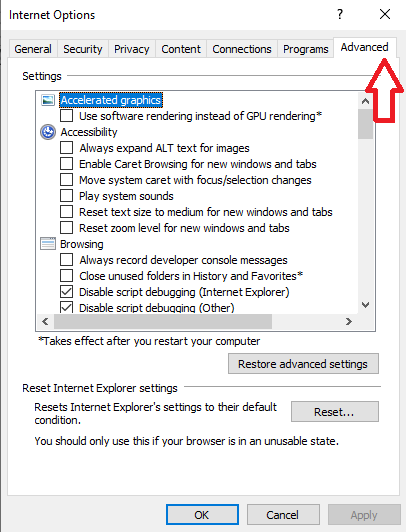
- In the “Advanced” tab, click on “Reset.” If you have an older version of IE like Internet Explorer 6, click “Restore Default.”

- Check the box that says “Delete personal settings” in the Reset Internet Explorer Settings box. Then, click “Reset.”

Note that this will remove your browsing history, search providers, home pages, and more.
- After Internet Explorer finishes applying the default settings, click “Close,” and then choose “OK.”

- Restart Internet Explorer, and it should be reset to its default settings.
Method 3. Reset IE via “inetcpl.cpl” command for a fresh browser start
To reset Internet Explorer:
- Close IE.
- Click Start, then Run.

- Type “inetcpl.cpl” and press OK.

- In Internet Properties, go to the Advanced Tab and click Reset.
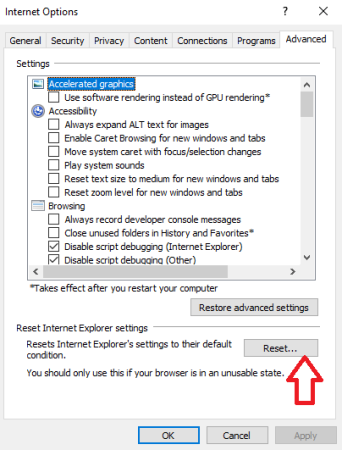
- Check “Delete Personal Settings” and click Reset.

- Wait for IE to finish and click Close.

This process refreshes IE, clearing settings and personal data.
Method 4. Reset IE by deleting user profiles
Resetting Internet Explorer using the registry is a bit tricky, so be careful and back up your registry first. Here’s how:
- Open the “Registry Editor” by typing “Run” in the search bar and clicking on it.

- Type “regedit” and press Enter.

- When asked by User Account Control, click “Yes” to allow changes.
- In the Registry Editor, find and delete a key called “[HKEY_CURRENT_USER\\Software\\Microsoft\\Internet Explorer].” Confirm by clicking “Yes” to delete it and everything under it.

- Next, delete anything related to IE under “Application Data” or “Local Settings.”

This process clears out IE’s settings, but be cautious because mistakes here can cause problems. Backup your registry before you start in case you need to undo any changes.
Method 5. Reinstall Internet Explorer
If none of the previous methods worked to fix Internet Explorer (IE), you can try reinstalling it. Here’s how:
Uninstalling IE:
- Go to the Control Panel and look for “Uninstall a Program” (or “Add/Remove Programs” in older versions of Windows) under the Programs section.
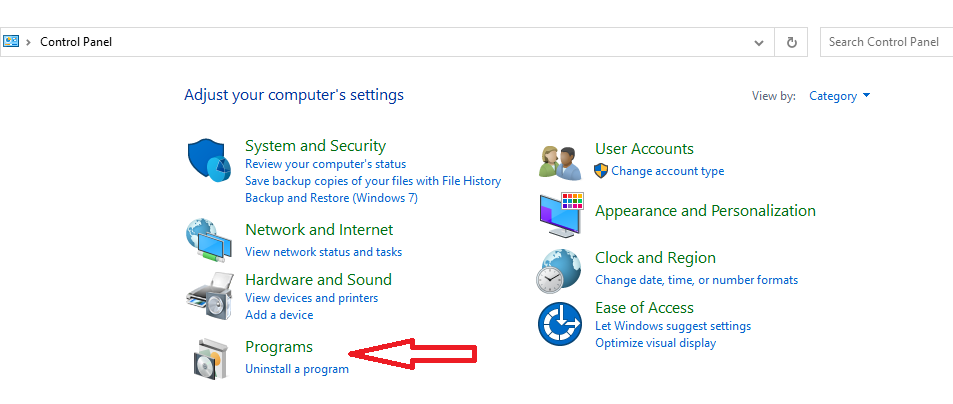
- Click on “Turn Windows features on or off.”

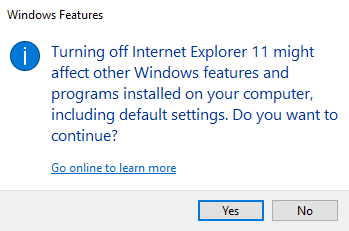
- Find “Internet Explorer” in the Windows Features window, uncheck it.

- Confirm by clicking “Yes” and then “OK.” This may require a computer restart.
Reinstalling IE:
Now, you have two options to reinstall IE:
Option 1:
- Go to the Control Panel, then “Uninstall a Program” (or “Add/Remove Programs”).

- Click “Turn Windows features on or off.”

- Check “Internet Explorer” in the list, click OK, and wait for changes to apply. Restart your PC if asked.

Option 2:
Use another web browser already installed on your computer and visit the official Internet Explorer website to download and install it.
This process ensures you have a fresh installation of IE on your computer. If IE was causing problems before, this might help. But remember, you can also consider using other more modern and secure web browsers like Chrome, Firefox, or Edge as alternatives to Internet Explorer.
Safari
Before resetting Safari, make a backup of important data. Then, follow the steps in this guide to reset Safari and clear unwanted changes while keeping your vital information safe.
Method 1. Erase browsing history in Safari browser
Resetting Safari by clearing its history is easy. Just follow these steps:
- Open Safari.
- Click on the “Safari” menu at the top.
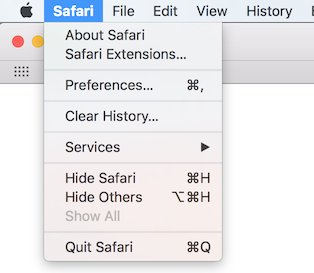
- In the menu, select “Clear History…”
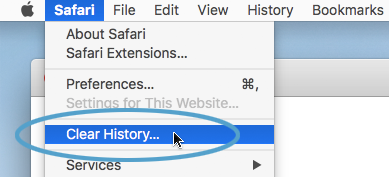
- You can pick how far back you want to erase your browsing history, like the last hour or all of it.
- Click “Clear History.”

This will remove the websites you’ve visited and any saved data. It’s a quick way to clean up your browsing history in Safari.
Method 2: Clear out web caches in Safari browser
To fully reset Safari, you might need to clear its web caches, especially if the first method didn’t fix your browser problems. This can be a bit trickier to find because it’s in the “Develop” menu.
Here’s how to do it:
- Open Safari.
- Click on the “Safari” menu and pick “Preferences…”

- In the window that opens, go to the “Advanced” tab.
- Check the box that says “Show Develop in the menu bar.”

- You’ll see a new “Develop” option in the top toolbar.
- Click on “Develop” and choose “Empty Caches.”
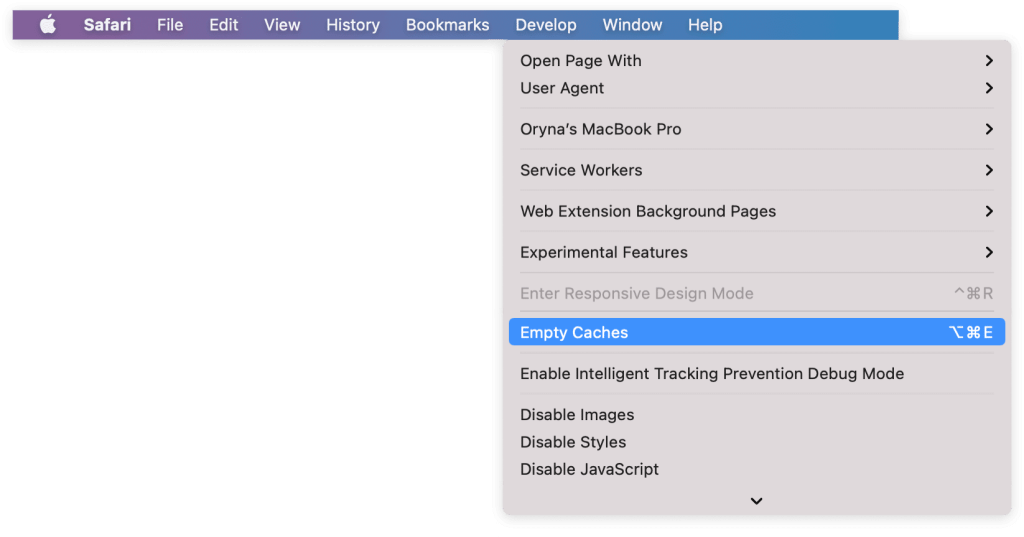
If you want a faster way, you can press “Option + Command + E” at the same time.
This helps clear out stored data that might be causing issues in Safari.
Method 3: Remove harmful or suspicious extensions from Safari
Sometimes, when you add new stuff to your web browser like extensions or plugins, it can make your browser act strangely. This can happen because some extensions, which are supposed to make your browsing better, might be created by shady developers who want to do bad things like collecting your information or sending you to unsafe websites.
If the previous methods we talked about didn’t fix your browser issues, you should check if there are any bad extensions causing the problems. Here’s how you can do it:
- Open Safari.
- Click on the “Safari” menu and choose “Preferences…”

- In the window that pops up, click on the “Extensions” tab.

- Look at the list of extensions carefully. If you see any that you didn’t add or look suspicious, remove or disable them. You can even turn off all extensions to see if that’s what’s causing the trouble.

- After dealing with extensions, go to the “Security” tab and uncheck the box that says “Allow Plug-ins.” You can also customize which websites can use plugins by selecting “Plug-in Settings…”
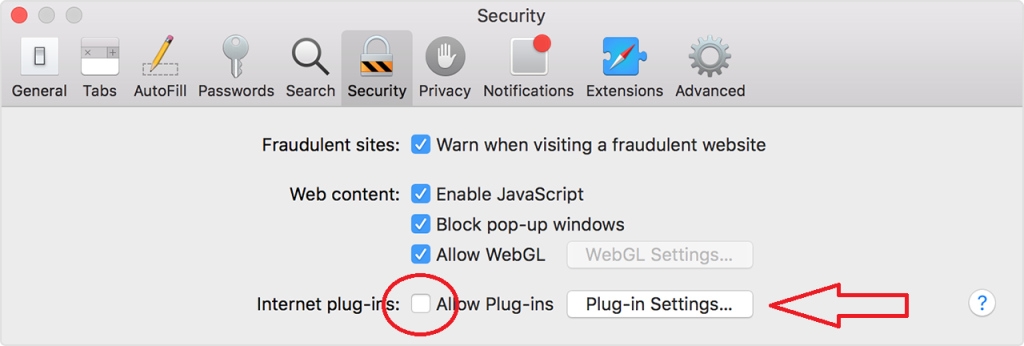
- Finally, restart Safari after doing all these steps.
This should help you get rid of any bad stuff that’s causing problems in your browser and make it work better.
Method 4. Manually restore Safari to defaults
Sometimes, the usual methods for resetting Safari might not completely fix the problems you’re facing. In such cases, you can try a deeper reset by moving some important folders and deleting certain files. Here’s how to do it:
- Close all open programs.
- Click on the “Go” menu in the top toolbar.
- While holding down the “Option” key, you’ll see a new option called “Library” – click on it.

- In the Library window, find the “Safari” folder and move it to your desktop or somewhere safe.
Next, go back to the Library folder and delete specific files from these folders:
- In the “Saved Application State” folder, look for a folder named “com.apple.Safari.savedState” and delete it.
- In the “Caches” folder, find all folders that start with “com.apple.Safari” and delete them.
- In the “Cookies” folder, find a file called “com.apple.Safari.SafeBrowsing.binarycookies” and send it to the trash.
- In the “Preferences” folder, delete any files that have “com.apple.Safari” in their names.
By combining these manual steps with the built-in features we talked about earlier, you should be able to fix issues with your Safari browser and enjoy smooth browsing once again. This deeper reset helps you get rid of any stubborn problems that the regular reset might not solve.
How to Prevent Adware Attacks

Adware can slow down your computer and fill your screen with annoying ads. But don’t worry; there are several ways to protect your devices from adware.
- Stick to Trusted App Stores: When downloading apps, use official stores like the App Store (for Apple devices) and Google Play Store (for Android). These stores scan apps for malware, so it’s safer. Avoid downloading apps from sketchy sources, as they might contain adware.
- Be Wary of Phishing: Watch out for phishing attempts. Emails, links, or websites may look real, but they can be traps. To check if a link is safe, use a tool like Google’s Transparency Report.
- Avoid Pop-Up Ads: Pop-up ads can be adware carriers, so don’t click on them. Closing them without clicking is safer.
- Use Antivirus Software: Antivirus software is like a shield against adware. It detects and blocks malware, including adware, before it can harm your device. Think of it as putting adware in a timeout zone.
- Keep Your Device Updated: Update your software and apps regularly. Updates often include security fixes that protect your device from adware and other threats.
By following these steps, you can keep adware at bay, ensuring a smoother and safer experience on your devices. It’s like having a strong lock on your front door to keep unwanted guests out.
Advanced Methods for Adware Removal

Advanced adware removal methods include using specialized anti-malware tools, analyzing system logs, and employing behavior-based detection techniques to identify and eliminate persistent and deeply embedded adware infections.
- Use Professional Anti-Malware Tool – Utilizing a professional anti-malware tool is paramount for the effective removal of adware from your system. These dedicated software solutions are designed to scan, detect, and eliminate adware, ensuring your computer remains free from intrusive and potentially harmful advertisements. With their real-time protection and comprehensive databases of known adware threats, professional anti-malware tools provide a proactive defense against adware infections. By running regular scans and leveraging the latest threat intelligence, they safeguard your privacy, system performance, and data integrity. In a few simple clicks, you can rid your device of adware, creating a more secure and pleasant browsing experience.
- Inspect the System Files Manually – Manually inspecting system files involves a hands-on examination of critical operating system components and files. This process allows for the identification of potential issues, corruption, unwanted program or malicious files that may compromise system stability and security. By carefully examining these files, users can pinpoint irregularities or anomalies, helping to diagnose and resolve system problems. However, this method is time-consuming, requires technical expertise, and carries some risks, such as accidental deletion of essential files. It’s often reserved for advanced users and IT professionals when more automated methods, like antivirus software, fail to address system issues effectively.
- Check System Restore Points – System Restore Points serve as snapshots of a computer’s configuration at specific moments in time. By checking these points, users can revert their system to a previous state if issues arise. This process involves inspecting available restore points to determine when each was created and selecting one that predates the problem. It’s a useful troubleshooting tool for resolving software-related issues, such as conflicts or installations gone awry. However, it doesn’t protect against data loss and doesn’t address hardware problems. Regularly monitoring and creating restore points is advisable to ensure a reliable recovery option in case of system hiccups.
- Get Help from Online Forums and Experts – Seeking assistance from online forums and experts is a valuable strategy for adware removal. Online forums like Reddit or specialized tech support communities provide a platform to describe issues, share experiences, and receive guidance from those who’ve encountered and resolved similar adware problems. Experts in the field can offer tailored solutions, recommend trusted anti-adware tools, and provide step-by-step instructions for removal. Their collective knowledge and expertise empower users to effectively eliminate adware, ensuring a cleaner and safer computing environment. However, users should exercise caution and verify the credibility of sources before implementing any suggestions or downloading recommended software.
- BackUp and Reinstall the OS – Backing up and reinstalling the operating system is a drastic but effective method for adware removal. It involves creating a copy of essential data and then erasing the entire system, including the adware. Once the OS is wiped clean, users reinstall it, ensuring a fresh and adware-free environment. While this approach guarantees a clean slate, it can be time-consuming and may lead to data loss if backups aren’t comprehensive. It’s a last-resort option when other adware removal methods have failed, offering a robust solution for restoring system performance and security. Regular backups are advised to minimize data loss risks.
In conclusion, Adware’s real-world impact is substantial, as it disrupts user experiences, compromises privacy, and slows down systems. It poses dangers by serving intrusive ads, gathering sensitive data, and sometimes leading to malware infections. In the above tutorial, we’ve discussed adware removal that involves using anti-malware software, while prevention includes safe browsing habits, regular system updates, and avoiding suspicious downloads. We’ve also stated about advanced removal methods that encompass manual system scans, professional help, or reinstalling the OS. By understanding the risks, employing effective removal and prevention strategies, and embracing advanced techniques when necessary, users can safeguard their digital environments against the nuisance and potential threats posed by adware.