How to Remove Amaznobxs.com (Simple Steps)
Understanding Browser Hijackers
Browser hijackers like Amaznobxs.com are a common online nuisance today, often causing unexpected ads to appear on your screen when you try to browse the Internet. These programs integrate with your main web browsers, such as Chrome, Firefox, and Edge, resulting in various annoying behaviors.
How Browser Hijackers Work
When your computer is infected with a hijacker like Amaznobxs.com, Syncnetworkprotocol.co.in or Searchfst.com, you might notice your web browser acting strangely. This could include being redirected to unfamiliar websites, having your homepage changed to something you don’t recognize, or being forced to use a different search engine. The primary goal of these hijackers is to generate ads that promote various products and services.
Browser hijackers are designed to influence only your web browsers and not other parts of your computer. They can display numerous online ads in various forms, such as banners and pop-ups, which can appear whenever you attempt to browse the Internet. These ads can become a significant source of irritation.
Browser Hijackers vs. Viruses
It’s important to understand that browser-based infections are not considered viruses. While they are certainly annoying, they don’t pose the same kind of threat as more dangerous types of malware like Trojans or ransomware. Malware such as Trojans can steal your personal information or damage your system, whereas browser hijackers primarily aim to bombard you with ads.
Despite their intrusive nature, browser hijackers don’t cause direct harm to your computer’s system or your personal files. They are more of a persistent inconvenience than a severe security threat. However, this doesn’t mean you should ignore them, as they can still lead to other issues.
Risks Associated with Browser Hijackers
One significant concern with hijackers is their ability to monitor your browsing habits. They analyze your search patterns to display ads that match your interests. This tracking can feel like an invasion of privacy, even though it’s mainly used to tailor advertisements to you.
Another risk is the potential danger of the ads displayed by the hijacker. Not all ads are safe, and some might lead to malicious websites or prompt you to download harmful software. Cybercriminals often use fake web offers, misleading banners, and sketchy pop-ups to spread serious malware like Trojan horses, spyware, rootkits, and ransomware. While the hijacker itself isn’t a severe threat, interacting with the ads it generates can expose your computer to more dangerous infections.
Dealing with Browser Hijackers
Even though browser hijackers like Amaznobxs.com aren’t the most dangerous form of software, they can still be quite troublesome. The aggressive advertising they bring can disrupt your browsing experience, making it difficult to use the Internet comfortably. Moreover, the potential risk of encountering unsafe ads means it’s crucial to be cautious while the hijacker is present on your system.
Avoid clicking on any ads that pop up while the hijacker is installed. These ads could redirect you to unsafe websites or encourage you to download harmful software. The best approach is to remove the hijacker from your browser and computer as soon as possible to restore your browsing experience to normal and reduce the risk of further infections.
In short, browser hijackers like Amaznobxs.com are a common and annoying problem for many Internet users. They cause unwanted ads to appear and can change your browser’s settings without your consent. While they aren’t as harmful as other types of malware, they can still lead to privacy concerns and expose you to more dangerous threats through the ads they generate. It’s important to stay vigilant and remove any hijacker from your system to ensure a safer and more pleasant browsing experience.
| Threat Summary |
| Name: Amaznobxs.com |
| Type: Browser hijacker, adware, PUP |
|
Description: It’s a sneaky program that takes over your web browser, messes with its settings, bombards you with annoying ads, and tries to trick you into clicking on them. Basically, it’s like an unwanted, pushy guest on your internet journey. |
|
Symptoms: Your browser will act weird – settings changed, too many pop-ups, and you might end up on fake or sketchy websites. It’s like your browser’s misbehaving and taking you on a strange trip. |
|
Distribution: Software bundling, free downloads, misleading advertisements, fake error messages, and more. |
| Removal: To find and get rid of this unwanted thing, follow the steps in the guide below. |
Special Offer
In order to remove Amaznobxs.com hassle free, we suggest you to scan the PC with powerful SpyHunter antimalware scanner. The fully functional free Trial of SpyHunter is Available for 7 days (Windows Version) with Credit Card required. There are no upfront charges within this period. Further, no charge will apply if you cancel 2 business days before the trail ends. For Mac Users, it is suggested to use Combo Cleaner which is a powerful antivirus and System optimizer.
Do make sure to read SpyHunter’s EULA and Privacy Policy. Spyhunter free scanner downloaded just scans and detect present threats from computers and can remove them as well once, however it requires you to wait for next 48 hours. If you intend to remove detected threats instantly, then you will have to buy its licenses version that will activate the software fully.
Process to Remove Amaznobxs.com (Detailed Manual Steps)
If bothered by a browser hijacker, no worries! Remove it by deleting the unwanted extension and resetting your browser settings. Access browser settings, find extensions, delete the suspicious one, and reset. This helps eliminate the hijacker and restores your browser to normal.
How to remove unwanted program from Windows 11
To get rid of an unsafe program on your Windows computer, follow these straightforward steps:
- Open your computer's settings by pressing "Windows + I" or right-clicking the "Start" button and choosing "Settings."

- In the settings window, click on "Apps" and then select "Apps & Features."
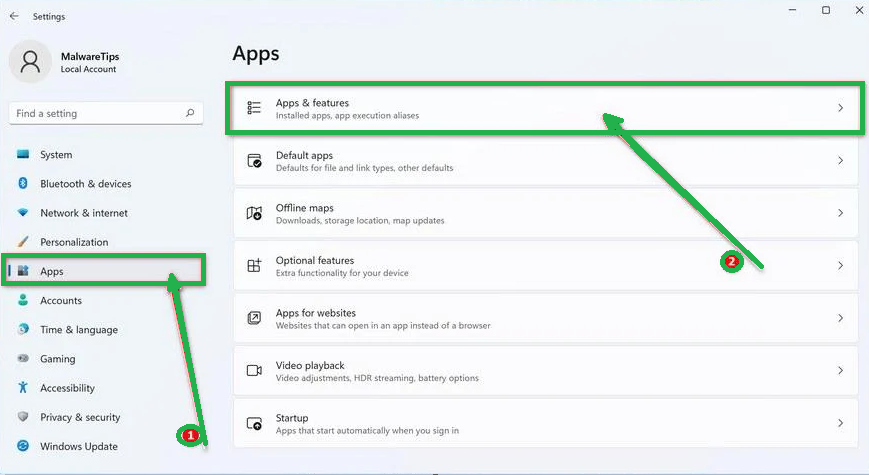
- You'll see a list of installed programs. Scroll through them and look for anything suspicious or unfamiliar. To make it easier, you can sort the list by the installation date. Just click "Sort by" and pick "Install date."
- Keep an eye out for any programs that don't seem right – things you don't remember installing or that don't sound like legitimate software. When you find a suspicious program, click the three dots next to it and choose "Uninstall."

- A message box will pop up. Confirm the uninstall process by clicking "Uninstall" and follow any prompts that come up to complete the removal.
- It's crucial to read all the prompts carefully because some malicious programs might try to sneak in extra things, hoping you won't notice.

- Once you've successfully removed the malicious programs from your computer, you've taken a big step in getting rid of the unwanted program.
How to Remove Unwanted program Virus from Windows 10
To remove an unwanted program from a Windows 10 computer, follow these steps:
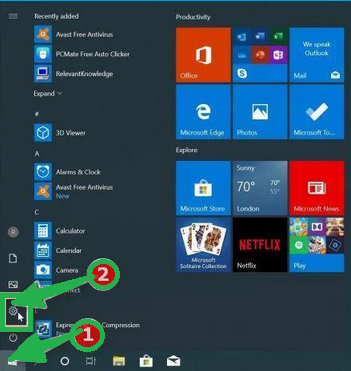
- Open the "Settings" app by press the "Windows key + I" on your keyboard. Alternatively, you can click the "Start" button on the taskbar and then choose "Settings" (the gear icon).
- In the "Windows Settings" window, you'll see various options. Click on "Apps." By default, it should take you to "Apps and Features," but if not, select it from the options on the left.
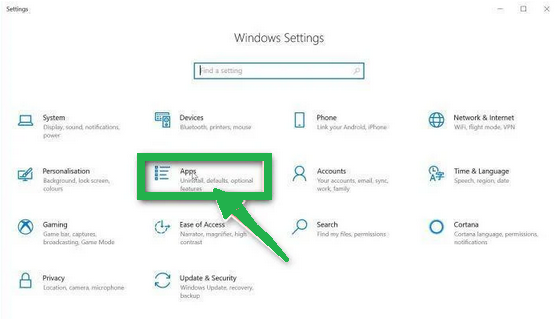
- In the "Apps & Features" settings, scroll through the list of installed programs. Look for anything that seems unfamiliar or suspicious. To help with this, you can sort the programs by their installation date. To do this, click "Sort by" and pick "Install date."
- Keep an eye out for any program that you don't remember downloading or that doesn't seem like a legitimate piece of software. When you find a suspicious program, click on it and then choose "Uninstall" from the menu that appears.

- A message box will pop up to confirm the uninstallation process. Click "Uninstall" to confirm and follow any additional prompts that come up to complete the removal.
- It's essential to carefully read all the prompts because some malicious programs might try to sneak in additional things during the process, hoping you won't notice.

- Once you've gone through these steps successfully, the malicious program will be removed from your computer.
How to Remove Unwanted program Virus from Windows 7
To remove an unwanted program from Windows 7, follow these steps:
- Click the "Start" button and select "Control Panel."
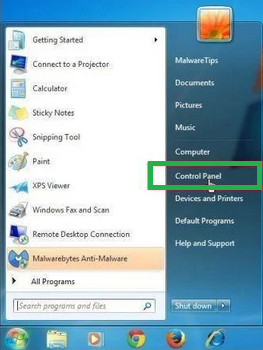
- In the Control Panel, click "Uninstall a Program" under the "Programs" category.

- You'll see a list of all installed programs in the "Programs and Features" screen. Find any suspicious or unfamiliar programs, click to highlight them, and then click "Uninstall."
- Look for anything that doesn't seem legitimate or you don't remember installing.

- Confirm the uninstallation in the message box by clicking "Yes" and follow any prompts to complete the removal. Read carefully, as some malicious programs try to slip in unnoticed.
- Once you've completed these steps, the malicious software will be removed from your computer.
How to Remove Unwanted program from Android/Mobile
To remove an unwanted program virus from your Android phone, follow these simple steps:
Step 1: Start in Safe Mode
First, we'll start your phone in Safe Mode. Safe Mode boots your Android with only the essential apps and settings, preventing malicious apps from interfering.
- Long-press your phone's power button (usually found on the side of your phone) until the power off menu appears.
- When the menu appears, tap and hold the "Power off" button on your screen. You'll see a "Safe mode" option.

- Tap on "Safe mode" to enter it.
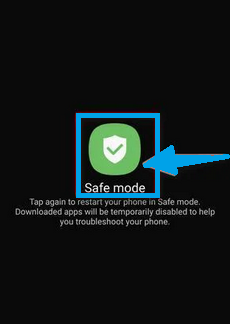
- Your phone will restart in Safe Mode, and you'll see the "Safe Mode" text at the bottom left corner of your device.
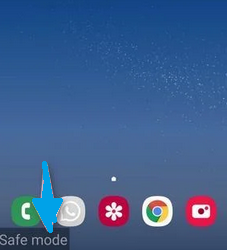
If you can't find Safe Mode on your phone, you can activate Airplane mode instead to cut off network connections.
Step 2: Check for Malicious Apps with Administrator Privileges
In this step, we'll check if there are any malicious apps with administrator privileges on your phone. These privileges are sometimes used for legitimate purposes but can also be exploited by malicious apps to prevent their removal.
- Tap the "Settings" app on your phone's menu or home screen.
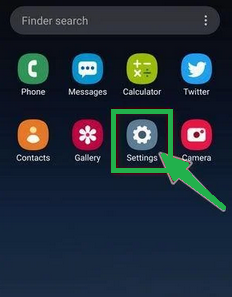
- In the "Settings" menu, look for "Biometrics and Security" (or similar) and then navigate to "Other Security Settings" and "Device admin apps." The location of this option may vary depending on your Android version or phone brand.
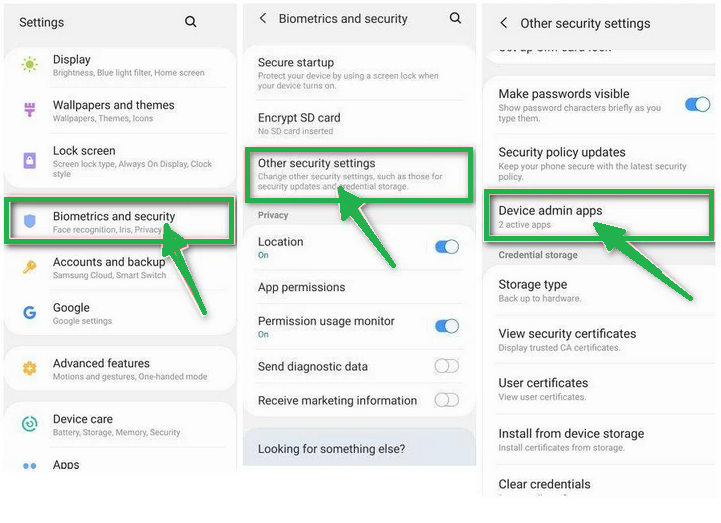
If you can't find "Device admin apps" easily, you can use your phone's search function to look for it.
- Once you're in the list of device admin apps, disable admin rights by tapping the option next to the app. This will remove the checkmark or turn off the toggle button. Some phones also let you tap the app in the admin apps list and then use the "Uninstall" link to remove it immediately.

Step 3: Check for Malicious Apps
While your phone is still in Safe Mode, we'll check for malicious apps.
- Tap the "Settings" app.

- In the "Settings" menu, tap on "Apps" or "App Manager" to view all installed applications on your phone.
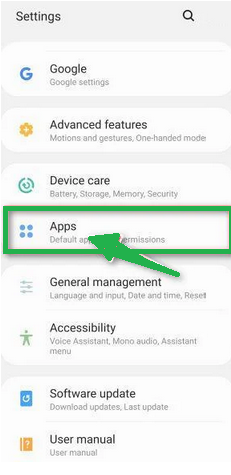
- You'll see a list of all installed apps. Scroll through the list and look for any suspicious apps that you don't remember downloading or that don't seem genuine. Malware is often hidden in apps like photo editors, weather apps, or camera apps.
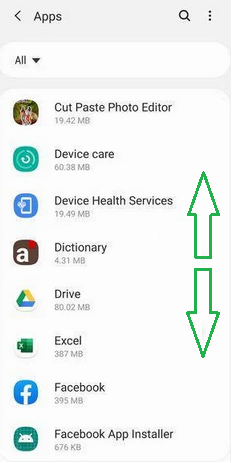
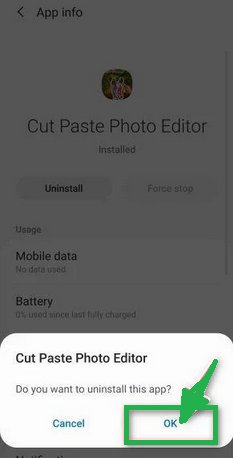
- When you find a suspicious app, tap on it to uninstall. This won't open the app but will take you to the app details screen. If the app is currently running, tap "Force stop," then tap "Uninstall."
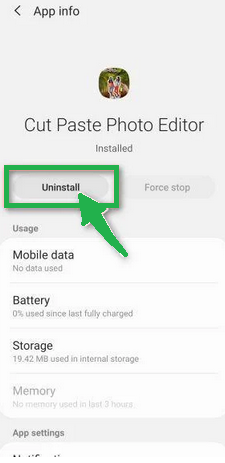
- A confirmation dialog will appear. Tap "OK" to remove the malicious app from your phone.
Step 4: Exit Safe Mode
Now that you've removed the malicious app from your phone, you can exit Safe Mode.
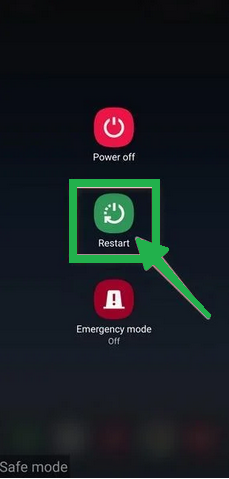
- Hold down the power button until you see the power off menu.
- Select the restart option. Your phone will reboot and exit Safe Mode, returning to normal operation.
By following these steps, you can effectively remove a Unwanted program virus from your Android phone and restore its security.
How to remove Unwanted program from Mac
- Check the top-right corner of your Apple menu bar for any unfamiliar icons.
- If you see one, click on it and choose “Quit.”
- Go to your dock and click on the “Finder” app.

- In the left pane of Finder, tap on “Applications.”
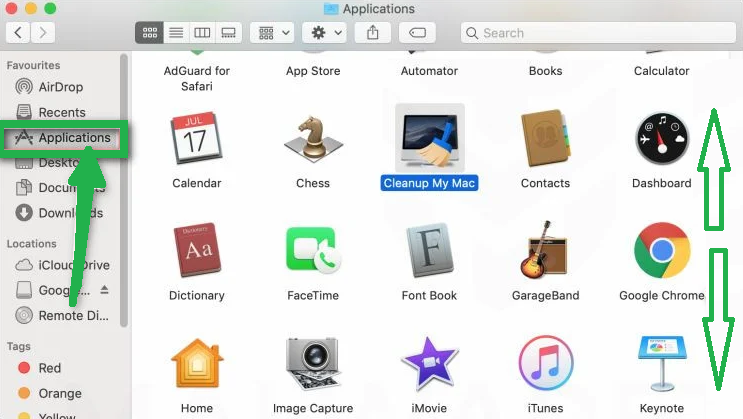
- A list of installed apps appears; locate the suspicious one.
- Right-click on the malicious app and select “Move to Trash.”
To completely uninstall an undesired application, navigate to the Application Support, LaunchAgents, and LaunchDaemons directories and delete associated files. This ensures thorough removal of the unwanted app.
- Click on “Go” in the top menu, then choose “Go to Folder.”

- Type /Library/Application Support and press Enter.
- Delete any suspicious items in the Application Support folder.
- Repeat for /Library/LaunchAgents and /Library/LaunchDaemons.

- Remove all relevant .plist files in these folders.
These steps help you find and delete potentially harmful files associated with unwanted apps on your Mac.
Undo Changes Made by Trackmenow.life in different Settings of PC
To reverse alterations inflicted by Trackmenow.life on your computer, it’s crucial to eliminate any registries it generated. Commonly affected Windows system registries include the following. Adjust phrasing as needed.
HKEY_LOCAL_MACHINE\Software\Microsoft\Windows\CurrentVersion\Run
HKEY_CURRENT_USER\Software\Microsoft\Windows\CurrentVersion\Run
HKEY_LOCAL_MACHINE\Software\Microsoft\Windows\CurrentVersion\RunOnce
HKEY_CURRENT_USER\Software\Microsoft\Windows\CurrentVersion\RunOnce
Access these entries by launching the Windows registry editor and eliminating any values introduced by Trackmenow.life. Execute this process by following the instructions below, ensuring a thorough removal of unwanted registry entries.
- Open the Windows registry editor by pressing “Win + R,” typing “regedit,” and clicking “OK.”

- Navigate to the Run and RunOnce keys.

- Identify the virus-created value by right-clicking and selecting “Modify” to reveal the associated file location.
- Verify if the file location corresponds to the virus; if so, remove the value.

Clean the Browser
After deleting the unwanted program, resetting your browser is like giving it a fresh start. It’s a helpful fix if you notice issues like slow performance or strange behavior. The reset takes your browser back to its original settings, erasing any changes made by the unwanted program. It’s like pressing a reset button to eliminate troublesome tweaks and ensure your browser works smoothly without any lingering problems.
How to Reset Browsers
How To Reset Chrome to Default Settings
Reset Chrome for Windows
Here's a step-by-step guide to reset Google Chrome on Windows:
- Launch Google Chrome on your computer.
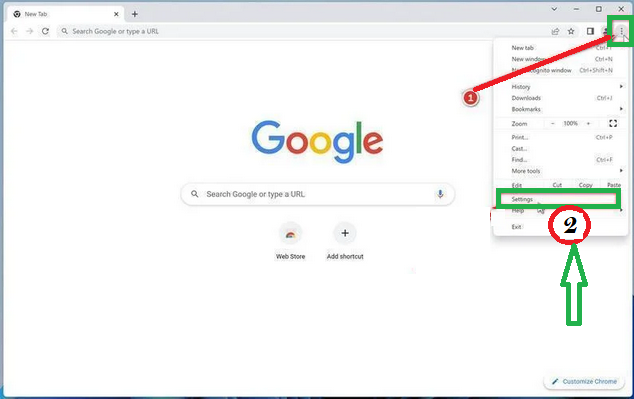
- Look for the three vertical dots in the top right corner of the Chrome window. Click on them to open a menu. Then, select "Settings" from this menu.
- In the Settings tab that appears, you'll see a sidebar on the left. Click on "Advanced" to get more options.
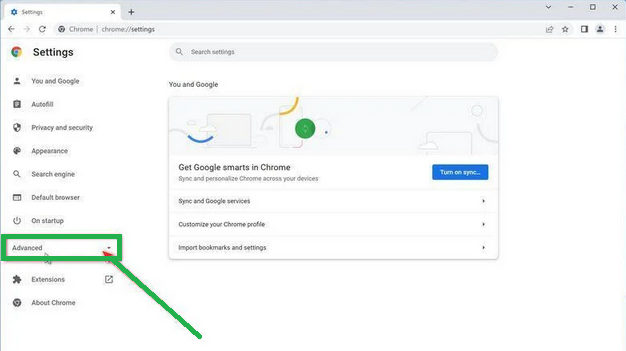
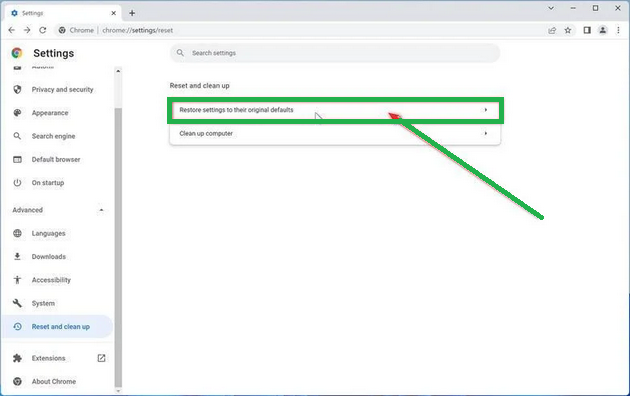
- Under the "Advanced" section in the sidebar, you'll find "Reset and clean up." Click on it.

- Now, in the main part of the window, you'll see the "Reset and clean up" section. Click on "Reset settings to their original defaults."
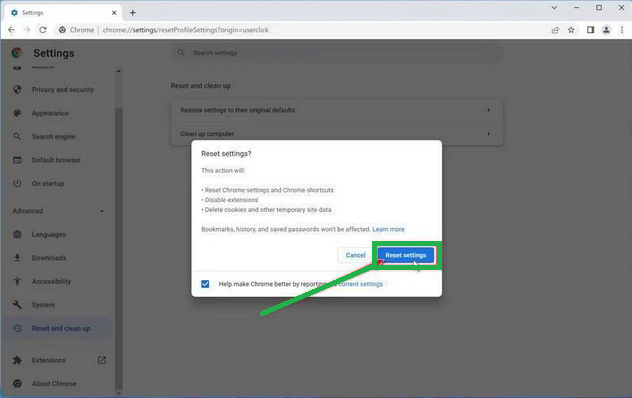
- A window will pop up to confirm the reset. It will explain what will go back to the default settings. If you're okay with that, click on "Reset settings."
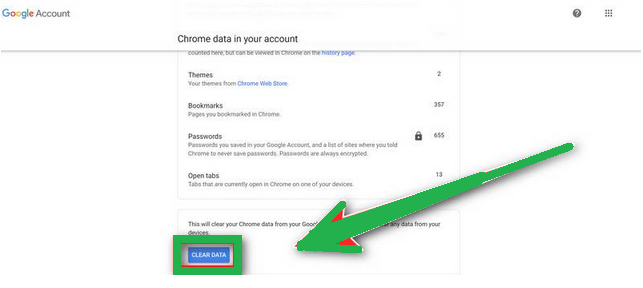
- If you find that a troublesome extension keeps coming back even after the reset, you can reset the data sync. To do this, go to chrome.google.com/sync and click on "Clear Data."

Reset Chrome for Mac
If you're using Google Chrome on a Mac and want to reset it back to its default settings, follow these steps:
- Click on the three dots in the top-right corner of Chrome (the menu button).
- Select "Settings" from the menu that appears. This will open the basic settings screen.

- In the left sidebar, click on "Reset and clean up."

- Now, click on "Reset settings to their original defaults."
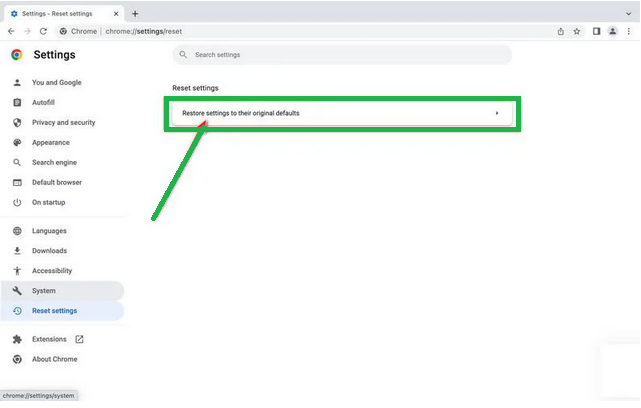
- A confirmation box will pop up, telling you what will be set back to the default settings. To complete the process, click on "Reset Settings."

Keep in mind that doing this will erase your homepage, tab settings, saved information, browsing history, and cookies. It will also disable any extensions you've installed. However, your bookmarks will be safe.
- If you're still having trouble with a malicious extension coming back even after resetting your browser, you can reset your data sync. To do this, go to chrome.google.com/sync and click on the "Clear Data" button.
Reset Chrome for Android
Resetting Chrome to its default settings on Android isn't as straightforward as on computers, but it's doable by clearing the app data. This means getting rid of saved cookies, cache, and site settings. Here's how to do it:
- Open the "Settings" app on your Android device. You can usually find it on your home screen or in your phone's app menu.

- In the "Settings" menu, look for "Apps" or "App Manager." This will show you a list of all the apps installed on your phone.

- Scroll through the list until you find the "Chrome" app, and then tap on it to view the app's details.

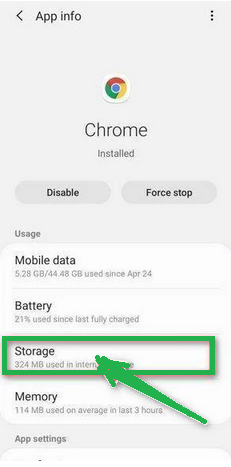
- Inside Chrome's app info menu, tap on "Storage."
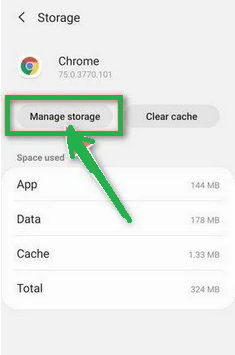
- Under the storage settings, you'll see two options – "Manage Space" and "Clear Cache." Click on "Manage Space."
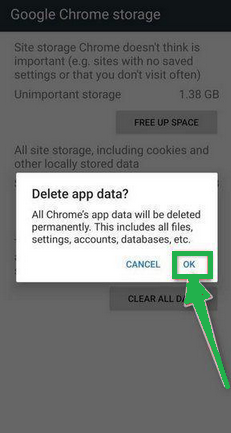
- Now, click on "Clear all Data." This will delete everything related to Chrome, including your accounts, bookmarks, and settings, essentially resetting it to its default state.

- A confirmation message will pop up, explaining what will be reset. To finish the reset process, tap "OK."
How to Reset Internet Explorer
Resetting Internet Explorer is an easy process and only takes a few minutes. Here's how you can do it:
- Open Internet Explorer, which is your web browser.
- Look for a little gear icon in the top-right corner of the browser and click on it.

- Then, select "Internet Options."

- In the "Internet Options" box, click on the "Advanced" tab.
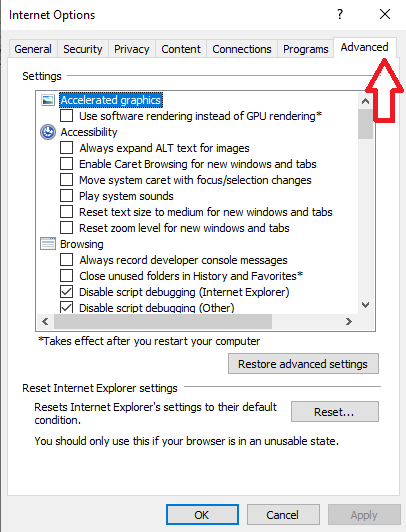
- You'll see a "Reset" button. Click on that.
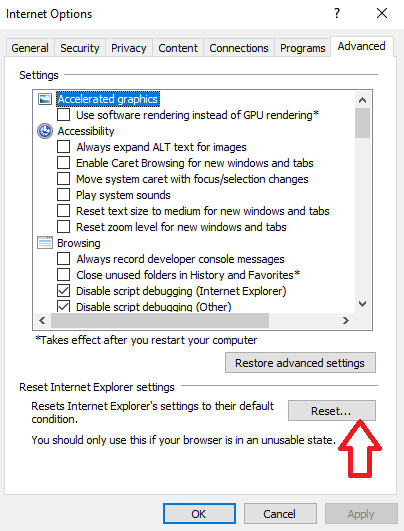
- Now, in the "Reset Internet Explorer settings" section, there's a box that says "Delete personal settings." Check this box, and then click "Reset."

- When Internet Explorer finishes the reset, a message will pop up. Click "Close" to close it. After that, close your browser, and you can open Internet Explorer again.

How To Reset Mozilla Firefox
Reset Firefox for Windows
- Click on the three horizontal lines in the top right corner of Firefox to open the menu. Choose "Help" from the menu.

-
- In the "Help" menu, tap on "More troubleshooting information."

- On the "Troubleshooting Information" page, find the "Refresh Firefox" button and click it.

- Confirm the reset by clicking "Refresh Firefox" again in the new window that pops up.

- Firefox will close and go back to its default settings. It will show you what information it saved. Click "Finish" when it's done.
After the reset, you'll see a folder called "Old Firefox Data" on your desktop. It holds your old settings. If the reset didn't solve your problem, you can copy some of the files from this folder to the new profile that was created. But if you're sure you won't need this folder anymore, it's a good idea to delete it since it might contain sensitive information.
Reset Firefox for Mac
Resetting Firefox on a Mac is easy. Here's what you do:
- Click on the three horizontal lines in the top right corner of Firefox to open the menu. Select "Help" from the menu.

- Then, choose "Troubleshooting Information."

- On the Troubleshooting page, you'll see a "Refresh Firefox" button in the upper-right corner. Click on it.

- Confirm the reset by clicking "Refresh Firefox" again in the new window.

- Firefox will close and go back to its default settings. It will show you what information it saved. Click "Finish" when it's done.
That's it! Resetting Firefox on your Mac is a quick way to make it work better while keeping your important data safe.
Reset Firefox for Android
Resetting Firefox to its default settings on Android is a bit different but still doable. It involves clearing the app's data, which includes cookies, cache, and saved site settings. Here's how you can do it:
- Open your phone's "Settings" app, which you can find in your menu or on the home screen.

- In the "Settings" menu, look for "Apps" or "App Manager." This will show you all the apps installed on your phone.

- Scroll through the list of apps until you find "Firefox." Click on it to open the app's details.

- In Firefox's app menu, click on "Storage."

- In the storage settings, you'll see two options: "Manage Space" and "Clear Cache." Click on "Manage Space."

- Now, click on "Clear all data." This will delete all of Firefox's data, including your accounts, bookmarks, and settings, effectively resetting it to its default state.

- You'll see a confirmation message that explains what will be reset. To complete the reset, tap "Ok."
How To Reset Edge to Default Settings
To reset Microsoft Edge on your computer, follow these simple steps:
- Click on the three horizontal dots in the top-right corner of Microsoft Edge to open the menu. From the menu, select "Settings."

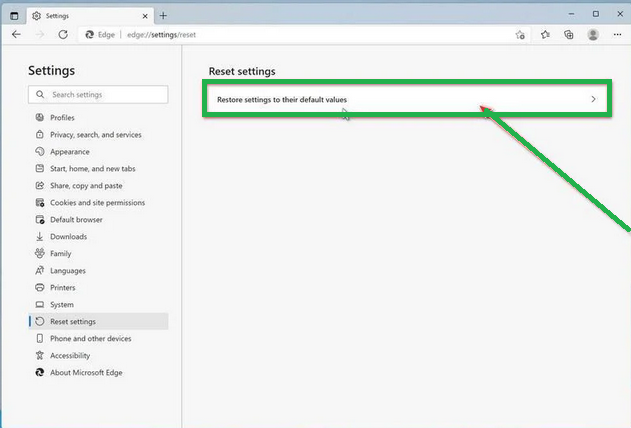
- Tap "Reset Settings" on the left side of the window.

- Now, click on "Restore settings to their default values" in the main window.
- A confirmation message will appear, explaining what will be reset. To proceed, click "Reset."
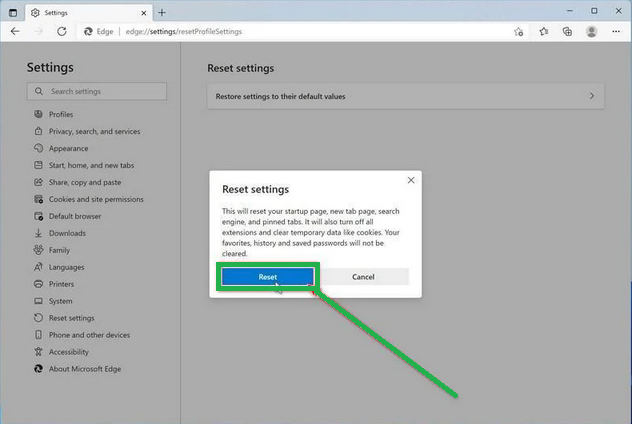
- Microsoft Edge will erase your personal data, browsing history, and disable any installed extensions. But don't worry, your bookmarks will remain safe and accessible.
How To Reset Safari
Before resetting Safari to its default settings, if you have bookmarks you want to keep, open Safari, go to the "File" menu, and choose "Export Bookmarks." Give your backup a name and save it.
To reset Safari on a Mac, you can use the Settings menu or Terminal. If you're using Safari on an iPhone or iPad, tap the iOS tab to reset the settings. This way, you won't lose your important bookmarks when you reset Safari. It's like making a copy of your bookmarks before cleaning up your browser.
Reset Safari for Mac via Settings
Here's how to reset Safari:
- Click "Safari" in the menu, then choose "Preferences." This opens a new window with your Safari settings.
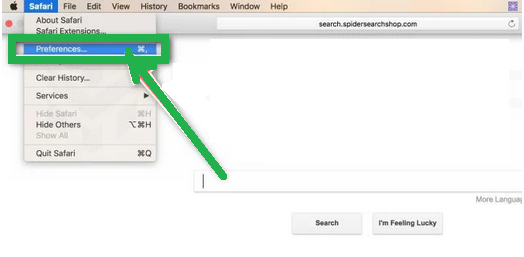
- Check your homepage in the "General" tab. If it's not what you want, change it.
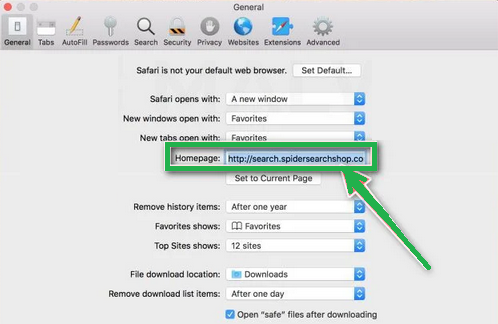
- Next, click on the "Extensions" tab.

- Look for any extensions you don't remember installing or seem suspicious. It's usually safe to remove them.

- In "Preferences," go to "Websites" and then "Notifications." Turn off the option that allows websites to ask for push notifications.

- In the Safari menu, choose "Preferences" again, then go to "Privacy." Tap on "Manage Website Data".

- Choose "Remove All" to clear website data.

- To show the "Develop" menu, go to the "Advanced" tab in "Preferences" and enable "Show Develop menu in menu bar."

- Click on "Develop" in the menu bar, and then select "Empty Caches" to clear out temporary files.

Reset Safari for Mac via Terminal
To reset Safari on your Mac, follow these steps:
- Open the "Terminal" app (you can search for it using Spotlight with "Cmd + Space").
- Go to the Apple menu at the top-left and choose "Force Quit." Select "Safari" to close it completely.
- Enter the commands one by one in Terminal. It will ask for confirmation to delete files. Type "y" and press "Enter" after each command.
mv ~/Library/Safari ~/Desktop/Safari-`date +%Y%m%d%H%M%S`;
rm -Rf ~/Library/Cache/*;
rm -Rf ~/Library/Caches/Apple\ -\ Safari\ -\ Safari\ Extensions\ Gallery;
rm -Rf ~/Library/Caches/Metadata/Safari;
rm -Rf ~/Library/Caches/com.apple.Safari;
rm -Rf ~/Library/Caches/com.apple.WebKit.PluginProcess;
rm -Rf ~/Library/Cookies/*;
rm -Rf ~/Library/Cookies/Cookies.binarycookies;
rm -Rf ~/Library/Preferences/Apple\ -\ Safari\ -\ Safari\ Extensions\ Gallery;
rm -Rf ~/Library/Preferences/com.apple.Safari.LSSharedFileList.plist;
rm -Rf ~/Library/Preferences/com.apple.Safari.RSS.plist;
rm -Rf ~/Library/Preferences/com.apple.Safari.plist;
rm -Rf ~/Library/Preferences/com.apple.WebFoundation.plist;
rm -Rf ~/Library/Preferences/com.apple.WebKit.PluginHost.plist;
rm -Rf ~/Library/Preferences/com.apple.WebKit.PluginProcess.plist;
rm -Rf ~/Library/PubSub/Database;
rm -Rf ~/Library/Safari/*;
rm -Rf ~/Library/Safari/Bookmarks.plist;
rm -Rf ~/Library/Saved\ Application\ State/com.apple.Safari.savedState;
Reset Safari for iOS (iPhone or iPad)
To reset Safari on your iPhone or iPad, follow these steps:
- Open the "Settings" app.
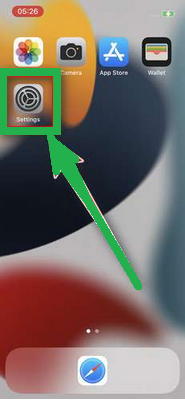
- Turn on "Airplane Mode" to disconnect from the internet temporarily and block unwanted access.
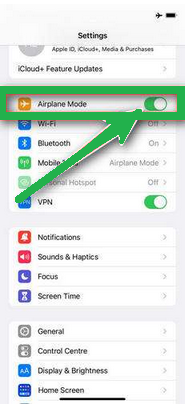
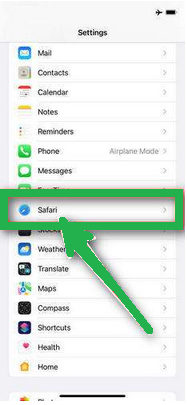
- Scroll down and click on "Safari."
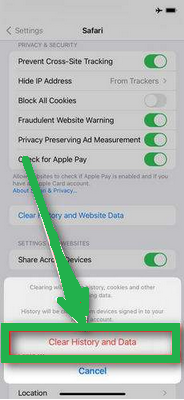
- Now, choose "Clear History and Website Data."

- Confirm by tapping "Clear History and Data" in the pop-up window.
- While in Safari settings, make sure to turn on "Block Pop-ups" and "Fraudulent Website Warning."
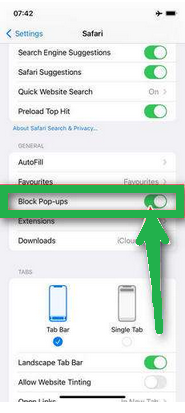
These steps clear your browsing history, website data, and other information stored by websites you visited. Also, by enabling "Block Pop-ups" and "Fraudulent Website Warning," you can enhance your browsing experience and protect yourself from unwanted ads and potentially harmful websites.
Recommended Security Software (SpyHunter)
SpyHunter acts like a guardian for your computer, shielding it from nasty stuff like malware and spyware. Using smart scanning, it hunts down and kicks out harmful programs sneaking around your system. It’s not just a detective; it also stops new threats from barging in. Anyone, whether tech-savvy or not, can easily use it because of its simple design. Plus, it keeps learning and gets regular updates to stay ahead of the bad guys. If you want a solid defender for your PC against digital troublemakers, SpyHunter is a reliable choice, always ready to keep your computer safe.
Step 1: Download SpyHunter 5 for your device through the provided link. Obtain it by clicking below.
Step 2: Proceed to the location where the installer is saved in your system. Typically, the file is stored in the “Downloads” directory. Execute the setup process by double-clicking on the installer file.
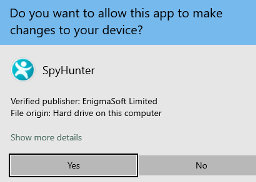
Step 3: Choose your desired language and press the “OK” button. This action triggers the installer initialization. When prompted, click the “Continue” button to proceed with the installation process.

Step 4: During installation, you’ll encounter a prompt to approve the ‘EULA and Privacy Policy.’ Opt for ‘I accept the EULA and Privacy Policy’ and then select the ‘Accept & Install’ button. This step is necessary to proceed with the installation process of the application.

Step 5: Initiate the installation process, and observe the progression through the visible progress bar. The process may require some time for completion. Once finished, a notification confirming successful installation will be displayed.

Step 6: Upon installation completion, SpyHunter will automatically launch. The following screen will be displayed for your attention.

Step 7: Additionally, the scanner will initiate a comprehensive scan of your computer to identify potential threats within your device. Throughout the scan, it will present you with information such as the detected threat’s name, security level, and specific details about the threat. Relax and wait for the scan process to conclude.

Step 8: Upon completion of the scan, press the “Next” button to continue the process.

Step 9: To finalize the removal process, the application will prompt you to purchase its licensed version. Alternatively, you have the option to opt for a 7-day free trial, during which the software will be fully operational, allowing you to eliminate all identified threats.

Special Offer
In order to remove Amaznobxs.com hassle free, we suggest you to scan the PC with powerful SpyHunter antimalware scanner. The fully functional free Trial of SpyHunter is Available for 7 days (Windows Version) with Credit Card required. There are no upfront charges within this period. Further, no charge will apply if you cancel 2 business days before the trail ends. For Mac Users, it is suggested to use Combo Cleaner which is a powerful antivirus and System optimizer.
Do make sure to read SpyHunter’s EULA and Privacy Policy. Spyhunter free scanner downloaded just scans and detect present threats from computers and can remove them as well once, however it requires you to wait for next 48 hours. If you intend to remove detected threats instantly, then you will have to buy its licenses version that will activate the software fully.
Steps to Avoid Infection like Amaznobxs.com

To safeguard your browser from the Amaznobxs.com browser hijacker and prevent infection, it’s essential to adopt a few precautionary measures. First and foremost, be cautious while downloading and installing software from the internet. Stick to reputable sources and avoid downloading applications from unfamiliar or suspicious websites. Additionally, when installing new software, carefully read through the installation prompts and uncheck any boxes that authorize the installation of additional, potentially unwanted programs.
Keep your browser and security software up to date. Regularly update your browser to the latest version, as these updates often include security patches that can help protect against various threats, including browser hijackers. Also, ensure that your antivirus and anti-malware software are updated regularly to provide maximum protection.
Exercise caution when clicking on links, especially those received in emails or from unfamiliar sources. Amaznobxs.com browser hijackers often spread through malicious links or attachments. If you receive an unexpected email with links or attachments, verify the sender’s authenticity before interacting with the content.
Consider installing browser extensions or add-ons that enhance your online security. These may include ad-blockers and anti-tracking tools that help prevent malicious scripts and unwanted tracking. Regularly scan your system for malware using reputable antivirus or anti-malware tools. Perform thorough scans to detect and remove any potential threats, including browser hijackers.
FAQs About Amaznobxs.com
What is Amaznobxs.com?
Amaznobxs.com is a browser hijacker that forcefully modifies browser settings, redirecting users to its own search engine and displaying unwanted ads, also it tries to trick individuals into accepting push notifications so that it could send intrusive ads on their screen later on.
How does it infect systems?
The intrusion of browser-based threats into the PC systems usually occurs due to users’ carelessness while browsing the internet. It often infiltrates through deceptive downloads, bundled software, or malicious links, exploiting vulnerabilities in browsers to take control.
What risks does it pose to users?
Amaznobxs.com can compromise user privacy, track online activities, and expose systems to additional malware by redirecting users to potentially harmful websites. Also, it regularly interrupts their browsing experience by showing thousands of annoying pop-up advertisements regardless of what they’re doing at the moment.
How can users remove it from their browsers?
You can remove Amaznobxs.com by using reputable antivirus or anti-malware software like SpyHunter, resetting browser settings, and uninstalling any suspicious browser extensions.
Can the hijacker be prevented?
Yes, users can prevent Amaznobxs.com by avoiding suspicious downloads, keeping software updated, using reliable security software, and being cautious with email links and attachments.

